Last Saturday our local group here in Utah got together and decided to do an ancients game. One member had a Norman army he hadn't used since 7th Edition, so we pulled out my early Scots Common army to give them a go.
Since neither of the other players had played much DBM before, we went though the army lists together and they bought out 300 point armies for their forces. This step took a while, as I did a lot of coaching about what the strengths and weaknesses of each troop type were, and how to divide their troops into commands, etc.
We then rolled up terrain and started. The Normans were the aggressors, so they selected their invasion route as coming along a road, through hilly terrain. They selected this hoping it would hinder the deployment of the Scots pikes, which it did in fact do.
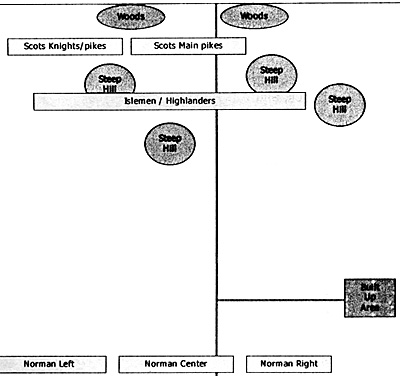
The terrain they finally rolled up was interesting - a road down the center of the board, and four steep hills in the Scots' central and left sectors, a built up area in the Normans' right sector. Though the Normans were worried about an ambush from it, the Scots' commander elected not to deploy any of his forces there.
The Normans set up with three fairly even commands. Each command had some elements of knights and some screening archers and crossbowmen (psiloi in DBM), and a single element of scouts (light horse in DBM). The Norman left also had a block of spearmen.
The Scots set up with a Isles and Highland command to their front, covering the two large Scots commands of spearmen and knights.
The battle opened with a general Norman advance, which angled to his left so a s to skirt the built up area. The Scots were primarily defensive, gradually moving forward to control the steep hills to his front and bringing up his pikemen in support.
Because both players were fairly new to DBM, they had difficulty with the "impetuous" mechanics of the rules. As the lines of battle drew closer, the Scot's commander lost control of his Highland rabble. He had deployed them in isolated groups among the hills, but without restraint they moved forward to engage the Norman skirmishers to their front. In a short period of time several elements were casualties.
The Norman general planned his main thrust on his left, and therefore angled the knights from his center toward that flank as well. As he approached his screen of skirmishing archers suffered greatly against a large block of Highland bows, but the Isles Ally-General's command was soon getting very close to breaking (in DBM commands break after losing more than 1/3 their original element equivalents). On the Norman right, a column of knights was able to slip through the steep hills and was maneuvering to take the Scots' center pike block in the flank. At this time things looked somewhat grim for the Scots, but a series of poor PIP throws by the Normans allowed their knights on the left to become impetuous, and they streamed forward into the Highland bows in a jumbled mass. Some bows fell, but the knights were unable to kill enough to break the command. The Scots CiC promptly brought up his smaller but ordered group of knights to counterattack, and was able to kill several elements of Norman knights - enough to finally break the Normans' strike command.
At this point time was called, leaving the Scots with a precarious 6-4 win. Both players enjoyed the rules and the action, and especially liked the planning and purchasing of their armies and then seeing them perform on the tabletop.
Back to Saga #78 Table of Contents
Back to Saga List of Issues
Back to MagWeb Master Magazine List
© Copyright 2001 by Terry Gore
This article appears in MagWeb (Magazine Web) on the Internet World Wide Web. Other military history articles and gaming articles are available at http://www.magweb.com