Prelude: 1st St. Albans - May 22, 1455
Richard of York, Salisbury and Richard Neville (Warwick) and 3,000 men marched toward London, where they expected to find the King. Meanwhile, King Henry VI, Queen Margaret, Stafford and Beaufort with a smaller force of 2-3,000 men marched to meet them as they did not wish to fight near London, which had Yorkist sentiments.
Both armies moved during the night in order to catch the other by surprise. The King's army won the race and halted 20 miles northwest of London, arriving at 7:00 a.m. while York stopped just outside St. Albans. A parley was attempted, but York demanded the head of Somerset as the price of peace, and the truce quickly ended.
York wasted no time in attacking with artillery and archery to the front, while Warwick, finding a gap in the Royalist ranks, attacked the enemy, routing the Royalists before him. John Whethamstede described the result when the Yorkists broke into St. Albans, "Here you saw one fall with his brains dashed out, there another with a broken arm. A third with a throat cut, and a fourth with a pierced chest, and the whole street full of dead corpses."
The King was captured, while Somerset and 300 other Royalists were killed. This battle began the series of vendettas that would decimate the royalty of England. Percy, Clifford, Stafford, Somerset and Huntington all died at St. Albans. After the battle, there would be an uneasy peace for several years before open fighting broke out again.
The Battle
The peace lasted for four and a half years, but the old hatreds and bitterness of the Lancastrian faction, backing the King and his Queen, finally came to the fore as the Yorkist leaders were indicted by a Great Council for treason. With the armies gathering once again, war was in the offing.
The Lancastrian noble, Lord Audley, gathered together an army of from 8-10,000 men and took it upon himself to deal directly with the Yorkist supporter, the Earl of Salisbury, Warwick's father. Salisbury gathered his own forces while York raised an army in the Welsh marches and moved to join their forces together. If they could combine their armies, Lord Audley would be in a bad position to counter them.
Audley was well aware of the Yorkist plan, so moved on Salisbury in an attempt to destroy his smaller army before York could join forces. Salisbury's forces were in the 5-6,000 man range, and included numbers of Welsh fighters as well as his own troops. Two of his generals were Sir Thomas and Sir John Neville.
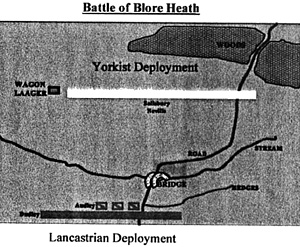
As Lord Audley moved against Salisbury's army, he also brought into his war council two other nobles, Lord Dudley and William Stafford, both loyal Lancastrians. As they approached the Yorkist positions, they found Salisbury's army drawn up along a 600-yard front with a stream to the left and a wagon laagar to the right flank.
Once the Lancastrian forces appeared before them, Salisbury had the right flank units break and run in a feigned flight. Audley wanted Salisbury dead, so he looked at the flight as fear of his superior numbers and ordered his cavalry to attack across the wet ground, and uphill into the Yorkists.
The arrow barrage that met the struggling Lancastrians forced them to retreat. Audley then ordered a second attack, leading it himself. He soon fell from his saddle, dead. Lord Dudley now assumed command and he dismounted many of the men-at-arms, who stormed up the hill into the Yorkist positions. Those Lancastrians who had remained mounted decided to leave while they could, so turned and ran from the field. This did little to instill confidence in the remaining fighters, who slowly at first began to fall back. Some decided to join the Yorkists rather than be killed in the continuing melee. The remaining Lancastrians, seeing their cavalry in retreat and their own men deserting to the enemy, panicked and broke.
Lord Dudley was captured and 2,000 of the Lancastrian fighters were killed, mostly during the rout and subsequent pursuit. The war would not have another long truce as it did before Blore Heath for five bloody years.
The Armies at Blore Heath
The armies listed below are listed with:
The total number of stands available for each troop type (you decide how many stands you want to have in a unit, anywhere from 2-10, usually cavalry are 2-4 stands per unit and infantry are 4-6 stands)
The armour class of the troop type
Whether they are trained or irregular
How many figures per stand and how much each stand costs.
Once you have your figures sorted into units, they must be assigned to one of the generals or the commander in chief. Each general in MW has a leadership quality, which can range from charismatic to poor. The general's leadership quality determines how many orders he may issue each turn. Depending on the number of units you have elected to build, you will probably find that some of your units will not be receiving any orders each turn! Such is how we handle command and control problems in MW.
Yorkist Army at Blore Heath:
Earl of Salisbury CiC Full Plate Cavalry Veterans Trained, Lance, 3 @ 58 points.
Sir Thomas Neville General Full Plate Cavalry Veterans Trained, Lance, 3 @ 43 points.
Sir John Neville General Full Plate Cavalry Veterans Trained, Lance, 3 @ 43 points.
4 stands Men-at-Arms Full Plate Cavalry Veterans Trained, Lance, 3 @ 18 points each.
24 stands Retinue Archers Heavy Infantry Warriors Trained, Longbows, 4 @ 7 points each.
8 stands Retinue Billmen Heavy Infantry Warriors Trained, Halberd, 4 @ 6 points each.
6 stands Welsh Archers Unarmoured Infantry Warriors Irregular, Longbows, 3 @ 3 points each.
6 stands Welsh Spearmen Unarmoured Infantry Warriors Irregular, Long Spear & Shield, 3 @ 3 points each.
12 Stakes @ +1 each
4 War Wagons @ 10 points each.
3 Supply Units
Army totals 5,440 men.
Lancastrian Army:
Lord Audley CiC Full Plate Cavalry Veterans Trained, Lance, 3 @ 58 points.
Lord Dudley General Full Plate Cavalry Veterans Trained, Lance, 3 @ 43 points.
William Stafford Full Plate Cavalry Veterans Trained, Lance, 3 @ 43 points.
10 stands Men-at-Arms Full Plate Cavalry Veterans Trained, Lance, 3 @ 18 points each.
16 stands Retinue Archers Heavy Infantry Warriors Trained, Longbows, 4 @ 7 points each.
12 stands Retinue Billmen Heavy Infantry Warriors Trained, Halberds, 4 @ 6 points each.
16 stands Shire Archers Lightly Armoured Infantry Poor Trained, Longbows, 4 @ 5 points each.
16 stands Shire Billmen Lightly Armoured Infantry Poor Trained, Halberd, 4 @ 4 points each.
3 Supply Units
Army totals 8,340 men.
Wagons: Salisbury set up a wagon laager of his baggage wagons, circling them on his right flank. Units may be inside the laager, but the wagons cannot be moved once placed. This costs 20 points worth of troops.
Table size for 25mm figures is 5' x 8'. For 15mm figures, use 4' x 6'. For 6mm-10mm figures, use 3' x 4'.
Woods are counted as Forests.
The stream and hedges are obstacles.
We recommend this is a club game, with each division assigned to a different club member. Another interesting variant is to only allow players to converse with each other when their stands are touching. This will keep discussions to a minimum.
One thing we have employed is to let players send couriers with messages (written) to each other during a game. You can send a message that turn to another general within command range (16" in 25mm, 12" in 15mm). If he is further than command range away, he receives the message next turn.
For the really devious scenario designer, allow the players to send messages across the field to their enemies! This will give the commanders something to think about.
Back to Saga #77 Table of Contents
Back to Saga List of Issues
Back to MagWeb Master Magazine List
© Copyright 2000 by Terry Gore
This article appears in MagWeb (Magazine Web) on the Internet World Wide Web. Other military history articles and gaming articles are available at http://www.magweb.com