No, this article is not about the famous siege of Malta. This article is about the field battle that took place at the end of the siege. The long and difficult sedge is a tremendous challenge to recreate on the table top. The field battle, however, involved forces of modest size that were well balanced.
The siege of the forts of the Knights of St. John lasted until September 8, 1565. The Ottoman army, led by Mustapha Pasha, was in the midst of one of many assaults on the forts when word reached Mustapha that a Christian relief army had landed on the west end of the island. Fearing that the relief army was larger than his army and that it might cut him off from his ships, Mustapha stopped the assault and ordered his army to withdraw to their transports. The fleet was moored in a harbor west of the siege lines, so the Turks had to move quickly.
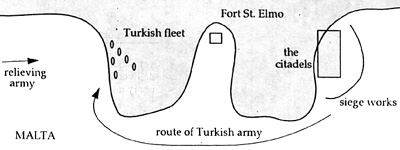 After the entire Turkish army had embarked onto its transports, the
Christian relief army appeared on a ridge within sight of the harbor. At that point the
Turkish commander realized that the relieving army was smaller than his. He immediately
ordered his army back onto the island to fight. The Italian Ascanio de la Coma, commander
of the relief army, attempted to hold his men in a defensive position on the ridge. However,
the Knights of St. John in his force were anxious to rescue their fellow knights, so they
charged. The rest of the army, full of young and adventurous soldiers, also charged.
After the entire Turkish army had embarked onto its transports, the
Christian relief army appeared on a ridge within sight of the harbor. At that point the
Turkish commander realized that the relieving army was smaller than his. He immediately
ordered his army back onto the island to fight. The Italian Ascanio de la Coma, commander
of the relief army, attempted to hold his men in a defensive position on the ridge. However,
the Knights of St. John in his force were anxious to rescue their fellow knights, so they
charged. The rest of the army, full of young and adventurous soldiers, also charged.
The forces were roughly 7000 Christians and 9000 Turks.
The battle took place on a flat valley leading to the harbor that is flanked by ridge lines. The only significant feature was a tower on the Turkish left that both sides fought to control.
The Christian cavalry smashed through the first Turkish formations, but was broken up and driven back by gunfire. The Christian infantry attacked on the run and eventually broke the Turkish line, chasing them back to their ships. The Turks raised sail and left Malta forever.
Army Composition
The Christian army was primarily Spaniah, having been raised by the Spanish Viceroy of Naples, Don Garcia de Toledo. Half of the infantry was Spanish, commanded by Alvarez de Sande, and the other half were German and ltalian soldiers of Spain's European empire, commanded by Vincenti Vitelli. The core of the cavalry was 200 Knights of St. John who had come to Messina from all over Europe to rescue their Order. They were supported by a substantial retinue.
Not as much is known about the Turkish army at this battle, other than it included Janissaries and Sipahis. Mustapha was assisted by Hassem, govemor of Algeria, and El Louck Ali, govemor of Alexandria, Egypt. To recreate this battle, I have assumed that the Turkish army still had the same proportion of different contingents that it had at the start of the siege, including Egyptians, Iayalar fanatics, and Algerian Corsairs.
Both armies left their artillery behind.
Set Up
The charts at the end of this article describe the composition of each army under different rules sets.
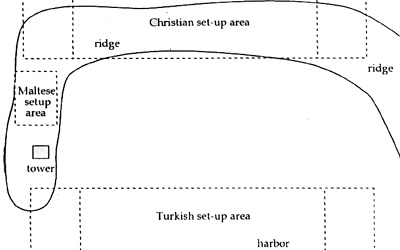 The map has two standard setup zones and a special set up zone on the Christian right flank. Only the Maltese militia of the Medina garrison may set up in that zone. They had approached the battlefield from the south. Use the standard playing area dimenion called for by the rules, or 6' x 4'.
The tower must be outside of the Turkish set-up zone, but closer to the Turkish zone than the Christian one. It must be unoccupied at the start (no DBR ambushes). The tower blocks line of sight and counts as Rough Ground for Armati and Tactica, and as a BUA for DBR, and a building for WRG.
The Turkish edge of the table is the harbor. Turkish units that leave the table by this edge cannot return. Christian units must stop when they reach this edge and cannot leave the table. If they are routing or retreating, they are eliminated.
Advice
The Christian (Imperial Spanish) player should keep his army together and advance on a wide front. He should be careful. Even though he has better quality troops, he is outnumbered. And watch out for Janissary and Iayalar charges.
The Turkish player (Ottoman) should keep his Janissaries in reserve and save them for a critical time and place. Use your firepower to wear down your opponent, while gradually withdrawing. Use your cavalry superiority to attack the flanks.
Victory Conditions
WRG: Rout one half of the enemy units.
Armati: Break units are marked on the charts. Both annies have 4 Heavy divisions, 2
Light divisions, and a break point of 3.
Medieval Tactica: Break units are marked on the charts. Both armies have a break
point of 3.
DBR: As per the rules.
Special Rules
DBR: 2 or 3 commands per side (only). All subcommands = subgenerals. No weather.
No ambushes. No terrain placement.
Medieval Tactica: Do not use the Battles rules. Only the Christian army must use
Obligatory Movement.
Arquebuses: Range: 12", roll 1 die per figure except when target is skirmishers (then roll
1 die per 2 figures). After first fire, arquebus-armed units cannot fire in a turn that they move more than half of their maximum movement allowance. Arquebus-armed units melee with
Sword. Mounted Arquebus range is 6".
Tercios: They can fire 8 shots forward and 4 to each of 2 sides, or 4 out every side. They
have no flanks and are not subject to flank attacks.
Swordsmen versus Pike: On the second and subsequent turns of melee, Janissaries
disorder opposing pike units.
| Table 1: Malta Relief Army, Various Rules Sets | ||||
|---|---|---|---|---|
| Historical | Medieval Tactica | DBR | WRG | Armati |
| Knights of St. John* | 12 HC 6 Lance +3 | 4 Ln(S) | 12 EHC, A. fanatic, lance, mace, sword, order | 1 HC 6 [2]0 +3 Lances |
| Spanish Knights* | 12 HC 6 Lance 0 - | 4 Ln(O) | 12 HCC, C, lance, sword, | 1 HC 5 [2] 0 +2 Lances |
| Mounted Arquebusiers | 12 LC 3-6 Arq. 0- | 4LH(I) | 12LC Marquebus,sword, open order | 1 LC 1 [0]0+1 Arq. |
| Spanish Pike* | 2 x 24 HI 5-6 Pike +1(12 Shot included) | 12 Pk(0) | 2 x 12 HI. B, pike, sword, close order | 2 Tercio 6 [4] 0+1 Pikes & Arquebuses |
| Spanish Shot* | see above | 12 Sh(I) | 2 x 12 MI, B, arquebus sword, order in Tercio | |
| Italian Pike* | 24 HI 46 Pike 0- | 6 Pk(0) | 24 HI, M, pike, sword, close order | 1 FT 5 [3] 0 +1 Pike |
| Italian Shot | 12HI 3-6 Arq. 0- | 3Sh(I) | 12MI,M,arquebus, sword, order | 1 FT4 [1] 1 +1 Arq. |
| German Pike* | 24 HI 5-6 Pike 0 - | 6 Pk(0) | 24 MI, C, pike, sword, close order | 1 FT 7 [4] 0 + 1 Pike |
| German Shot | 12 Sk - Arq. 0 + 1 | 3 Sk(0) | 12 LI, C, arquebus, sword, order | 2 SI 2 [1] 1 +2 Arq. |
| Maltese Militia | 16HI 3-6 Spears 0- | 4Sp(I) | 16MI,D,spear,sword, close order | 1 FT5 [1] 1 +1 Spears |
| * Break unit for Armati or Tactica. | ||||
| Table 2: Malta Turkish Army, Various Rules Sets | ||||
|---|---|---|---|---|
| Historical | Medieval Tactica | DBR | WRG | Armati |
| Turkish Sipahis* | 18 HC 5-6 Spear +3 | 6 Sp(O) | 18 HCM, B, lance, ax, bow, sword, shield, order | 1 HC 5 [2] 0 +2 Lances/Bows |
| African Sipahis* | 18 HC 4-6 Spear O - | 6 Sp(O) | 18 HCM, C, spear, bow, sword, shield, order | 1 HC 4 [1] 0 +2 Lances/Bows |
| Akijinis | 16 LC 3-6 Spear O - | 4 LH(O) | 16 LC, D bow, sword, open | 1 LC 2 [0] 0+ 1 Spears/Bows |
| Janissanes* | 24 HI 5-6 Musket +3 | 6 Bd(F) | 24 MI, B, fanatic, musket, sword, order | 1 FT 5 [1] 2 + 1 Muskets |
| Iayalars | 24 HI 3-6 Sword +3 - | 6 Wb(F) | 24 LI, D, fanatic, sword, shield, order | 1 FT 4 [2] 2 + 1 Swords |
| Azabs | 2 x 12 Sk - Arq. 0- 6 | Sh(I) | 24 LI, D, arquebus, sword, | 2 SI 2 [1] 1 +2 Arq. |
| Levy | 24 HI 3-6 Arq. 0 - | 6 Hd(S) | 24 MI, E, arquebus, sword, order | 1 FT 4 [1] 2 +1 Arq. |
| Algerians* | 24 HI 4-6 Arq. 0 - 1 | 6 Sh(I) | 24 MI, C, arquebus, sword, order | 1 FT 4 [1] 2 + 1 Arq. |
| Egyptians* | 24 HI 4-6 Sword 0 - | 6 Ax(0) | 24 MI, C, sword, shield, order | 1 FT. 4 [1] 2 +1 Swords |
| *Break units for Armati or Tactica WRG Units should have at least 20 figures for infantry, and at least 6 for cavalry | ||||
Back to Saga #67 Table of Contents
Back to Saga List of Issues
Back to MagWeb Master Magazine List
© Copyright 1998 by Terry Gore
This article appears in MagWeb (Magazine Web) on the Internet World Wide Web. Other military history articles and gaming articles are available at http://www.magweb.com