Plenty of time a new rules set seems foreign and strange until you have it explained to you. In this article, I will attempt to do this with MW. The stting is a small battle between Normans and Saxons. If it looks a lot like Hastings, well....
The Normans are advancing on a Saxon hamlet in Northumbria, with orders to burn the village as well as the fields around it. They have had reports of a small Saxon rebellious army, led by Mereward, a nephew of Hereward, ambushing Norman patrols and killing any unlucky captives. The village has been pointed out as a supply base for the rebels. Thus, William the Conqueror's " harrying of the North" must be enforced.
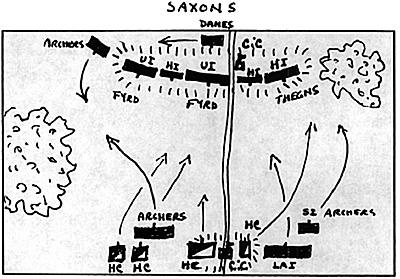
Roger, leading the small Norman force (approximately 1,600 Normans are advancing against 2,300 Saxons) crests a low hill when he sights the Saxons spread out across a low hill blocking the single road leading into the village. A small woods flanks the Saxon left, while Mereward's army straddles the hill. The Normans will not burn the village without a fight!
The Armies:
Saxons:
- CiC, Heavy Cavalry Veteran morale, javelin and shield, 3 figures, loose order
2 x 2 stand Huscarl units, Heavy Infantry Veteran Morale, Axes/Shield, 8 fig each close
1 x 6 stand Thegn unit, Heavy Infantry Average Morale, Spear/Shield, 24 fig. close
1 x 4 stand Archer unit, Unarmored Infantry Poor Morale, Bow, 12 figures in loose order
1 x 6 stand Fyrd unit, Unarmored Infantry Average Morale, Spear/Shield, 24 fig., close.
1 x 6 stand Fyrd unit, Unarmored Infantry Poor Morale, Spear/Shield, 24 Fig., close
1 x 4 stand Danish Mercenary Hird, Heavy Infantry Average Morale, front rank Axe/Shield, rear rank Javelin/Shield, 12 Fig., loose for a total of seven units plus command.
Normans:
- CiC, Fully Mailed Cavalry Elite Morale, Lance Shield, 3 figures in loose order
2 x 2 stands Norman Heavy Cavalry Veteran Morale,Lance/Shield, 6 Figures each, loose order
1 x 4 stands Norman Heavy Cavalry Veteran Morale, Lance/Shield, 12 Figures in loose order
1 x 2 stands Fanatic Heavy Cavalry, Lance/Shield, 6 figures in loose order
1 x 6 stands Archers Unarmored Infantry Average Morale, Bow/Shield, 18 figures in loose order
1 x 6 stands Spearmen Lightly Armored Infantry Average Morale, Spear/Shield, 24 Fig., loose
1 x 4 stands Skirmisher Infantry Average Morale, Bow in open order for a total of seven units plus command.
In our rules, each general and the CiC must roll for his command ability, i.e. how many orders he may issue each turn. The higher you roll, the better, and more versatile will be your command oragnaization. The Saxon commander rolled for his command quality and found out he wasn't very good! He had three orders to issue each turn and seven units to command. The Norman player rolled a little better, receiving four orders per turn for his seven units. Both sides would experience command control problems throughout the game. Once either army lost three of its units, the game would end. The Norman player opted to start the game with his cavalry in wedge formation (this gives them the ability to fight 2 ranks deep in the initial round of close combat). The players set up as on the map.
First Turn
The first turn, neither side needed any order markers, as all units were well outside of 12" from their nearest enemy, so used the faster Strategic movement. There are two movement speeds in our rules. Strategic movement (outside of engagement range) is faster than Tactical movement (inside of engagement range). Both players move simultaneously during the Strategic Movement Phase.
The Norman proceeded to shift the bulk of his army to his right, keeping his archers on his extreme left to deal with any Saxon counterstrokes. His skirmishers and the unit of fanatic cavalry (they must have had the most Norse blood in their veins) wheeled into position on the Saxon wooded flank, preparing to assault the heavy infantry thegn unit holding the Saxon flank. The other Norman units began to make a slow, half-speed advance toward the hill.
Meanwhile, the Saxons sent their lone archer unit off the hill to try to get flanking fire on any Normans charging past their front. The Danish reserves also began to move to the Saxon right, anticipating a chance to take the initiative against the Norman archers. The rest of the Saxon army formed into Shieldwall (a better fighting formation which also helps bolster morale, but only moves at 1/2 speed). The first turn was over.
Second Turn
The second turn found virtually all of the Norman units moving up to engagement range (18" in 25mm, 12" in 15mm) of their enemies. The Norman player had actually issued orders to two of his units, even though being out of engagement range, orders were not required. The skirmish infantry archers and fanatic cavalry had been given orders which allowed them to continue moving toward the enemy when they came within engagement range (normally, without orders, you must halt if you have no orders and the enemy or you move up to engagement range of each other. Troops were much easier to control and motivate as long as they were a suitable distance from the closest enemy, 300 yards in these rules. Once they perceived their tactical situation, they had to be explicitly ordered to do other than stand and watch). If you anticipate the need to get closer to the enemy to fire on him, prepare to charge him, etc., you can issue orders even though they are not required. This allows you to move even if the enemy 'pins' you by moving up to engagement range during the Strategic Movement Phase.
The Norman now moved his fanatic heavy cavalry up to within his normal movement range of the thegns, so they would be required to charge next turn. Unfortunately for the Normans, the archers were still too far away to get any hits on the Saxons, so they were unable to fire.
On the other flank, the two opposing archer units opened fire upon one another at extreme range (a basic to hit chance of 10%, each stand rolling a d10). Since both were unarmored and shieldless, and even though both units had moved, there was actually a 20% chance for each stand to hit. The Normans rolled well, inflicting two casualties on the Saxons while they in turn inflicted one on the Normans. That action ended the turn.
Third Turn
Turn three found both players feverishly placing their allowed number of order markers on the most critical units. The Saxon player opted to give defend orders to the thegns on the flank facing the raging Norman fanatic cavalry (this order reflects the men locking shields, planting spear butts into the ground and in general getting physically and psychologically prepared to receive an attack). The players then rolled a die each to see which side would move first during the tactical movement phase (those troops within engagement range). The Norman won and chose to go first. Charges are simultaneous, so all charge orders were revealed and acted upon first.
The Norman fanatic heavy cavalry required no orders (upon moving up to within their normal movement range of the Saxons, fanatics immediately become frenzied and are required to attack the nearest enemy unit), and charged up the low hill into the waiting thegns. The Norman skirmish infantry archers managed to get off a volley, incredibly inflicting two casualties on the thegns (the archers had received defend orders, which allowed them a "steady fire" bonus).
The Norman cavalry and the spear unit continued to move toward the Saxons on the hill, while the left flank archer unit had been given defend orders enabling them to get the steady fire bonus. The Saxon player had used his orders to bolster his troops on the hill and to move the reserve Danish foot unit to cover the vacated hill spot left by the Saxon archers. During the missile fire phase, the opposing archer units exchanged fire with one another and the Normans outshot the Saxons, forcing them to take a morale test (once a unit loses a complete stand, it must take a morale test and the Saxons had now lost a stand of figures). The Saxon rolled poorly. Calling on the Gods of War, the Saxon player re-rolled (I allow one re-roll of a bad die roll per turn, if the player has purchased a priest figure) and rolled worse than before! The Gods were not with the Saxons this time. The archers were forced to retire in fragmented condition (the next state worse than disorder).
During the close combat phase, the Norman fanatics slammed into the thegns, but due to the fact that the Saxons were uphill, in shieldwall, and had defend orders, the Normans inflicted only one casualty on them, not enough, along with the archer hits, to remove a stand and force a morale test. The Saxons also inflicted one casualty on the Normans, so the close combat was a "lock", with each side doing the same number of hits. The Norman wedge flattened out, became disordered and things looked very bleak for the fanatics. They could not retire, as fanatics may never voluntarily quit a close combat, so were stuck in a poor situation against fatally superior numbers.
Fourth Turn
The next turn, after orders were place, the initiative die were rolled and the Norman again won, electing to go first. Feeling that he had to take advantage of the Saxon loss in firepower, the Norman player had given charge orders for an attack straight up the hill for everyone within range. Three Norman cavalry units and the spear unit were committed to the attack. The Saxon player gave his front three units on the hill defend orders and waited. Defend orders also prevent your unit from pursuing or following up an enemy which is pushed back, retires or routs. It is the only way to avoid having to leave a good tactical position if your opponent runs away. The Normans had to literally outkill their opponents to have a chance at winning. The initiative dice were rolled, the Norman won again and opted to go first, declaring his charges, for those units with charge orders.
The Norman player decided that he would try to get his heavy cavalry worked up into a state of frenzy, to get the close combat bonus that went with crazed attackers. This is not a given. For each of his desired units, the Norman player had to roll a d10, attempting to roll the unit's unmodified morale To Pass number in order to get them frenzied. The veteran heavy cavalry each had an 80% to succeed. Both rolls were horrible. Neither unit made it to the enemy lines, instead halting 1" away in a milling, disordered state (they had both rolled '9', meaning they had failed morale by one. Charging troops which fail by one halt, disordered 1" from the enemy!). Pleading with the Gods, the Norman player fervently grasped the ten-sided die and re-rolled the left-hand cavalry unit. This time they passed and rode into the Saxon huscarls...frenzied.
If that wasn't bad enough, the spearmen did not even get up enough steam to make it to the enemy lines, their charge petering out short of the fyrd position (charges, retirements and routs are all unknowns, you roll a die and add the appropriate additional allowance to an established movement amount). They also stood in impotent uselessness, disordered (chargers which fail to contact are disordered) and at the mercy of the Saxons if they chose to come off the hill next turn.
The Saxon fyrd units, both seeing chargers of better armor class than they, were required to take a morale test. Even though the attacks fell short, they still had to test as for all they knew, they were soon to be ridden down. The Saxon player begged for and got his required To Pass rolls.
The Norman archers, the only other unit able to move (limited by four orders per turn, the Norman had seven units, so some were left orderless each turn), marched up to close range of the fyrd and prepared to fire at point blank range. During the missile fire phase, they inflicted three hits on the fyrd, not enough to remove a stand. The skirmisher archers on the other flank again fired ineffectually at the thegns (again, they did not receive orders so could not get the benefit of a defend order). Cursing, the Norman could only watch in pain as the close combat phase occurred.
Having won the initiative, the Norman began the the close combat phase on his right, where he had a chance, as the left-most melee, where his disordered fanatics were fighting many, many thegns, would be a total disaster (the thegns, overlapping the Normans on both sides, now counted all the stands as eligible to fight, where the Norman now only could fight with his front rank stand). The successfully charging, frenzied heavy cavalry wedge crashed into the huscarls. Rolling their randoms, the Saxons were up 1. The Normans managed to inflict two casualties on the Saxons, who only did one to the cavalry. The Saxons fell back, disordered, and the Normans followed, falling out of wedge in disorder as well. This was as good as it got for the Norman.
The Norman heavy cavalry fanatics, outnumbered 6-1 and overlapped on both sides, broke and ran as they lost a stand and their morale failed (they had minuses for being fragmented with two disorder markers, a stand lost and unsupported). The skirmishers, seeing their best troops fly by in panic, followed suit. The spearmen, already in bad shape (being disordered for failing to charge home as well as unsupported) had little hope for survival when the thegns pursued right into them. They failed their morale test for being charged into by heavier opponents and joined the rest of the flank swarming from the field. The game was over.
Afterwards, the wisdom of charging at extreme range was questioned by the Saxon player. The Norman had to agree. It is always better to move up to as close as possible to be certain the attack will go in instead of taking chances. Also, the Norman would have been smarter to have directed his main assault initially against the weakest part of the Saxon line, the center--and why were these poor quality fyrd in the center of the army? Because the general was right next to them and both flanks were secure. Add the uphill factor and the poor morale fyrd were as effective as veterans.
This was a simple, one command game. Usually, we play three or four commands and upwards of 18-24 units per side in 2 1/2 to 3 hours to a decisive conclusion. Feel free to contact me about these rules or AW if you have any comments or questions.
Back to Saga #66 Table of Contents
Back to Saga List of Issues
Back to MagWeb Master Magazine List
© Copyright 1998 by Terry Gore
This article appears in MagWeb (Magazine Web) on the Internet World Wide Web. Other military history articles and gaming articles are available at http://www.magweb.com