History tells us that Carthage attempted to bring Macedonia into the Punic Wars against the Romans. This event did not take place. Theodotus reports that in the course of these unsuccessful negotiations, the Carthaginians became so incensed by Antigonas Gonatas, that they decided to invade Macedonia, The following is an account of the ensuing battle.
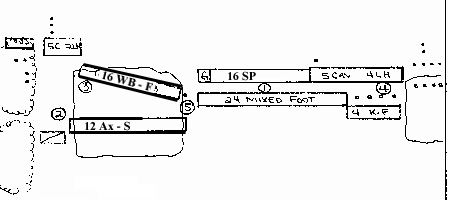
Gonatas deployed on a flat plain, bounded by woods on his left and a small rough on his right. A larger rough dominated the left center of the battlefield. His mixed infantry phalanx was placed in the open area with archers in ambush on the far right. This infantry included veteran pikemen, mercenary hoplites and Galatians. Behind them, in reserve, was the Companion cavalry which ultimately deployed to the far right. On the left, was a line of thureophoroi, a small body of horsemen and several units of archers and javelin men in ambush in the woods. (Psiloi are depicted by dots on the map.)
Hannibal deployed his African spearmen directly opposite the phalanx. To their right, a large band of Gallic infantry covered the rough area opposite the peltasts. A smaller command of mixed cavalry, Numidian light horse and light infantry covered each of the flanks. The battle unfolded in classic ancient style. The heavy infantry of both sides moved boldly forward in the open field (1). Near the woods, the Numidians moved forward to delay any advance in that sector (2), meanwhile the Carthaginian auxilia tried to clear out ambushing psiloi. The Gauls moved forward and refused their right flank (3).
The Macedonian Companions moved to their right to attack the Gallic cavalry which was moving forward (4), supported by Numidian horse and javelin men. The Numidian light horse again proved their valor, crushing the Greek javelin men and the Companions, all of which took considerable time.
Back in the center, the two phalanxes crashed together. The Macedonians quickly gained the advantage as the Galatians destroyed the opposing spearmen. Elsewhere in the line, African spearmen held on versus pikemen and hoplites. Part of the Gallic cavalry overlapped against the Galatians on the end of the phalanx, a shoving match developed where neither side could gain advantage. The right hand elements of thureophoroi tried to penetrate the gap between the Gauls and the spearmen (5), but were repulsed with heavy losses.
The spearmen finally collapsed and Hannibal ordered a last ditch charge by the Gauls in the rough. The assault was repulsed with minimal losses. As the spearmen fled, the rest of the Carthaginian army broke, the battle was over. This battle was not terribly exciting, as the battle plans were essentially a straight ahead push by both sides followed by an infantry slugfest; it did however, illustrate some basic points on how DBM battles are fought.
Points
A] In placing the terrain, the Macedonians forced a lot of rough going. This provided cover to the opposing Gauls from the Companions and did not help at all- a prime example of not knowing the opponents list and acting accordingly.
B] Both armies feature regular generals, at 350 points, three commands is almost a no brainer. The balance between commands was interesting. Both sides had large commands of foot comprising over 50% of the army. In order to win, you had to beat it. Also, it could always be given the highest die roll to keep it moving (or to hold the Gauls) Carthage split the balance of the force into two roughly equal commands. Gonatas split the rest into one fragile unit of four fast knights (to absorb the inevitable one) and one screening command which was substantially larger- 4 horse, 7 auxilia and 4 psiloi. The Macedonian concept was bit riskier ( the fast knights were broken) but it was more flexible. Irregular generals require an entirely different approach- three equal sized commands are most appropriate to extend the durability of the army and limit the impact of die roll variability.
C] The easiest way to win in DBM is to get a match up which kills your opponent on a simple higher modified roll (waiting for a double is difficult) The Gauls stayed in rough terrain to avoid the fast knights, but the superior Galatian war bands hit the spearmen in the center and punched a big hole. Also, the Numidian light horse beat the Companions in a similar fashion, even though they needed plus 3 to do it.
D] Maintaining the initiative is another must! The Carthaginians rolled well early in the battle and pushed their center and left wing commands forward, while the right was held back. The Macedonians mirrored this strategy with the results cited in #3 above. Subsequent bad rolls by Carthage hurt their ability to react. Initiative is critical to gain the match ups of choice.
E] Getting the correct initial unit formations is also important, Hannibal had to use valuable PIPs to sort out his left wing cavalry and get the light horse into a fighting line rather than a 2 by 2 double column. Initiative was lost.
F] Killing on a simple advantage is great, but killing with a flank attack is even better. This must be exploited at all costs. Gonatas failed to do this when the Galatians broke the spearmen with a hole two stands wide. The correct tactic is to immediately wheel the slow war bands onto their neighbors flanks, even if it takes two PIPs and two turns (which it does) Keep in mind that such a wheel is only allowed if the hole is more than one stand wide.
G] Do not forget the "Kill Zone," this is the area 40 mm deep behind your stands in combat or within recoil range. When Gonatas tried to attack the seam between the Gauls and the spears, the dice were against him and he had to recoil into other Auxilia facing in a slightly different direction. Both were killed as a result. Allow space behind your melee units and keep them facing in the same direction.
There were plenty of demonstrations of how to win and how to lose by both sides. In the end, the dice decided in favor of Gonatas. Many DBM battles are decided in this fashion, but that does not explain how some players win consistently and the rest of us do not. In any case, it was fun and we will do it again next week.
Back to Saga #58 Table of Contents
Back to Saga List of Issues
Back to MagWeb Magazine List
© Copyright 1997 by Terry Gore
This article appears in MagWeb (Magazine Web) on the Internet World Wide Web.
Other military history articles and gaming articles are available at http://www.magweb.com