In a recent matchup between Carthaginians and Patrican Romans, a short decisive battle was played out that clearly illustrated several key aspects of DBM. While this was not a historical matchup, the game lessons are still valid.
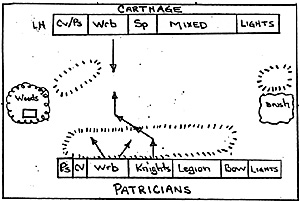
The Patricians were the defenders. They set up in two commands behind the long gentle hill line almost completely out of sight. In the Initial terrain placement, the hills had been six inches closer to the table center. The attacking Carthaginians, also in two commands, chose to move them back with the intention of entering from that side and grabbing them early. A bad die roll put them on the other edge.
On the opening move the 10 stands of fast warbands moved forward for Carthage. Insufficient PIPs kept their fight hand mounted troops from keeping pace. On their left, a mixed force of elephants with spearmen and blades also moved slowly- the different movement rates required two PIN for every group move of two inches. The light troops on the far left rarely moved the entire game because the mixed elephants/infantry soaked up every PIP.
The Patricians crested the hill on turn one. Their plan was to wheel the 6 Irregular fast knights into the advancing Carthaginian warbands rather than tackling the spearmen directly ahead. The 12 Patrician superior warbands would split into two groups of six and support the knights on both flanks. The legionaires and lights would advance straight ahead to meet their counterparts. On the far left, the Roman cavalry would by to hold against the numerically superior Carthaginians. Three auxilia hidden in the woods did not come into play.
By the end of the second turn, the flow of the battle was Irreversibly cast. The CarthagInlan warbands continued forward, outstripping their supports on both flanks. The complicated wheel-move-wheel-charge plan for the Patrician knights disintegrated into a spontaneous charge due to insufficient PIPs to execute the second wheel (irregulars require 2)
The knights charged headlong into the warbands, leaving their supporting infantry far behind. Their fast speed allowed five of the six stands to hit the double rank of warbands at the same time. The results were devastating as 8 of 10 were killed and the command dangerously approached demoralization. Knights kill warbands with a simple positive result, 2:1 is not needed.
The Carthaginians finally made a strong initiative roll. The two remaining warbands were pulled back to relative safety and the right wing cavalry moved forward to cover them. The spearmen and mixed troops on the center and left also advanced slowly.
Two of the knights nearest the spearmen wheeled to their left at great expense to avoid them. The remaining knights spontaneously dashed into the waiting cavalry which were supported by a rear rank of psiloi. They hit piecemeal and died one stand at a time.
On the Roman right, the lights and legionaires were advancing slightly faster than their opponents due to units with unmixed movement rates and regular status. The game would end before the two lines collided. The battle would be decided on both sides of the hole left by the dead Carthaginian warbands and Patrician knights.
The Patrician warbands (superior) had been slowly moving to cover the knights flanks. Again the wheeling irregulars came on slowly. To the immediate right of the knights, six warbands struck the Carthaginian spears. The spears were also superior and the warbands bounced off.
To the left, the 2 remaining knights and six supporting warbands hit the Carthaginian cavalry which had become slightly disjointed in destroying the first four knights. Several more Carthaginians were destroyed, demoralizing the entire wing. This wing was also slightly larger than its sister and baggage combined so the entire Army disintegrated.
This was not the most exciting battle that I have played, but the lessons are excellent:
- Use terrain to disguise your deployment
- Minimize the combination of troops of different speeds, the elephants would have been better place with the fast warbands.
- Complicated maneuvers of irregulars is slow at best and can easily turn into a spontaneous mob.
- Planning the right matchup can Win the game; knights against warbands are killers (here again the elephants could have worked well with the warbands)
- Beware of premature demoralization, the Carthaginians lost 20% of their army, all from one large command, and fell apart.
This battle took longer to set up, plan and pickup than it did to play out. However the lessons were quite instructive. We are still learning the rules and the art of DBM and its FUN.
Back to Saga #46 Table of Contents
Back to Saga List of Issues
Back to MagWeb Master Magazine List
© Copyright 1994 by Terry Gore
This article appears in MagWeb (Magazine Web) on the Internet World Wide Web. Other military history articles and gaming articles are available at http://www.magweb.com