Following their devastation of the town of Essex and the border villages, the plunder-laden Scots had ridden on towards , intent on destroying it as well. The hapless villages along their march were burned and pillaged. King William knew that he had to put an immediate halt to these depravations. Gathering his forces after putting down the Saxon revolt in the North, he rapidly marched south, leaving his heavy and medium infantry behind and joined up with his scattered units of knights as he went. Odo rode half a day behind, intent on joining his lord if and when the Scots were brought to battle. The Archbishop's mounted troops also rode with William and the fyrd responded for his call for battle to oppose the hated northern invaders. Over two thousand of them marched on Oxford to bolster the Norman ranks.
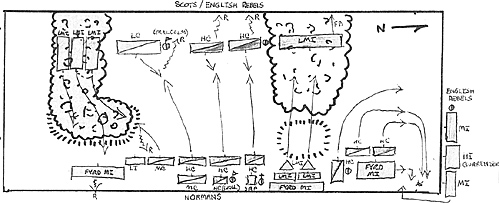
Malcolm, King of the Scots, and his mounted foot rode rapidly toward the town, their rebel English allies moving in on Oxford at the same time from the north, but before the two armies could join up, William's knights encountered the Scots army which promptly drew up in battle array, taking full advantage of the wooded terrain to thwart the mostly mounted knights of the Normans.
Seeing that his numerical strength was made up mostly of poor quality fyrd levies and light-armed archers, William had only his knights to really rely on for hand-to-hand combat. Two small units of Danish mercenaries (ten men each) were all that he had for wooded terrain . The Scots had established their cavalry in the center of their army, flanked by their mounted LMI who quickly divested themselves of their mounts and moved forward to gain the high wooded ground to- their front. William ordered his heavy knights to attack the Scottish cavalry and destroy them while the Danish mercenaries were to engage the isolated Galwegian force opposing them on their flank.
Having word of another force (the rebel English) on route to join the Scots, the Archbishop's forces faced to the north in preparation to destroy this threat. With battle-cries and lowered lances the Norman household guards crshed into the Scots cavalry, instantly routing both units. The Scots LC, commanded personally by Malcolm, held for a bit, but were also soon streaming to the rear in confusion, Malcom himself managing to stay one step ahead of his adversaries.
The Scots LMI, however, were a different story. The Norman MC retainers attempted to charge uphill through the woods and were quickly cut to pieces by the 2HCW Galwegians who were soon swarming out of the woods and down the hill in Dursuit. Excited by this, the other Galwegians took up the battle cry and came screaming down on the unreliable left flank fyrd, who promptly turned about and ran for the rear; but not fast enough. The Scots were quickly upon them doing horrible damage. Fully three hundred fell in the ensuing slaughter.
Meanwhile, the English rebels had appeared and managed to slip around to the rear of the Archbishop's troops, taking his fyrd unit in the flank. Fortunately, the rigors of the force marching had so depleted the English ranks that the meager remnants of the force which finally did arrive was not strong enough to do enough damage to the huge fyrd unit to push them back, and they quickly turned the tables on the doomed English HI, forcing them to fight desperately in the face of certain extinction. Soon the HC troops had them cut off from all hope of relief and as there more fortunate comrades retreated, they themselves were allowed to surrender.
Seeing that there was nothing left to fight for, the remaining Scots also slipped back into the woods and as nightfall came, made their way back to their horses and retreated north. Odo's arrival was delayed for so long that William sent word by courier to turn and head back north as quickly as possible to try to cut off the retreating English and Scots. He was too late.
The Scots left over 500 cavalry dead on the field or scattered beyond recall in the woods of southern England. In addition 250 men were captured and decided to enlist as mercenaries in the Norman ranks. Norman losses were 60 knights and nearly 500 fyrd, mostly from the Essex area levies who were virtually destroyed by their cowardice.
William turned his force around, marched through London and once more headed north to where he knew the English rebels, more Scots, a cantankerous Welsh army, and many Danes were gathering to make a stand to oppose his rule. The next battle would be not only the biggest, but most certainly the decisive one of the campaign.
(Ed. note: This battle was the first table top engagement of our Hastings campaign. William had thought there was a much larger army invading his southern realm than their actually was, consequently he sent his main field forces to deal with it, allowing the, allies the chance to finally join their main armies together in the north. The Scots made the best of a bad situation by burning and destroying William's tax base in the south, forcing him to respond.
The fyrd, never of much use except to give the enemy a target to attack, were used sparingly, but even this couldn't keep them out of trouble! The Norman knights in wedge usually do a number, especially with Lance vs JLS, on any other comparable cavalry they run into. Being 'A' or 'B' class also allows them to usually be impetuous as well, and that certainly doesn't hurt. The Norman lack of rough terrain troops seem to be their main problem and with a lot of wooded terrain, the cavalry have a rough time trying to keep their flanks covered. More on this in the next issue of SAGA.)
Back to Saga # 1 Table of Contents
Back to Saga List of Issues
Back to MagWeb Master Magazine List
© Copyright 1985 by Terry Gore
This article appears in MagWeb (Magazine Web) on the Internet World Wide Web. Other military history articles and gaming articles are available at http://www.magweb.com