When Time Is A Factor
I am often asked "How do you paint miniatures quickly?" Looking back over the years I can see definite tricks and adjustments of technique to speed up painting. The techniques I will mention will produce high quality paint job. I have to say, however, I do not use the same techniques when painting for personal use or display.
Separate the figures by specific rig (archers, etc.) or by specific weapon/pose (archers, standing) unit commanders can be grouped with the basic troops. Army command (usually all different figs) are placed aside as their own group. If figs can't be separated by weapon/pose, separate by unit/basic pose (peasants/standing: left foot forward)
TOOLS
For painting an army you will need the basic tools mentioned in the past: (brushes, files, craft knife, etc.) Add the following to the list: Roofing nails (4"), Wood sticks (thin dowels, Popsicle sticks, etc.) 6-10" long, Fat old dry brushing brush 1/4" Black primer spray Good white paint (use Liquitex Titanium White) in the 8oz. jar Styrofoam (dense) scrap blue foam is great. Plastic Paint pallet with wells.
Useless info: The best wooden sticks are from 1" wide wooden venetian blinds. Hard wood, flat uniform size. When paint and glue build up just sand. They last a long time. Mine are over seven years old.
PREPARING THE FIGS
 With Figs in groups you will know how many sticks you'll need. Super glue a nail to the bottom center of your sticks and place in rows in the Styrofoam.
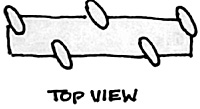
Once done, glue the figs in Staggered pattern on sticks. Bases should be as far over the edge as possible. This will put more space between the figs. and help with moving them once done.
 Once the army is glued in place, spray them with the black primer. I have found with most spray primers that when put under my desk lamp to dry the heat cures the paint while drying. This helps keep the detail crisp even with heavy spraying.
When the primer is dry, dry brush the miniatures with your white paint. I like to paint three stands at a time and only drybrush three at a time as well. This step should be quick. You want the black to be in the creases and the white to only be on highlights. Metal areas such as armor and weapons do not need the white dry brush. Again do this quickly, neatness doesn't count, if the metal areas get a little white, don't worry, the most important is the defining/black lining of areas on the fig.
PAINT BROWNS FIRST
 The painting techniques used will be a modified three step technique. Without changing direction complete a single area of fig on each miniature before moving on to the next area. All of the faces, all of the right hands, all of the left hands, all of the right legs, all of the left legs, etc. Turn 1/4 turn, repeat till done. Remember that each time you turn the stick or reposition your hand it uses time. Painting in steps is only one part of painting quickly. To speed things up even more, paint in tones. Begin with browns (brown, flesh, red, yellow) Browns are the most used colors. Begin by painting the basic color of all the brown areas. When done, you will have three sticks with 6-8 figs. with base colors of flesh." tunic, weapons, boots, hair, back pack & pouches. This completes the first step
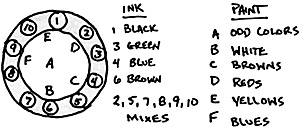
Begin the second step by using an ink wash 4:1 ink to H20 (from issue #7 of RI and Pocket Painting Guide) wash all painted areas. Since this is our first steps as with dry brushing, you do not need to be neat. The wash can go on heavy, if you get some on unpainted areas its okay. this completes the second step. Finally, begin the third step. After the wash has dried highlight areas as normal. Highlight one color at a time. All flesh, all tan, all brown, etc. before starting a new color. From personal habit I have noticed I set my colors on my pallet in a pattern. I use a ten space pallet with wells around the outside and a flat area in the middle. Washes and paints are placed for ease of use. Odd colors not used often are placed wherever. The placement helps as I can change tones when highlighting by picking up a little color off a neighbor. I use a second pallet, the area between my index finger and thumb. I do this to steady my hand and to limit my movements, thus saving time.
 With my brush I take a bigger than normal amount of paint from the pallet and place it on my hand. The brush can be drawn away and turned to sharpen or flatten the bristles and I load them with the correct amount of paint. I finish the other colors by tones as well. Take a bit of extra care not to mess up the completed browns. Leave details (eyes, shields, etc.) and metal for last.
ALMOST DONE
Now paint the whites of the eyes. Use your black ink straight from the bottle and paint all metal bits. Blackline as you would normally (some areas still have blackline from the preparation step). Add details such as pupils, stripes, tattoos, etc. When the black is dry, finish drybrushing metal areas and pick out things such as buttons, piping, belts, etc. you should have a finished group of figures, ready for a clear, protective finish. Three stands done. Use the same steps for the rest of your army.
OTHER TRICKS
1) Using inks will allow some interesting short cuts. This trick comes to mind for Russian Naps or American AWI. This trick can be done on any size figure from 6mm to 25mm with great results. Using ink at full strength, paint directly over the white in the creases making shadows and the white creates a lighter tone on the highlights. Doing steps 1-3 in one easy step.
COLOR KEY
AWI Blue Coat: Dark Blue Ink
Russian Coat: 4 parts Dark Green and 1 part black. This may look too dark when mixed but wait until it hits the white on the fig. Adjust green or black as needed.
Trick 2: Gray Layering: Painting blacks & greys are made quick by highlighting with a layering technique. Paint an area with dark grey or black. Highlight with a medium grey, then highlight with a lighter grey.
AND LAST
We have the base to finish. 6mm and 15mm figures I base first (flock etc.). And then put 4-6 stands on a stick. Then paint the entire stand all at once. Note: Do not super glue bases with magnetic bottoms (There's always something to slow a process down). 25mm figures get based after painting. Flocking with super glue is quick & simple. Take care not to cover feet. With our new line of paints, inks and gels Renaissance Ink will offer basing gels in a variety of colors. The gels are put around the base with a craft stick or old brush. They may be painted once dry or if you use colored gels, the base is done for you and you only need to highlight.
Using these techniques you will be able to field a good looking army in record time.
Back to Renaissance Ink Issue 10 Table of Contents
Back to Renaissance Ink List of Issues
Back to MagWeb Master magazine List
© Copyright 1998 by John Jay Wirth
This article appears in MagWeb (Magazine Web) on the Internet World Wide Web.
Other military history articles and gaming articles are available at http://www.magweb.com