In mid-1988, WARGAMES ILLUSTRATED (the glossy British wargaming magazine) published in issues #10, #11 and #12 , a series of articles by a fella named Roger Underwood. In these three pieces, Underwood explained his thoughts on campaigning, and presented a series of charts by means of which a complete table-top campaign could be carried out.
Underwood's articles focused on The Wars Of The Roses, 1470 or so, and his own campaigning efforts used the WRG rules, hence his army listings and point values were oriented toward fighting WRG battles.
Bob Hurst and I worked on the Underwood concept, adding to it where we thought it was deficient. And then, one Saturday, Fred Haub and I set out an Underwood-type campaign using ancients rules (my own, of course). and we spent an interesting 3 hours, during which time, we had two battles, I suffered two losses, and I turned my sword over to Fred.
The Underwood concept requires that each campaign turn, the participants select a "strategy" - or, perhaps, a better word would be a 'tactic'. These tactics are compared, and the Underwood charts define the outcome. There is no actual map movement; the basic campaign background is a "paper" one, as each side merely notes his desired movement.
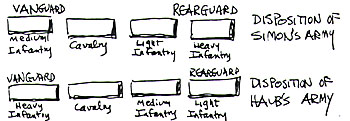
Prior to referring to his charts, Underwood requires that each army be laid out in terms of four groups, or divisions: a van, 2 center groups, and a rearguard. In my army, the van consisted of a contingent of medium infantry, followed by a second division of cavalry, then a third group of heavy infantry, and finally. the rearguard of light troops. All divisions were composed of three units. I also had several units of archers, which were "free wheeling", i.e., they were not attached to any of the formed groups.
In the Haub/Simon campaign, on the first campaign turn, the listings started me out with three options; each option was given a point value:
-
1 pt. Make an immediate attack with your van; other troops to follow up at best speed.
2 pts. Deploy your forces, defining where you put your four divisions of troops.
3 pts. Withdraw immediately. failing back to a better defensive position.
Fred's listings, in this case, were similar, but his point values differed:
-
0 pts. Immediate attack
3 pts. Deploy
6 pts Withdraw
I chose the first option, immediate attack, worth 1 point. Fred's choice was to attempt to withdraw, for a value of 6 points.
Adding the point values of both sides, we come up with a total of 7 points. Then we referred to the Underwood listings, looking up the resultant "7-point-outcome". Note that with my values of 1, 2, and 3, and with Fred's values of 0, 3, and 6, the total of the two will be anywhere from 1 to 9... Underwood's tables set out 9 different results.
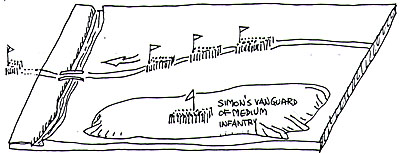
In our case, the 7-point-outcome stated that, with my immediate attack, I had caught the enemy in column of route as he attempted to retreat across a bridge. It went on to say that Fred's rearguard had already retreated across the river, and that his three other divisions were strung out along the road.

The 7-point-outcome also gave us a map describing the initial troop placements, together with some additional information. In all, the listings were complete, enabling us to immediately set up a battle.
Looking at the map, you'd think I was in an excellent position. But I had neglected to read all the notes provided by Underwood. He stated that because of the immediacy of the attack, only my vanguard was ready and would go in. As for the other three groups, my cavalry division would arrive on Bound 3, and the other divisions on Bounds 4 and 5.
Not good. My vanguard was composed of medium infantry; my heavy stuff - cavalry and heavy infantry - would be delayed in making an entrance.

It also turned out that Fred had placed all his light units in his rearguard... the division that had already crossed the river... so that, on Bound 1, although they were in column, he had cavalry, and medium and heavy infantry divisions to face me. Which meant that once he deployed, he really wouldn't miss his rearguard of lights.
Ah well, thought I, perhaps my mediums could hold up the enemy until my heavier units reached the battlefield. My vanguard of medium infantry thus advanced, bolstered by several units (2 stands each) of archers who fired on Fred's units as they deployed from road column.
Each archer stand contributed 20 percent to the unit's probability-of-hit (POH), thus the 2-stand archer unit had a 40 percent chance of producing an impact on the target. And if the archers were successful in hitting their target, two things occurred:
-
a. The targeted stand was sent to the Rally Zone, remaining offboard until it rallied.
b. I "earned" a marker, to be used later in the game to affect the enemy's morale.
Fred deployed his cavalry division before I could reach them in their original column of route, and he charged my division of medium infantry. In melee, every stand in a division of troops contributes to the combat value of the division. In our battle, the values of interest were:
| Value per Stand | Value per Stand | ||
|---|---|---|---|
| Heavy Cavalry Medium Cavalry |
20 15 |
Heavy Infantry Medium Infantry |
15 10 |
Fred had 3 units of heavy cavalry, each composed of 2 stands, 6 stands in all. That gave him a Total of 120 points. My 3 units of medium infantry, also composed of 2 stands each, gave me a Total of 60 points. We each then referred to the following chart:
----------------------------------------------------------
No effect
Total ----------------------------------------------------------
Enemy loses 1 stand; you receive 1 marker
1/2 Total ----------------------------------------------------------
Enemy loses 2 stand; you receive 2 markers
----------------------------------------------------------
With my 60 point Total, therefore, a low toss of the percentage dice - under 30 - would knock off 2 stands. Unfortunately, my dice toss was a 45, and only one enemy cavalry stand was removed.
Fred's 120 point Total permitted him two bites at the apple... he tossed dice for the first 100 points, and then referred to the chart again, tossing again for the second 20 points.
I lost 2 stands... I also lost the melee. and my medium infantry division retreated. All this occurred on Bound 2; note that my cavalry were due to arrive on Bound 3. And while the melee went on, the remainder of Fred's troops deployed... my mediums were in sad shape, and in no condition to face the Haubian army.
We fought one more bound, and again the Simonian mediums took it on the chin. I had essentially lost one of my key divisions, and even as my cavalry finally showed up on the field on the baseline on Bound 3, I sued for peace. My heavy infantry were due on the next bound... there was no sense in sacrificing my cavalry.
And so the first battle of the campaign was over; a disastrous defeat for Simon. As for our losses, we looked to the Rally Zones at the time the battle ended. We diced for every stand in the zone... a percentage dice toss of 70 or under and the stand rejoined its division; a toss higher than 70 and the stand was destroyed.
We had noted that Underwood really didn't provide satisfactory choices for the participants who had engaged in battle. And so we made up our own Underwood-type listing, giving the winner the choice of holding position, or pursuing, or negotiating. These three options were assigned point values, as were the choices given to the loser.
When Fred and I compared our post-battle choices, we then noted that we were referred to another set of three options each, but these options centered on negotiation. In effect, a parley was held between the parties.
At these negotiations, I again was given three options. Of my three choices, I chose the one that stated that I was to be prepared for treachery, and that I should designate one of my divisions to lie in wait for an ambush.
This was the wrong thing to do... Fred and I compared the numerical ratings of his choice and mine; I quote the result:
- Your suspicious and distrusting attitude... not only caused the parley to fail,, but it also caused... (one officer)... to desert, taking... (his unit with him)...
Which meant, after I had diced to see which unit had deserted, that one of my 2-stand heavy infantry units now fought for Fred.
The parley was finished and once again, we both referred to the Underwood campaign listings, and this time I was given four choices:
-
a. Hold your position
b. Advance and attack
c. Maneuver through difficult terrain to your right
d. Maneuver through gentle, rolling terrain to your left.
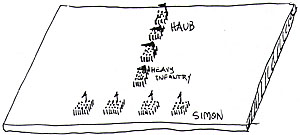
I chose the fourth option, maneuvering to my left. Fred's decision was to hold his present position. When we compared the point values given to the above options, and consulted Underwood's listings, we found that my clever maneuverings had placed me squarely on Fred's right flank. Again, Underwood set the scenario, giving us a map and troop dispositions.

Fred was rather unhappy, wondering why he had been so disadvantaged. Why, indeed?? I couldn't argue with the results, thinking that, this time, a smashing flank attack was just the thing to even up the campaign, and make up for my defeat in the first battle.
All of my divisions were deployed on Fred's right flank, about 12 inches from the right flank of his vanguard division of heavy infantry. We diced for the initiative for the first bound of the battle, Fred won, and his heavy infantry division proceeded to change facing to the right to face my units.
At the same time, he sent his cavalry division forward and to the right, in a clockwise movement, to engage the remainder of my troops.
Directly facing his advancing heavy infantry was my own cavalry division, and instead of charging his heavy infantry, I had the clever idea of taking my horsemen and riding around the advancing heavy infantry and striking his medium infantry in the rear. In part, one of the reasons for avoiding combat with his heavy infantry division was that, unlike all the other divisions on the field which were composed of three units, the Haub heavy infantry division was made up of four units (it had been bolstered by my unfaithful, deserting unit).
Whatever the reason, I now have to admit this maneuver was dumb! dumb! dumb! By the time my cavalry completed their move and reached Fred's medium infantry, his own heavy units, infantry and cavalry, had closed to contact with, and defeated, the rest of my army.
I noted previously that each time one of your archer units scored a hit, you received or "earned" a marker. Markers were also earned in melee... each stand sent to the Rally Zone earned a marker. Each bound, the active player could point to an enemy unit and challenge it, forcing it to take a morale test. The function of the markers was to reduce the morale level of the testing unit; each marker that was applied reduced the level by 5 percent. Failing the test was fatal... the unit was defined to have fled the field.
In Bound #3, Fred challenged one of my remaining heavy infantry units; he applied all of his markers (10 of them) to the unit, reducing its morale level from an initial 85 percent, to 35 percent. Unfortunately, the heavy infantry couldn't face up... it failed the test and was immediately removed from the field.
My heavy infantry division, at the start of the campaign, was composed of three units. One had deserted, and now a second was destroyed, leaving one unit alive. It looked as if it was time to throw in the towel, and, once again. hand over my sword to Fred. It's a good thing I keep a ready supply of swords on hand.
And so, our campaign was over... I had managed to reverse two excellent positions on the battlefield (one, catching Fred's units in column of route, and the other, coming in on his flank). I had suffered two decisive losses, had one of my divisions, the heavy infantry division, decimated, and lost two swords. You couldn't have asked for a better run campaign.
As I previously stated, the entire affair (both battles, plus the in-between-battle tactical maneuvering) took about 3 hours. I had purposely kept the size of the divisions small... 3 units per division, each composed of 2 stands. In our next outing, we'll increase the size of the forces.
Back to PW Review March 1997 Table of Contents
Back to PW Review List of Issues
Back to MagWeb Master Magazine List
© Copyright 1997 Wally Simon
This article appears in MagWeb (Magazine Web) on the Internet World Wide Web.
Other military history articles and gaming articles are available at http://www.magweb.com