 Over the years I have built several kits that
have been usod for purposes ranging from displays to
articles used in wargames. Aircraft have alwsys been
a personal favorite and with the release of Lion's Den
Wargames' version of World War II aerial combat
rules, the opportunity to expand my collection of
aircraft for that era was too great to pass up.
Over the years I have built several kits that
have been usod for purposes ranging from displays to
articles used in wargames. Aircraft have alwsys been
a personal favorite and with the release of Lion's Den
Wargames' version of World War II aerial combat
rules, the opportunity to expand my collection of
aircraft for that era was too great to pass up.
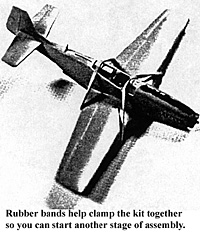
So, with that in mind, I decided to write this article to lend my knowledge in the construction and use of aircraft kits in this truly fantastic game.
In order to start your kit, there is one thing to remember -- the kit will be outdoors over a large area with other players moving around it. Sturdiness is the key word here. Liberal amounts of glue should be used in the construction process, as well as putty to fill in any cracks or defects that might occur.
I will be the first to admit that a well- constructed kit is beautiful to look at, but it must be kept in mind that details, such as aerials, vent tubes, radio wires, and even gun barrels are prone to breakage. The emphasis here is not to delete items on purpose, but rather to focus on different areas of researching the combat units and decorating the aircraft according to that research.
Construction
Once you have decided on which aircraft you would like to build, there are a couple of items you will need to put on base along with the kit. One item is O.D. plastic tubing, cut into 2" lengths. This is used to anchor the aircraft to the position stake for game play, which will be explained later.
The other item is a sheet of thick mil acetate. Acetate is used to simulate the rotation of the prop (if the aircraft has one), and should be cut in a circle corresponding to the diameter of the prop itself.
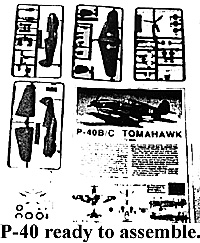
 Follow the directions in constructing your kit.
There are no special instructions here other than the
fact that the aircraft is supposed to be airborne, so
unless you build a JU-87 Stuka or similar aircraft with
fixed lending gear, the wheels should be in the up
position. Also, if you decide to attach bombs or
external fuel tanks, keep in mmd that you will be
inserting the tube stand in the undercarriage, so model around this accordingly.
Follow the directions in constructing your kit.
There are no special instructions here other than the
fact that the aircraft is supposed to be airborne, so
unless you build a JU-87 Stuka or similar aircraft with
fixed lending gear, the wheels should be in the up
position. Also, if you decide to attach bombs or
external fuel tanks, keep in mmd that you will be
inserting the tube stand in the undercarriage, so model around this accordingly.
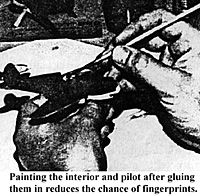
The best technique I have found is to build the aircract completely, but omit the canopy and props. By constructing it in this manner, you can then paint the aircratft without the risk of paint ending up on these items. I will cover the installation of these items later in this article. If you want the cockpit of your plane to be detailed, then I suggest that you do so before you assemble the fuselage, but, as I mentioned earlier, that is a matter of personal taste.
With the pilot installed before the painting process, however, you get the added benefit of a good primer coat on the interior, which makes the paint easier to apply.
Once you have let the glue set on the aircraft, it is time to install the tube stand. You will need a 3/16" or 1/8" drill bit for a pilot hole (I prefer the 1/8" bit) and a bit to finish the drill process. The key element of this process is locating a spot to install the tube. Ultimately the tube should be centered under the wing, but care should be taken that you don't place it in the pilot's lap. Once you have decided on a location, drill a pilot hole using your small bit (a Dremel tool is very handy in this process). Take caution in drilling to avoid boring a hole in the top of your fuselage. After the pilot hole has been drilled, take the 1 and 1/4" bit and finish the hole out to the proper size.
 It would be beneficial to the drilling process if you handle this procedure by grabbing the bit in your fingers and drill by hand. Even though the hole is slightly smaller than the tube, it gives a tighter fit and you can adjust the fit with a hobby knife if needed.
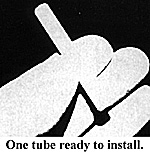
Take the tube and bevel the top. Once this is done, trial fit the tube in the hole. Check the path of the tube to make sure that it will not come into contact with anything that would keep it from becoming centered.
If the tube will push in without much resistance, pull it out and apply a bead of Super-Glue around the top. Slide the tube back in until it's positioned where you want and than seal tbe point where the bottom of the aircraft and the tube meet with another bead of Superglue.
If the tube will not slide in comfortably, use your knife and carefully shave off material until the tube fits the way you want. That is all there is to it and now you're ready to paint.
Painting
When picking colors for your aircraft, consider the technique with which you plan to finish the kit. Often you can paint in spray cans that match the colors you desire which allow you to cover the aircraft with a base coat and then you can come back and detail it later. If you're not sure about a certain color, consult the assembly directions for paint tips. Also, there are several books on the market that detail color schemes on aircraft or just ask someone at the hobby store.
 Whatever technique you choose to finish your
kit is strictly personal taste. Airbrushing is an
excellent way to achieve blends if the paint scheme
requires it, however, the same effect can be attained
with good brush work. Remember that the level of
detail is up to you, so any additional detailing, such as
paint chipped away showing metal on the wings and
fuselage or smoke from the exhaust only adds to the
realism.
Whatever technique you choose to finish your
kit is strictly personal taste. Airbrushing is an
excellent way to achieve blends if the paint scheme
requires it, however, the same effect can be attained
with good brush work. Remember that the level of
detail is up to you, so any additional detailing, such as
paint chipped away showing metal on the wings and
fuselage or smoke from the exhaust only adds to the
realism.
Once the aircraft has been painted and hardened completely, I spray a coat of Testor's GlossCote on the entire kit. This furnishes a smooth surface on which the decals can adhere. Follow the kit instructions on decal placement and application.
Once the decals have set, spray on a sealer coat of GlossCote or DullCote, depending on the type of finish you're trying to attain.
As a personal note I prefer the flat finish on camouflaged aircraft. It gives off a "weathered" look. A good gloss finish works well on any type of aircraft with exposed or unpainted surfaces where bare metal is showing.
Finishing Your Aircraft
After the sealer coat has dried (preferably overnight), it is time to install the canopy and prop spinner. You will need the required pieces from the kit plus a circle cut from a sheet of clear acetate that matches the diameter of the aircraft's propeller. There are several ways to cut out the acetate circle, such as scissors, but I prefer using a compass. By scribing the outside with the point of the compass several times, you can "cut" the circle out and it leaves a center point so you can attach it to the spinner.
 After the circle or "props" have been cut out,
bend it in order to crease the plastic. This gives the
illusion of the prop blades spinning at full throttle!
Care must be taken in order that the plastic is not
bent to the point of breakage and that the "blades" are
aligned with the center.
After the circle or "props" have been cut out,
bend it in order to crease the plastic. This gives the
illusion of the prop blades spinning at full throttle!
Care must be taken in order that the plastic is not
bent to the point of breakage and that the "blades" are
aligned with the center.
Mounting the props to the spinner depends on the type of spinner. If the spinner is in two pieces, just Super.Glue the props between them. A solid spinner takes a litde more time. Remove the blades and cut a hole in the acetate to match the diameter of the spinner where blades were attached.
Next, glue the props to the spinner. As a side note here, I suggest that you take a hobby knife and scrape off any paint that might be on the surfaces to be glued. This will also be a good idea when you glue the canopy into place.
Making a Flight Stand
The "flight stand" is actually the base on which the aircraft mounts. In outdoor use the stand is simply pushed into the ground. For indoors you could devise a base for the stand out of wood or plastic as long as the base size was adequate enough to support the model.
A flight stand is made from a piece of 1/8" diameter steel rod cut to a length of 24 inches. Selecting one end as the top, attach a piece of 1/4" diameter plastic tubing cut to 4 inches (the same kind you stuck into your airplane). I have found that if you heat the rod, the tube will slide on without the need for glue to anchor it. Just be careful not to heat the rod too much!
Next, glue a 1 and 1/2" disc made of thin sheet styrene (.040 is good) to the underside of the plastic tube.
Now all you have to do is paint it. The tube at the top is divided into three separate "bands". These represent altitude heights from low to high. I use 1/4" tape to mask the bands and then spray the whole thing with flat black paint. When that dries you can peel the tape and there are the altitude bands.
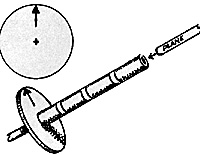 The only thing required on the disc is an arrow that points forward This indicates the direction the plane is traveling. You may opt to add more detail, such as turn degrees and fire arcs for weapons. The illustration at right will help.
That's a1l there is to it! Next issue you'll get a summarized version of FIGHTER COMMAND, plus a scenario to use your new models with. Keep 'em flyin'.
More Fighter Command
Back to Table of Contents Penny Whistle #30
Back to Penny Whistle List of Issues
Back to MagWeb Master Magazine List
© Copyright 1997 by Lion's Den Publications.
This article appears in MagWeb (Magazine Web) on the Internet World Wide Web.
Other military history articles and gaming articles are available at http://www.magweb.com