 The following account, brief though it is, lists the events and army
layouts for the semi-large DBA encounter that we fought at Gamecon 2, on
February 20. After a couple of individual battles, it was suggested that we
combine armies for a grand melee. Many thanks to Bobby, Tony, and Rick for the
use of their armies and terrain.
The following account, brief though it is, lists the events and army
layouts for the semi-large DBA encounter that we fought at Gamecon 2, on
February 20. After a couple of individual battles, it was suggested that we
combine armies for a grand melee. Many thanks to Bobby, Tony, and Rick for the
use of their armies and terrain.
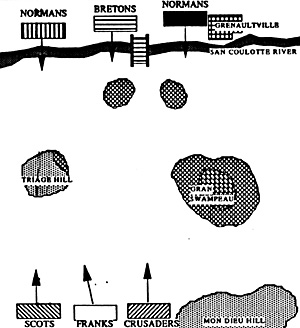
After the DBA tournament at Wargamers, the folks who stayed late fought a battle royal with TEN (count 'em!! 10) DBA armies on the main table, and that idea was used for our somewhat smaller battle. We randomly chose armies and then rolled for sides. On the northern end of the board, near the river, were two Norman armies and a Breton army. To the south were the Early Crusaders (very early, since the other armies were all from about the 1066 time period!), the Later Frankish and the never victorious Pre-Feudal Scots.
Since the distance between the two opposing forces was substantial, movement was doubled for the first three turns; this worked out quite well, and could have been extended for another turn or two. Map A shows the initial layout of the armies, and their movements.
From the north, the Normans and their Breton allies came across the river, and proceeded south. The crossbowmen reached the central forest and established a temporary "line of death", while waiting for the rest of their fellows to catch up. The Knights advanced on both flanks, and the infantry slowly moved up to the center.
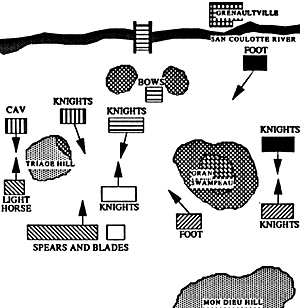 At the opposite end of the valley, the Crusaders and Franks (not to be
confused with the Beans and Franks) joined together briefly in the center before
going their separate ways, with the foot moving into line with the Scots, who had
early on set out to form a long line of spear and blades. Two elements of light
horse were sent out far in advance of the main body of men to scout the enemy.
Map B shows the position of the forces just prior to initial contact.
At the opposite end of the valley, the Crusaders and Franks (not to be
confused with the Beans and Franks) joined together briefly in the center before
going their separate ways, with the foot moving into line with the Scots, who had
early on set out to form a long line of spear and blades. Two elements of light
horse were sent out far in advance of the main body of men to scout the enemy.
Map B shows the position of the forces just prior to initial contact.
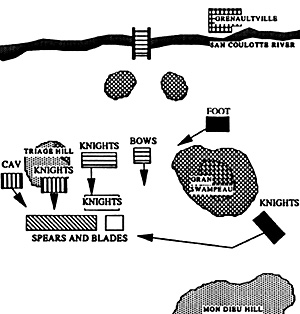
On the eastern side of the Great Swamp, the Crusaders and Norman left hit each other head-on, where - after several attacks - the Crusaders retreated into the edge of the swamp. Then the great Crusading Knight-General was laid low, and his men scattered to the winds. The Normans advanced around the swamp and began to close in on the Franks, who had moved forward into contact with the Bretons. On the western side of the valley, the Norman right moved up over the hill, and nearly lost a cavalry element to a surprise maneuver by the Scot light horse, but it was not to be, as the Light horse was ridden down and destroyed by the mounted Normans.
The Franks valiantly tried to stern the onrushing Bretons, but to no avail. Their fate was sealed when a Norman flanking action overran their right flank, and we know what happens when the Franks am flanked. Can you say AMF???
They did, however, take quite a few of the enemy with them before they expired. Map C shows the position of the two forces at this point.
 The Scots, those kilt-wearing, bagpipe-playing- haggis-eating buggers,
were in a word...doomed. Their warbands threw back the Norman cav, but the
blades couldn't cut up enough Breton and Norman horse, and were trampled into
the heather (or the French Equivalent). The Norman and Breton commanders
enjoyed the comforts of all the victorious hosts. and retired to search for a good
bottle of Chateatinetif-de-Pape and some baked brie.
The Scots, those kilt-wearing, bagpipe-playing- haggis-eating buggers,
were in a word...doomed. Their warbands threw back the Norman cav, but the
blades couldn't cut up enough Breton and Norman horse, and were trampled into
the heather (or the French Equivalent). The Norman and Breton commanders
enjoyed the comforts of all the victorious hosts. and retired to search for a good
bottle of Chateatinetif-de-Pape and some baked brie.
All-in-all, the battle went well, with the agreement that if the general of the army and/or four stands are lost, instead of immediate removal of all of the associated forces, the remaining elements do not move or engage in offensive actions, but hold their ground and fight defensively. In the event they are forced to recoil, they flee instead, with all the rules for fleeing troops applying to them. The participants in this battle all seemed to be satisfied with the methods of play, and would like to see some similar scenarios in the future, since this enables DBA players to have larger-scale actions without the size of WRG armies and their rules. Perhaps at the upcoming DBA toournament? Hope to see you on DBAttlefield!
Back to Novag's Gamer's Closet 14 Table of Contents
Back to Novag's Gamer's Closet List of Issues
Back to MagWeb Master Magazine List
© Copyright 1993 by Novag
This article appears in MagWeb.com (Magazine Web) on the Internet World Wide Web. Other articles from military history and related magazines are available at http://www.magweb.com