 Hal, look, I'm actually sitting down and writing this!! I'm not one for writing and as it seems my memory is failing, this makes for a great combination as many of my wargaming opponents (and partners) will attest.
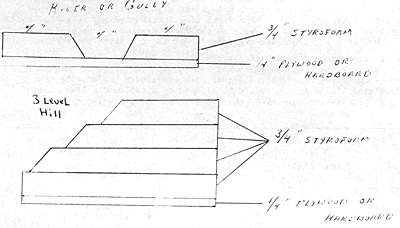
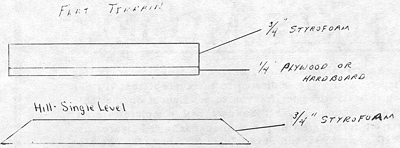
I would really like to claim all the praise that Hal was heaping on me in the November-December MWAN (well, maybe not heaping, but my name was mentioned), but I got my idea from Greg Novak when he ran a S.W. African colonial game at Oak Forest Hospital. Greg's boards seemed pretty elaborate to me and being basically a lazy guy, I tried to figure out a way to make acceptable terrain without too much labor. So rummaging through my house I searched for some inexpensive but adequate materials to construct my terrain. I found some 3/4's inch styrofoam left over from some home improvement project and 1/4 inch panelling probably from the same project. I took this material and after a beer and some chocolate chip cookies (good combo to get the old grey matter moving, or sloshing), things started to come together. I said, hey, if you glue the styrofoam to the panelling then you would have some nifty flat terrain. And look, if you glued two layers of foam to the boards, you would have a hill (Editor's Note: It's very difficult to pull the wool over Greg's eyes). Oh boy, I was really cooking now! But, wait, the best idea (stolen, no less) was if I cut the styrofoam down to the board I would have a river or gully. Well, this was great! Now to find a way to do this without too much work.
Looking around my work bench, I spied a small table saw purchased for me by my wife and children so I could do work around the house - it was brand new. I figured this would be much better than any method requiring my arm to move vigorously back and forth. Thus, I started cutting some of the panneling into 12" X 12" squares. Quite by accident I found that I could use this saw to cut the styrofoam also. Now that I had some of my material cut, I needed a way to stick it all together. Some Sobo glue was perfect for the job and is easy to use.
 Everything was looking great with one exception; it was all flat. So it was time to employ some of the methods of raising and lowering terrain. First, I decided to do some rivers. Since these were to be geomorphic boards, I had to make sure everything matched when it was laid out side to side. For the rivers, I used a four inch river with four inch banks on each side (see diagram). Noting that river banks sloped into the water, I cut the boards at a 30 degree angle on the table saw. Between each side of the boards, I made the banks wavy to simulate the irregularities of a stream or gully.
To make a long story short, I have supplied some diagrams of how I put all this material together. As for finishing the terrain, I painted all the ground surfaces a flat green color, all rivers a glossy blue and all river banks flat brown. Using a spray adhesive I applied a grasslike foam to all the areas painted green. After building my first set of hills as part of the boards I decided that I would like more flexability so I made the rest of my hills separate from the boards and of varying sizes so that some hills might cover more than one of the geomorphic boards and could be moved and changed as the game set-up required. So, please note the following diagrams.
Materials and Sources
White Glue-Frank's Nursery
1/4" plywood-Home Center or lumber yard 3/4"
Styrofoam - Dow Chemical (Sold in packages of 4 - 2'X4'X 3/4" panels. I
found mine at K-Mart.
Paint-Purchased all paints at Frank's Nursery.
The total cost in materials for my layout was about $54.00. This gives me a 8' X 5' playing surface complete with hills and river.
Back to MWAN # 20 Table of Contents
Back to MWAN List of Issues
Back to MagWeb Magazine List
© Copyright 1986 Hal Thinglum
This article appears in MagWeb.com (Magazine Web) on the Internet World Wide Web.
Other articles from military history and related magazines are available at http://www.magweb.com