I have used the method described here to apply paper flags from various paper flag vendors, some flags that I have drawn
myself with my computer graphics software and some flags downloaded from the web and printed on my printer. I have refined this method over a couple hundred flag mountings and use it for multiple scales; 6mm, 10mm, 15mm, 20mm, 25/28mm and 54mm figures. I have used this method successfully with the thicker paper stock some of the flag vendors provide, the inkjet printer paper and standard copy paper.
You will need the following materials:
- The flag
- The figure with a flagpole
- White glue (I use Elmers)
- Some water
- A toothpick (You can use an old paint brush as an alternative)
- A tweezers (I use electronic or medical tweezers that I got in an electronics store)
- (Optional) A damp cloth for wiping glue off your hands and tools
 Prepare the Flag
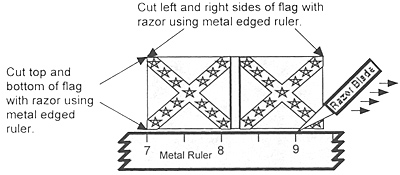
Cut the flag out of the paper sheet using a metal straight edge and a razor. This gives a reasonable guarantee that the flag will have parallel opposite sides. Some people cut on the outside of the flag color and some people cut on the inside. This seems to depend on whether you like to paint the edge of the flag black or try to edge the flag in a paint color similar to the color of the flag that borders the edge.
Get the standard bearer or flagpole that you are going to mount the flag. I prefer to paint the figure first, including the flagpole. Take the flag that you just cut out and check that it fits the flagpole. Bend the flag at the center point before you do this. I usually use an extra piece of dowel or rod to do this so the flag doesn't crease.
Make sure you have the flag in the correct orientation. This seems obvious, but there's a reason the hair dryer has a label that states not to use it while showering (go figure). At the same time, check where you want to put the flag, for instance, closer to the eagle, if there is one, or closer to the standard bearer's hands, etc.
 Apply the Glue
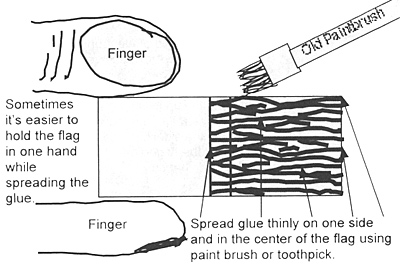
Put the creased flag face down on a clean surface. You will be spreading glue on the backside of the flag. I use Elmers glue with no dilution. I use very little glue, but that's where the toothpick comes in handy.
Apply the glue across 1/2 the flag and the center section, where the flag wraps around the flag pole, of the non-colored side of the flag.
Spread the glue around. Some of my friends use an old paintbrush to do this. I use an old paintbrush or a craft toothpick. If you have spread too much glue on the flag, use the toothpick horizontally across the flag or the old paint brush and evenly distribute the glue, making sure you get the edges and the center, but not too much. If you have applied excess glue, wipe some of it off the toothpick and run the toothpick across the flag again. Repeat this until you have a very thin layer completely covering the flag center and one half.
Now you have the back of the flag lightly coated (reminder... it doesn't take much glue), place the flag around the flagpole using the center of the flag as a guide for matching up to the flagpole. Remember to make sure the flag is oriented correctly, meaning it is not upside down (laugh while you can... it happens to the best of us). Press the flag sides together, taking care to meet the corners on the top and bottom of the flag as evenly as possible.
 Depending on how much glue you applied earlier, how long you have waited to press the flag sides together and what type of paper the flag is printed on, you may have some time to move the flag around by just sliding it between your fingers to get the corners correct. I suggest you do this as carefully as possible as a habit. Later, you may want to leave just a tiny bit more glue on the flag or speed up putting the flag onto the flagpole. The glue will have some slipperiness to it and you can use this feature to adjust the flag.
Attach the Flag
It is a common practice to smooth the flag out at this point and squeeze out air bubbles and excess glue. Given the convenience of your fingers being already attached to your hands, most people will find these adequate tools to do the job. Over applications of many flags, though, I have found the occasional one that gets the color portion ripped off as it sticks to some tacky, almost dry glue that has inadvertently gotten on my fingers while I was pressing the air bubbles out. This resulted in ruined flags and having to remove the damaged flag and starting over.
Instead of my fingers, I use an electronics tweezers.
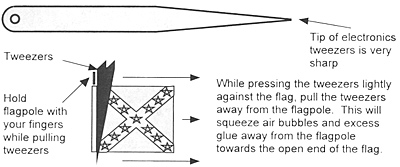
The steel of the electronics tweezers is very flexible and the tip is very sharp. This allows you to press the tweezers against the flag and get a very straight edge sliding along the flag as you press the air bubbles and excess glue out to the sides. The sharp tip allows you to get at the small pockets at the top of the flag near the flagpole and at the bottom of the flag near the flagpole, just above the standard bearer's hands.
 Take your tweezers and slip it along both sides of the flag with the flag loosely between the tweezers arms. Start at the flagpole. Simply pressing down with the tweezers squeezing right next to the flagpole will fix the flag at the center point. If glue squeezes out at the top or bottom of the flag, remove the glue with your toothpick or other scrap, like a bent paper clip.
Hold onto the flagpole with your one hand and while gently squeezing the tweezers evenly along the length that is in contact with the flag, pull the tweezers away from the flagpole. The air bubbles and excess glue will move away from the flagpole and be squeezed out the open end of the flag. Wipe any excess glue from the edge of the flag. Make sure and check the top and bottom edges, as well as the edge furthest from the flagpole
While pressing the tweezers lightly against the flag, pull the tweezers away from the flagpole. This will squeeze air bubbles and excess glue away from the flagpole towards the open end of the flag.
Now that you have glued the flag in place, and the paper is still mildly damp, you may bend the flag so that it will dry in any position you wish, with waves or overlaps, etc. I find using a round dowel or other; smooth, rounded object helps with this. I lay the dowel along the flag where I want a mild fold in the flag and gently wrap the flag to conform to the dowel.
Final Comments and Hints
Hint 1: Be careful to wipe any glue off your hands while you are applying the flag and smoothing it so you don't wind up with the colored part sticking to your fingers or the tweezers as the glue dries.
Hint 2: If you used the "right" amount of glue, there will be very little glue "bleed out" as you smooth the flag. If you do get bleed out from the edges (which happens to me all the time with the tweezers), wipe it off then wipe off the tweezers and your fingers quickly. It helps to keep a damp rag near your work area for this activity.
Hint 3: While the flag is still damp, quickly bend it with the ripples you want (or whatever). Thicker paper will make this more difficult and may cause the paper flag to crease, rather than fold nicely. The round dowel, pencil, toothpick, etc. can help if you have big fingers, like me.
 Hint 4: While bending the flag, be careful not to misalign the flag edges. If the glue is very wet or the bend in the flag is too severe, the flag will misalign at the edges that are parallel with the bend.
Hint 5: Think about which way the flag should go over the flag bearer's shoulder or side depending on what other figures will be mounted near the flag bearer. If the flag is large or you mount figures tightly on a base, the flag may block or rest on the surrounding figures.
Hint 6: Once dried, consider painting the edges black with a watered down paint. I usually use a 50/50 solution of water to paint. For a nice, bright flag or flags with only one color fields (i.e. all red with an internal design), consider edge the flag in the field color, rather than black. I do this with the British Union Jack flags and they seem to stand out much better than just the flag edged flag.
 Hint 7: Pay special attention to the flag at the flag post closest to the figures hands. This is the hardest place to see and the flags (in my experience) tend to separate there. I usually turn the figure upside down and use the tweezers to re-squeeze this part to make sure it's bonded. In some cases, I have had to re-squeeze this particular section 2 or 3 times. It will sometimes come loose after squeezing the excess glue out or after bending waves into the flag.
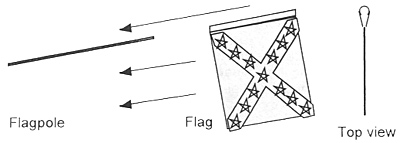
Hint 8: Instead of folding the flag around the flagpole, as suggested earlier, I find it easier for me to fold the flag while still unattached to the flagpole. This seems easier for me to get the corners and sides properly aligned. This requires that you do a pretty good preparation fold at the center. The flag will look like a teardrop when viewed from above. After aligning the corners, I put the flag over the flagpole through the tunnel of the flag near the flag center.
Back to MWAN # 123 Table of Contents
Back to MWAN List of Issues
Back to MagWeb Magazine List
© Copyright 2003 Hal Thinglum
This article appears in MagWeb.com (Magazine Web) on the Internet World Wide Web.
Other articles from military history and related magazines are available at http://www.magweb.com