 This article will look at one of the basic terrain types we typically see on the miniatures board today, the hill. We will look at how hills are being used defensively in games as well as how to make your own hills.
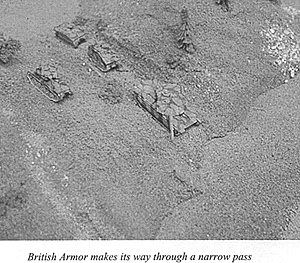
British Armor makes its way through a narrow pass
First of all, why bother having hills on the tabletop? The most obvious answer is that they exist in real life. A tabletop could be totally devoid of forests, buildings, walls, hedges, etc. but a few hills scattered around changes the dynamics of your miniature battlefield! A tabletop with no terrain whatsoever would make for a quick bloody battle, but this is not the kind of game that many of us would enjoy (unless you really have to go home early).
How many scenarios have been written and how many games have been played where the hill is the objective? Even the TV series "Combat" and the movie "Pork Chop Hill" have had hills as objectives that were to be taken and/or held. One advantage hilltops have becomes apparent when troops, vehicles or ordnance are able to "see" (by using your eyeball or a periscope) a vast expanse that is the battlefield. The commander has more knowledge to take advantage of in terms of knowing enemy deployment, enemy troop movements, examining possible avenues for enemy advances etc.
Are there advantages for defending on a hill? Yes, but with a caveat. When defending a hilltop, the defender would have the height elevation advantage over the advancing enemy. Thus, defending units would have a better chance of spotting and hitting the advancing enemy. Depending on the time period one is playing and what unit(s) is available, placing units with hitting power and long range capabilities on a hilltop seems to be a smart move. An added benefit for the defending unit(s) would be concealment. After all, what defending player does not derive some smug satisfaction after ambushing the unsuspecting opponent's unit(s) and watching his or her facial expressions of intense pain and regret?
As a result, the enemy advance could be disrupted to the point that the entire attack will fail. Therein lies the caveat, for when the unit(s) fire, there is the possible nasty consequence of receiving return fire from other advancing enemy units as well as the target unit if it was left intact after the initial attack. Chances are that the unit(s) on the hilltop will not be long for the present gaming table. This is an example of unwanted negative attention. Another way to look at this is as a demonstration of magnetism without the use of magnets! Hopefully, the soon to be vaporized unit(s) will have done their job in aiding the defender to a glorious victory.
Is there a way for the defender to prevent his or her units from being eliminated after firing once or may this from happening? Well, there is a way and it is called the "Reverse Slope Defense.." The defender sets up his or her units on the reverse slope opposite the enemy's avenue of advance. This has two main advantages. One is that the defender's units are not exposed to fire from the advancing enemy units. In effect this trick "hides" units until they're needed.
 Making Hills
Making hills is not all that difficult a task. If one needs hills right away and there is no money in the budget, then two items would be needed: books and a tablecloth. One arranges the books to resemble a hill as they see fit and merely drape a tablecloth (hopefully the color of the tablecloth will go well with the field of conflict). Many of us however, would like something more permanent. One may choose to purchase ready made hills that can be found in hobby stores or on Ebay. The downside is that one may not find a hill or group of hills to their liking. In order to make your own hills you will need a few simple items:
- 1. Styrofoam or foam?
The typical material of which many hills are made. One can find said items in a hobby store or as part of packing material (All you need is a good eye and a little imagination...)
2. Cutting tool
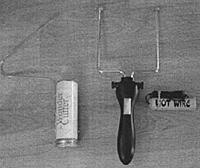
This could be a knife, a scraper of some sort or a foam cutting tool.
3. Paint
Hopefully, the paint will roughly match what real life hills look like!
4. Flock
This would include grass, rocks, lichen etc.
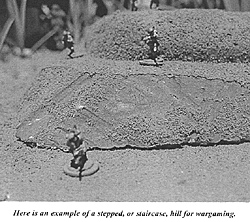
Now on to the hill making process itself. First, determine how high your hill will be and what kind of sloping will it have. Sometimes it is better to have a hill that resembles a staircase somewhat. This "staircase" will allow placement of large scale miniatures (25 / 28mm) on the slope of the hill without falling over and possibly damaging the fine paint job on the miniature.
 How does one create the "staircase" effect? This will require a few layers of Styrofoam with each ascending layer is smaller than the one preceding it. The longer in length these steps are, the lower the rise of the hill and thus, the hilltop will not be that high. The shorter the length of the step the opposite will be true.
Here is an example of a stepped, or staircase, hill for wargaming.
The edges of these "steps" could be rounded off depending on the owner's preference. The other way to create slopes on a hill would be to use a foam cutter or some other cutting tool. Personal experience has proven to me that the foam cutting tool is the best route to go. It is less messy and the cuts as well as slopes are neater and more easily defined.
Once your basic hill mass has been formed, it is now ready to be painted. In addition to paint, I have to include primer. Be careful as to what effects the primer has on the Styrofoam. One can observe and smell melting material fairly quickly so test the primer on an expendable piece of material. Just like miniatures, not all Styrofoam are made the same way using the exact same materials. Also, do this outside or in an area where there is plenty of ventilation. I have used primer because it forms a better bond between the paint and the Styrofoam of the hill. It is less likely that the paint will flake off.
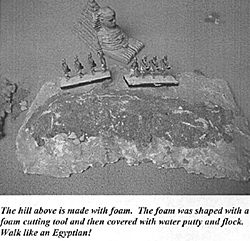
 The hill at right is made with foam. The foam was shaped with a foam cutting tool and then covered with water putty and flock. Walk like an Egyptian!
Another alternative is to coat the entire hill with water putty that can be found in almost any hardware store. When the water putty hardens, it will form a hard surface that will make the hill last through many battles. When the hill is being painted, try to use different colors to reflect the various soil / rock types that do make up hills. While the paint is still wet, flocking or ballast can be added. One can also wait for the paint to dry off, apply watered down white glue and sprinkle the flock/ ballast that way. Lichen or bits of model railroad tree material will add detail to the hillside as well.
By adding all these little details to your hill will make it that much more appealing on the table. That is what eye candy is made off.
So whether you are in need of a Bunker Hill, a series of hills that guard the road to Minsk, Marye's Heights or just a plain garden variety hill, we hope that this will help those of you who want to literally make a mountain out of a mole hill.
Back to Table of Contents The Messenger May 2003
Back to The Messenger List of Issues
Back to MagWeb Magazine List
© Copyright 2003 by HMGS/PSW.
This article appears in MagWeb.com (Magazine Web) on the Internet World Wide Web.
Other articles covering military history and related topics are available at http://www.magweb.com