There can be no wargamers alive who after watching The Wrath of Khan, or experiencing the Battle of Endor, did not want to rush out of the theatre and somehow transfer the experience of battles in space to the tabletop. Up till now, the only way to acquire the models was to save cash, buy the precious few (and huge) plastic kits available, convert them, paint them, re-glue the bits that break off, (yawn), what's on TV?
Fortunately there has been a resurgence of intelligence among established toy makers, making it possible for grown men without children of their own to march into Toys 'R US and buy up the core of a useable Star Fleet. Micro Machines has released both Star Wars and Star Trek models in various scales, where all models are about 2 inches long, perfect for wargames. They also come with a clear stand, and are made of a durable soft plastic and come painted. But: they are expensive, and soon poverty rapidly causes a rude re-entry into a lower orbit. However: these models make an excellent core for your own scratch built fleet of ships.
The first thing you need is imagination, which as solo gamers is a given. Next: Don't listen to any rubbish about "official" scales and incompatibility of model sizes. Yes, among Sci-Fi types there are those closed minded people who profess deep knowledge of techno babble, who pooh-pooh any attempt to tinker with the "official" made up future. (Sounds like the same guys who made solo wargaming so popular.) Anyway, the next item you need is balsa wood and a good super glue. In Canada and the US we can get balsa wood "grab bags", for around $5. These usually have a few big chunks of wood (great for bases) and a mix of flat wide pieces (perfect for hulls) and a lot of strips - excellent material for warp nacelles (engines to new recruits). Also be a little picky about the glue. There are several gap filling glues that have made the old Balsa cement obsolete in the eyes of the impatient modeller, squinting from years of glue fumes and fixed postures, waiting for a spar to dry. A sharp Xacto, some fine grit sandpaper, and a small tooth saw are all you need.
Now what? Remember that these ships are playing pieces and are not going to the Smithsonian Institute. Detail is great, but time consuming and frustrating when you are just starting out. It is also discouraging at times, so set your sights a little lower. The models will never look like the plastic ones with all their hull detail molded in.
Best Ships
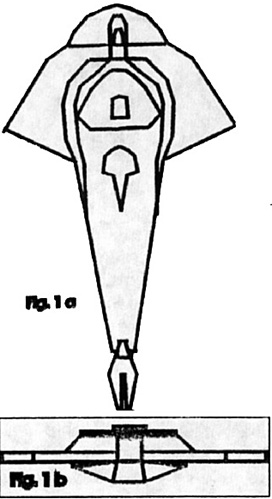
 The best ships to start with are the ones with angular lines, or soft curves that can be easily copied. Don't try a Klingon Battle cruiser first off, because the round "head" of the ship is hard to emulate without practice. The Cardassian Galor Class warship is an easy start. It has sharp edges made to be cut with an Xacto, and very few curves. Try to look at the general shape of the ship, and ignore the detail, essentially you need to visualize the hull shape as a sculptor might. The KISS rule of Keep It Simple, Stupid works well here. Find several of the flat pieces of balsa, and laminate several layers, making sure you make the wood a little larger than the model; it's easier to cut off than to glue on. The wood grain laminate also gives you a ready made guide to keep the hull symmetrical in the vertical plane. The laminate will dry fast, so draw the rough outline of the ship on the wood in pencil (never ink as it doesn't soak in right, smears, and ultimately bleeds through your best paint job).
I made some drawings to illustrate, however the best model is the actual miniature. (I think I drew the tail section too fat) Figure 1 is the top, front, and bottom views. You'll find that it's easier to go with the grain. Too much pressure can cause the wood to split right down the model, so go slow and make several shallow cuts rather than one deep one. Balsa also compacts under pressure, and often several cuts across the grain are better than one. Pretty soon the ship takes shape, and now you can look to add larger detail, like the split tail and superstructure along the spine of the ship. These are best carved as individual pieces, then glued on later. Before painting, make sure that all the super glue has dried, because it can ruin a paint brush.
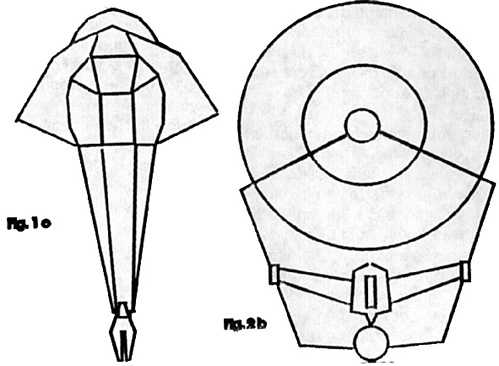
Another good start is the Reliant. It's got a big saucer section, but these are easy. You can find something round to trace circles on flat balsa, or better still use a compass. Then cut two smaller circles to centre on either side of the big one. Use the Xacto to cut the shape of the bridge area and the same but larger area on the other side of the hull. Compare with the model as you go. Then sand the cuts smooth and you'll have a good saucer hull.

The tough looking part is the "roll bar" where the Photon torpedoes are. The best way to tackle this is with 20 thou plastic card. Cut the roll bar out with scissors, ignoring the weapons pod. Bend the ends carefully and voila, it fits. The weapons pod is carved from balsa and mortised slightly on the bottom so that when fitted, it will look like it is set in the middle of the roll bar. The engines can be made the same as the Reliant model, or like the TV Enterprise. The FASA books had plans for such a ship. It was an earlier and less successful cruiser, but an excellent conversion for your balsa ships.
Bases These are best kept functional, not fancy. A 1 inch square of balsa 1/4 inch thick works well. The stand can be balsa, but thin wooden dowel or even bamboo barbecue skewers work better. A length of about 2 inches is sharpened on both ends and pushed into the model and the base. Add a little glue and you're done.
Painting This is up to you, these vessels are under your command, paint them like the Micro Machines or as you like them. It is a good idea to base coat them with something if you are using Humbrol enamels or a fancy acrylic. My sister is an "artist", so I regularly raid her basement for thick artist acrylics, and I find that these don't need any base coating. Just remember that a good paint job goes a long way to bringing even a poor model up to snuff. As you improve, the old models make great markers for burning space hulks (boy have I got a lot of those). The main thing is that this is a cheap, fun way of producing models from scrap balsa, where the only hazards are a few minor cuts and fused fingers - take it easy on the glue.
I haven't even mentioned Star Wars. If anything, Star Wars offers an even better source for small balsa wood models. Many of the ships are angular and squarish, and with the release of the role play game by West End Games, the availability of potential models has increased. The Star Trek games seem to have fallen out of favour though. Star Fleet Battles, a great if cumbersome game once produced a fine line of miniatures in lead. I hear that they will once again be available in the US and Canada by Christmas 1994, but who knows? They will also be expensive now that they must be cast in pewter (ouch) not lead. Whatever happened to plastic?
FASA had an excellent role play game that had technical supplements called Ship Recognition Manuals. These gave the dimensions in metres and provided three view drawings. There have also been limited releases of promotional toy starships in cereal and such, which provide ready made models or at least patterns to copy. Another source not available to many are two fantastic computer games for the IBM. Both are Larry Holland of LUCASARTS, and are called Xwing and Tie Fighter. Both have expansions with more ships and they allow the person to pilot a fighter for the Alliance or for the Empire.
These games are the next best thing to getting singed by Darth Vader's light sabre. The technical manuals that accompany the game also give details of ship size in metres, weaponry, etc. The best thing is that the computer graphics are rendered in 3 dimensions, and you can fly around the ships, stop the game, and actually make a decent design for a balsa ship. Incidentally, why are IBM compatible computers so expensive in Europe? For $1000 US you get a SVGA machine with enough RAM to handle anything. Lobby your MP's.
Scales
A dreaded word when confronting a pot bellied Trekkie who will tell you that it's impossible to use mixed scales. Boring! What I use as a thumbnail sketch is that every 100 yards or metres of a ship equals 1 inch. That way the Micro Machines are about right for Star Trek. Star Wars Micro Machines have a very small Star Destroyer that I use as a patrol ship (waste not, want not). I use the plastic model that is 15 inches long. The reason I did so was that it was a really nice kit, and that the "official" scale of 1600 metres was just about right. It also looks more impressive and capable of holding 40 thousand souls. I played with the idea of scratch building two of them but the wood was as expensive as buying one kit.

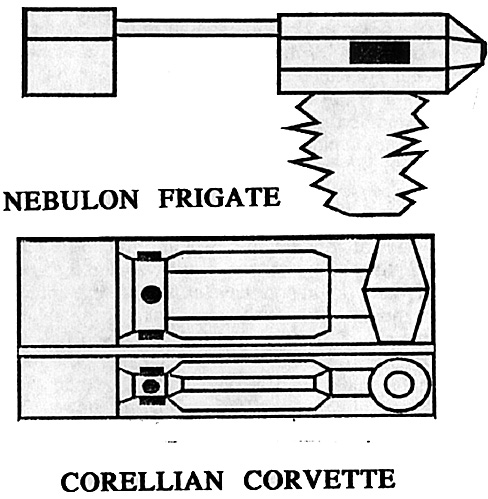
Leave about 1/4 inch down from the top perfectly flat. From this point you will cut a triangular section off, so that the 3 lines meet at the centre of the bottom surface. These two pieces are joined by a thin dowel so that the total length of the main hull is 3 inches. The last item is the lower hull. Use a thick piece here, not laminate. It should be 3/4 inch long, 1/2 inch wide and _ inch thick. Cut a series of triangles out of the _ side that get progressively bigger towards one end. Repeat the process on the other side. It is easier to do than to explain, so see the drawing. Glue the wider end of the lower hull to the bottom of the large hull, closer to the centre of the ship.
The base is attached with dowel into the bottom of the lower hull, and that is one Nebulon B Frigate. The hanger bay for fighters is painted on the right side of the main hull. These ships are used by both the Rebel Alliance and the Empire and are easy models to make. Another useful ship from Star Wars is the Blockade Runner or Corellian Corvette. Using the rough scale, these models are 1 1/2 inches long. I found small wooden furniture plugs at a hardware store, that when the wide sections are glued together, made an excellent representation of the front of the ship. The hull is one piece of thick balsa that is almost square with very few cuts. See the drawing. I added turbo laser turrets out of thin "buttons" of dowel. The engine is merely painted red with orange and yellow highlights. Micro Machines makes a great model of this ship that you could copy instead, and use these models to represent up-gunned Modified Corvettes that are in Tie Fighter.
 Small vessels such as fighters or shuttles can't be represented in scale, so I build them about 2 inches long. They are attractive and I use them to represent a squadron, losses are tracked numerically rather than by removing the miniature. This helps prevent games from becoming too cluttered with ships. You'll soon find that keeping track of 25 ships on a side is quite a feat in itself. A cheap source of fighters are the 1/700 scale jet fighter models made by various Japanese firms. Micro Machines makes all the Rebel fighters plus a Tie and a shuttle.
There are many items around your house that can be adapted to these miniatures. Plastic spoons can be used to create hulls of ships, or glued together to form a complete ship. Two medium sizes about 1 inch long make the basis for an Imperial patrol ship. Just add a small superstructure at the "rear" of the ship, where the handles once were and a small section under the hull. Also a large sensor array on top of the main superstructure can be added. Plastic ships need a long thin nail super glued into the bottom of their hulls, as wood doesn't always bond to plastic.
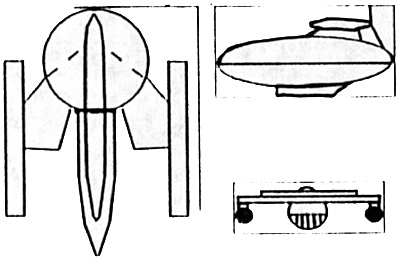
Small Macdonald's coffee spoons are very handy for adding details to otherwise plain models. The covers from Bic pens also are useful as hulls. One ship utilising this shape is based on a FASA Federation ship. I used a large circle like the Reliant hull. I glued this onto the stem of the cap. I then fashioned another flat balsa piece to make a set of "wings". At the ends of these I made small engine mounts and made either newer engines to represent a retro fit in an old ship, or the round engines for the original. The small gap in the pen cap at the bottom of the hull can be filled with putty, and small lines etched in to represent a shuttle bay. Poker chips and bingo chips can be used to make round hulls, and halves of aircraft model drop tanks or bombs are also effective as details. I'd be interested in hearing from anyone with suggestions for ships or anyone who would like to swap ship designs.
Next time I'd like to discuss building a balanced wargame force, and illustrate the most useful and least appreciated vessels in any fleet, freighters. I'll also give you a cheap and easy set of rules to begin wargaming. May the Force be with you.
Back to Table of Contents -- Lone Warrior #111
Back to Lone Warrior List of Issues
Back to MagWeb Magazine List
© Copyright 1995 by Solo Wargamers Association.
This article appears in MagWeb (Magazine Web) on the Internet World Wide Web.
Other military history articles and gaming articles are available at http://www.magweb.com
