It's Easier Than You Think
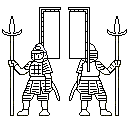
I've been able to draw lots of paper soldiers despite have almost no artistic talent. If I can do it than so can you. This article is intended to give you some tips and suggestions so you can learn from my mistakes. This is basic stuff, so if you're an artist, or have a lot of experience drawing paper soldiers you might as well stop reading now.
Don't Start From Scratch
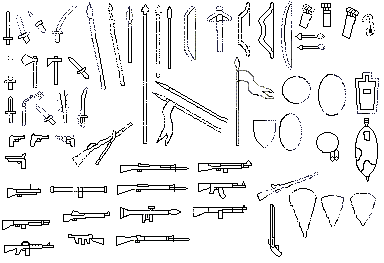
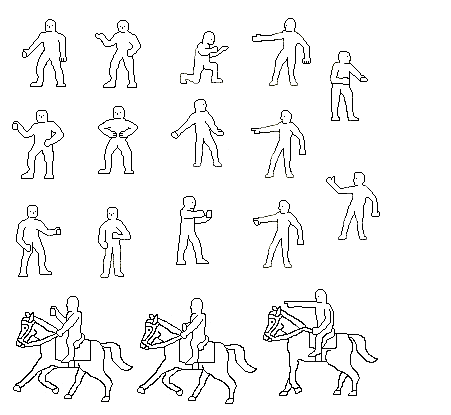
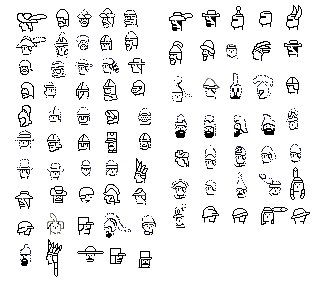
The hard part is getting a decent looking basic figure in a useful pose. I've already done it so use mine. It'll save you loads of time. Go to the Black & White Paper Soldiers Page (http://www.juniorgeneral.org/paperbw.html) and find the paper soldiers that are closest to what you want. It's easiest to start with one of these, but if you can't find anything close look at the Masters. These are basic black and white line drawings of human poses, humans on horses, weapons, heads, and other useful stuff. Masters: poses, heads, weapons.
Create a File in Paint
I draw my figures using Paint. It's an easy program to use. Cut and paste the figures you're going to modify into a new file, you only want the front view right now. Later you'll make the reverse sides. Save it as a GIF, and make sure the image is large so you have room to work. You should draw your figures the size you want them. If you try to resize them after they're drawn you'll lower the quality of you art work. So if you want larger or smaller figures now is the time to make the change. Resize them if necessary and clean them up before you start modifying. Use the View menu to Zoom in and get a large close-up of your figure. This will allow you to see the individual pixels and make the necessary modifications to the drawing.
Keep it Simple
Now use the pencil tool (black and white) to make the figure look the way you want. Often it's easier to cut and paste pieces of other figures or Masters rather than drawing things from scratch. It's not a coincidence that all my figures look alike! You'll find that the Transparent Copy tool is very useful. When drawing curved lines try using the Oval tool rather than the Cuved Line tool. The Curved line tool is a bit squirrely. If you need a nice curve draw an oval, then cut out the arc you need and paste it onto the figure. Keep it simple, don't try to draw too many small details. Very small items like buttons, stripes, and lace shouldn't be drawn at all. They can be added when you color the figure. Diagonal lines don't look very good at 72 dpi so try to draw spears and other linear objects vertical or horizontal. The pose will look a bit stiff, but it's better than the alternative. Also keep in mind the joys of symmetry. If you're drawing something symmetrical, like a pattern on a shield, you can draw one side, then copy, flip, and paste to get the other side. Also don't forget about Undo. You can undo only the last three changes so fix errors right away.
 Drawing the Reverse Side
If you've made a side view then you don't need to draw a reverse side, skip down to the next section. If are doing a front/back figure then this will take a little more effort. Copy the front view and paste a copy into the image so you have two identical figures. Go to the Image menu and use Flip/Rotate to do a horizontal flip. This will give you a mirror image of the figure. Next erase most of the interior lines while leaving the outside intact. If you change the outline the two images won't match up. If an interior line shows a feature that will be shown on the back side, like a belt, then keep it. Go ahead and draw the back side of the figure. It's easiest to have the front side right next to the back so you can refer to it as you draw. Again, remember to use cut and paste whenever you can. There are no masters for the reverse sides. They would be useless since the outline wouldn't match the modified front side. So browse through the black and white figure sets to find useful pieces you can cut and paste. Just make sure that you don't change the outline of the figure. Once again Transparent Copy will come in handy.
Preparing to Match up the Figures
Now that you've got the two sides of your figure drawn it's time to put them on bases. Start by moving all the poses to the bottom or top of the image so you have plenty of room to work with - cut and paste them into a larger image if necessary. You can crop it later. Next draw a horizontal line across the image. This will be the fold line.
![]() Lining up Side View Figures on Bases
Lining up Side View Figures on Bases
Start by drawing a base for your figure. I use the Oval tool, or Curved Line tool to draw an arc and add a horizontal bottom to it to make a semi-circular base for the figure. Or you can draw a rectangular base using the Rectangle tool. Once you have a base that is the right size you can Select it and drag it into position behind the bottom of your figure. Make sure you are in Tranparent Copy mode when you do this so you'll see both the figure's lines and the outline of the base. I like to have two pixels between the bottom of the figure's feet and the bottom of the base. After the base is in position set the color to White and use the Pencil to eliminate the parts of the base outline that overlap the figure. The figure should appear to be standing in front of the base. When you are finished use Select to select the figure and base, copy it, and drag it down to the horizontal line. The bottom of the base should be on the fold line. Paste another copy of the figure into the image and use the Image Flip/Rotate menu to do a vertical flip. Drag the flipped copy into positon. It's easy to line them up if you are set to Transparent Copy. You can drag it so the bottoms of the two figures overlap, adjust the horizontal alignment, then drag it straight down.
Lining up Front / Side View Figures On a Base
First you need to put the base in position on the fold line. I use a rectangular base. You can draw a rectangle with a horizontal line across the middle or use the one on this page. Drag the rectangular base into position so the fold line is right across its middle. Next Select and Copy the front view. Drag it down into position on the base. Again, I like the feet of the figure to be two pixels above the fold line. If you're putting more than one figure on the base then paste a copy of the figure and drag it into position beside the first one (two pixels above the fold line). You should be able to fit two figures on the base without overlapping each other, but if you want a third figure on the base you will have some overlap. If you want a single figure on the base you will want to cut down the size of the base. Use the Pencil tool to white out the parts of the base that overlap the figures, and if necessary to correct any figure overlap. The next step is to put the reverse images in place. Start by Selecting the reverse side image and use the Image Flip/Rotate menu to rotate it 180 degrees. Copy it and drag it into place on the bottom of the base. You can line it up with the front side images by dragging it so the bottoms of the feet on both images overlap, correct the horizontal alignment, then drag it straight down so it's two pixels below the fold line. Repeat the process if you have multiple figures on the base. Finally, use the Pencil tool to white out any overlap.
Coloring Basics
The basic method of coloring figures is to simply use the Paint Bucket tool to paint the areas of your figure. The tricky part is getting the shades of color you want using the awful Paint color editor. You can customize the colors by using the Colors menu. Good luck with it, I find it frustrating to use. A shortcut is to browse through the figures on the Color Paper Soldier page to find the colors you want. You can then cut and paste a piece of the figure with the desired color into an empty spot on your figure page. The eyedropper can then be used to select the desired color for the Paint Bucket tool. Another useful tool is the palette Alex Kremer has created. You copy your figures into the center section. Then you can select colors from the color chart around the edges. When you're done painting trim off the color chart edges, or cut and paste your colored figures into a new file. The pencil tool can be used to color in very small details like buttons, stripes, and lace.
Advanced Coloring Techniques
You can get great results by using a more advanced image editing program and working with layers to create shadowing and noise. I don't know how to do that, however, so you're on your own if you want to go that route. I sometimes use a Gradient Fill feature in a photo editing program. Gradient Fill will create a nice shading effect which can be used for lustrous metal or shadowing. You set two colors - a light and dark shade of the same basic color. You can set the gradient so the lighter shade is in the center, or the top, or wherever is appropriate for the figure. Another tool I sometimes use is Blur. This tool is good for giving a grainy look to the base.
Once you're finished the figures are ready for printing and basing. Check out the How to Print and Base article in the last issue for some tips on how to do this.
Other sites with more information
PaperWorlds.com Great resource for paper accessories for tabletop miniatures gaming, wargaming, roleplaying and more. Also a good place to look for tutorials.
Cardboard Warriors website (users.skynet.be/gwindel/index.html) by Patrick Crusiau featuring a great how to article, and a bunch of excellent historical soldiers
Brabatini discussion group on Yahoo! Groups, about cardboard wargaming and sharing paper soldiers.
Illustrations


Back to Table of Contents -- Junior General Report # 5
Back to Junior General Report List of Issues
Back to MagWeb.com Magazine List
© Copyright 2004 by Matt Fritz.
This article appears in MagWeb.com (Magazine Web) on the Internet World Wide Web. Other articles covering military history and related topics are available at http://www.magweb.com