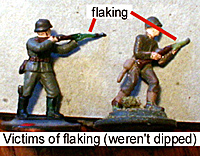
 Paint does not readily adhere to plastic figures. The paint will rapidly
flake off of your figures; especially parts that are flexible
like spears and rifles.
Paint does not readily adhere to plastic figures. The paint will rapidly
flake off of your figures; especially parts that are flexible
like spears and rifles.
I vividly remember painting my first bunch of figures -- a platoon of WWII American infantry. After their first taste of combat I was horrified to see the paint was already beginning to flake. I did some research and experimentation and found a method that seems to work well. Keeping paint on plastics is like curing hiccups; there are 100 different remedies.
Check out the Nick Grant's DBLCHM (http://www.geocities.com/dbplastic/) website for some other suggested methods and some good links.
 1. Clean - The figures must be cleaned with warm
soapy water. This is to eliminate the slippery stuff they put
on to get the figures out of the molds. You can do this in the
sink but I like to put mine on the top rack of the dishwasher.
The excessive heat from the drying cycle can melt plastic figures,
so be sure to turn it off and let the figures air-dry.
1. Clean - The figures must be cleaned with warm
soapy water. This is to eliminate the slippery stuff they put
on to get the figures out of the molds. You can do this in the
sink but I like to put mine on the top rack of the dishwasher.
The excessive heat from the drying cycle can melt plastic figures,
so be sure to turn it off and let the figures air-dry.
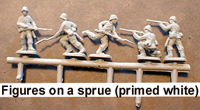
2. Cut and Assemble - Most of the time the figures are attached to the sprue at the head and base. I cut them free at the head but leave them attached at the base. Then I cut away the frame of the sprue leaving four or five figures attached to each sprue stick. It's much easier to handle and paint a stick of figures than to pick them up individually so I leave them on their sprues whenever I can. Cavalry figures need to be cut off the sprue so you can glue the riders onto the horses. Often the figures will require some assembly. Glue them together using rubber cement. I like to use paper flags to make standard bearers for my command stands so I generally cut the flags off the standard-bearer figures. If there are no standard bearer figures I usually make my own by selecting some suitable figures, removing their weapons, cutting up a paper clip to make a flag pole, and gluing it into the figures hands. I suggest cutting a small hole in the base to hold the bottom of the flag; this will help keep it in place.
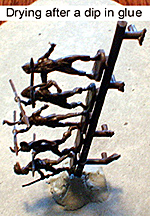 3. Dip in Glue - This step is messy but ESSENTIAL. The
idea is to dip the figures in glue. This will result in a clear
flexible skin over the figures. The paint will adhere nicely
to this surface. Mix up some Elmer's glue
and water (Elmer's glue is also known as PVA glue). I buy my
Elmer's glue in gallon containers, but a smaller squeeze bottle
will be enough for most projects. Pure glue will work fine, but
I like to water it down a little bit so it won't be too thick.
I don't have a standard recipe but I suggest about 80% glue to
20% water. Put the glue in a plastic container. I like to use
margarine containers because you can put the lid on it when you're
done and keep the stuff for later use. Prepare your work area
for dipping and drying - lots of paper towels, newspaper, and
clay (more about this later). I have a large plastic pan I use
to keep the figures in while they dry. Dip your figures in the
glue solution. Let the excess glue drip off, shake off the excess,
and blow gently to get rid of films that form between arms, legs,
etc. Set the figures aside to dry - if they are on sprues I stick
them vertically into small lumps of clay. If they have been cut
off then you can set them down on their bases. Continue dipping
until all the figures are done. Check the figures for drips and
drops; these usually form on the ends of rifles, spears, etc.
and should be wiped off before they dry.
3. Dip in Glue - This step is messy but ESSENTIAL. The
idea is to dip the figures in glue. This will result in a clear
flexible skin over the figures. The paint will adhere nicely
to this surface. Mix up some Elmer's glue
and water (Elmer's glue is also known as PVA glue). I buy my
Elmer's glue in gallon containers, but a smaller squeeze bottle
will be enough for most projects. Pure glue will work fine, but
I like to water it down a little bit so it won't be too thick.
I don't have a standard recipe but I suggest about 80% glue to
20% water. Put the glue in a plastic container. I like to use
margarine containers because you can put the lid on it when you're
done and keep the stuff for later use. Prepare your work area
for dipping and drying - lots of paper towels, newspaper, and
clay (more about this later). I have a large plastic pan I use
to keep the figures in while they dry. Dip your figures in the
glue solution. Let the excess glue drip off, shake off the excess,
and blow gently to get rid of films that form between arms, legs,
etc. Set the figures aside to dry - if they are on sprues I stick
them vertically into small lumps of clay. If they have been cut
off then you can set them down on their bases. Continue dipping
until all the figures are done. Check the figures for drips and
drops; these usually form on the ends of rifles, spears, etc.
and should be wiped off before they dry.
4. Prime - Your paint job will look much nicer if you prime the figures first. After the figures have dried you should prime them with white spray paint - I use Rustoleum flat white protective enamel.
5. Paint - I paint my figures using cheap acrylic paint from the arts & crafts store. The brand I favor is Folk Art, which come in 2 oz bottles and only cost about $1. Folk Art paints are quite thick, and I normally thin them with water when painting so 2 oz will last a long time. I always seem to be in a hurry, so I paint a bunch of figures at the same time, assembly line style. Get some skin tone and paint all the flesh, then do the uniforms, weapons, packs, etc. If I'm really in a hurry I simply paint over some details, like belts and straps.
6. Dip Again - When the figures are finished I dip them again in my glue solution.
7. Basing - Cut the figures off their sprues. I make my bases from Illustration Board, which is lightweight and cheap, but also sturdy. Generally I mount the figures two per stand. Infantry stands are 1.5" x 1" rectangles; cavalry are mounted on 1.5" square bases. I glue them to the bases using undiluted Elmer's glue. This is a good method because you can pull them off their bases later if you decide to use a different base size. I simply paint my bases green or brown rather than using static grass or flocking. When the figures are finished I print out paper flags and attach them to the standard bearers. You can find some great flags, and instructions on how to use them, at Ian Croxall's Warflag website (http://www.warflag.com).
Back to Table of Contents -- Junior General Report #1
Back to Junior General Report List of Issues
Back to MagWeb.com Magazine List
© Copyright 2002 by Matt Fritz.
This article appears in MagWeb.com (Magazine Web) on the Internet World Wide Web.
Other articles covering military history and related topics are available at http://www.magweb.com