 One of the more pleasurable aspects of playing De Bellis Antiquitatis (DBA) is that most armies are required to field a camp. This requirement provides an objective on the field of play. However, it also allows an artistic opportunity. DBA has very few rules regarding camps and no rules regarding their content. Many DBA players enjoy this freedom.
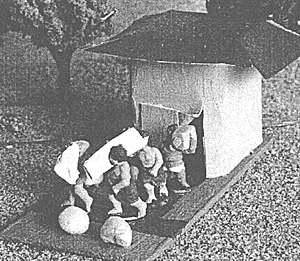
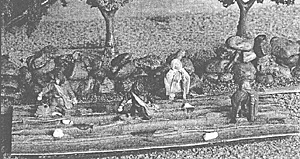
I have recently enjoyed it, myself. I've just completed a few camps and I am pleased with the results. Photographs of two of the camps accompany this article. One is a scene of sowers in a field; the other shows men leaving a tent carrying supplies. All figures are from Essex and were purchased at The Soldiery in Columbus.
When I purchased the sowers, I felt that they would best be displayed in a furrowed field. I pondered on how to create this look and eventually came up with an idea. I cut out a piece of corrugated paper and removed the top sheet. This left the corrugated part exposed. An unexpected bonus was parts of the top sheet remained attached to the corrugated paper. I thought about removing it, but noticed that it gave a grassy look. I decided to keep the "fluff."
Next, I took my painted figures and loosely placed them in the field. I played with their positions until I was satisfied. Their placement looks neither random nor ordered. I marked the final positions with a small amount of paint. I took a knife and made a small hole for each of the four figures. I then pushed the miniatures up from the bottom through the hole. This meant that the figures sat in the field -- not on top of it. Holding the figures and the paper upside down, I applied super glue to the bottom of the miniatures and Elmer's glue to the bottom of the corrugated paper. I laid a piece of card stock over the bottom of the corrugated paper and pressed and held for 30 seconds. I then gently flipped over the whole scene and placed in on a table to rest.
To finish the piece, I pounded some aquarium rocks with a hammer. I took some smaller pieces and glued them throughout the field to represent rocks and stones. I astly, I dotted the field with spots of brown and green paint to represent various types of ground. This was a very easy job and took less than an hour, not counting painting time. At the end, I was pleased with my efforts.
 My second project mostly dealt with the creation of a tent. I had purchased several figures carrying bags, boxes or rugs. I wanted to show the figures either as loading up something, like a cart, or taking items from a place. I could not find any vehicles or tents to use, so I decided to make a tent.
I had once seen a friend, Commodore Johnson, cut up 3"x5" cards to create buildings. This seemed a possibility, so I cut out a piece of card stock for my base. It measured 3"x1.5". These dimensions dictated the size of my tent. Each of the four sides would be 1" wide. The tent would be 1.5" tall. In addition, I wanted the tent to have a roof, and I wanted to have two of the sides overlapping. These last two additions would add stability. My final paper size would be 2.5" tall and 5" wide. I cut out several pieces of paper and choose the best. I bent the top of the paper and then the sides. After making some cuts to allow the top to lie down, I was able to assembe the piece into a tent.
I glued the overlapping ends and the top and held the paper for a few minutes to allow the glue to set. After I was sure that the glue would hold, I made a cut in one of the sides about an 1/8th" from the edge. I bent the paper at this cut. This would be the entry point into the tent. I then painted the tent and allowed it to dry. My tent was finished, but it seemed incomplete to me. The top didn't look right. I decided that I would cut out a second piece of paper and add it to the roof. I took this paper and painted it. After drying, I cut indents into the four comers. This would allow the four sides to be bent down independently. This completed the tent. I took the tent and added it to its base. I had previously painted the base green.
After the tent was secured to its base, I painted two intersecting brown lines. This wouk represent paths leading to the tent. The painted figures went on the base Lastly, I added several aquarium rocks to the camp. I like using these rocks -- they give a lifelike feel. I then created a second camp using this technique. I was please with my efforts.
Camps can add to the presentation of any DBA game. They are much easier and quicker to create than any DBA army. With just a little imagination and work, you can create a tiny masterpiece. I hope that this has inspired you to consider trying your hand at creating a camp or two.
Back to The Herald 53 Table of Contents
Back to The Herald List of Issues
Back to MagWeb Master Magazine List
© Copyright 2003 by HMGS-GL.
This article appears in MagWeb.com (Magazine Web) on the Internet World Wide Web. Other articles from military history and related magazines are available at http://www.magweb.com