 Shortly after discovering the wonderful world of miniatures gaining. I became somewhat obsessed with gaming terrain and accessories. My profession has allowed me to experiment with many materials that I would otherwise never have encountered . and I would like to share some of my accidents and discoveries with readers..
After experimenting with wood, plaster, and several types of styrofoam I prefer to use blue foam insulation for making terrain. The foam is extruded polystyrene that comes in 4' by 8' sheets of 1/2", 3/4", 1 ", 2", or 4" thickness. One inch foam is available at most lumber yards and at some stores such as Builders Square. DIY, Stambaughs, etc. It usually runs about $10 to $12 a sheet. The foam comes in two forms; the first is called scoreboard and has prescribed seams that allow it to be snapped for fitting between studs. The second form, which I prefer, is simply a solid sheet. If a sheet won't fit in your vehicle cut it to fit with a razor knife.
The following are lists of tools and materials that I use to make terrain.
Tools
- Razor/Hobby Knife
Hacksaw Blade
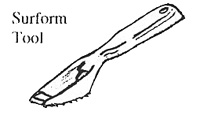
Surform Tool
Sand Paper 100-150 grit
1" Paint Brush
Materials
- Blue Foam Insulation
Artists Acrylic Putty or Paste
Artists Acrylic Paints
Artists Acrylic Matte Medium or Matte Varnish
Landscaping Flocking or "Fuzz"
I use a bare hacksaw blade to cut out the basic shape of the terrain. The loose blade will flex enough to cut out depressions in the foam. The greatest tool for shaping the foam is a Surform shaving tool. It gives the foam a coarse texture that looks good when you're finished. The Surform tool is available at most hardware stores. After I finish shaping the foam I sand it with 100 to 150 grit sandpaper. Foam drywall sanding blocks and mini orbital sanders work nicely. Don't worry about gougesor tears in the foam; the flocking will hide those.
To protect the terrain I paint on a mixture of putty and water (9 parts putty to 1 part water). Acrylic artists putty/paste or Woodland Scenics Flexpaste work well. Spackling compound doesn't take acrylic paint well and tends to crack, since, it is less flexible than the foam. While this step makes the terrain more durable. It is not absolutely necessary. My oldest scenery doesn't have this coat and is doing well at eight years of age.
After the putty is dry. paint the foam with a base coat corresponding to the finish of the terrain, i.e. green under grassy areas, yellow-brown under dirt roads, etc. I prefer artists acrylic paints, but most acrylic and latex paints will work fine. I've been told that some latex house paints will shrink enough when drying to warp the foam, but I haven't had that happen yet.
To finish the terrain I apply Woodland Scenics flocking or"fuzz" with artists acrylic matte medium or matte varnish. I prefer matte medium/varnish to white glue. White glue tends to run more and dries glossy under the fuzz. Matte medium also gives the foam an elastic protective coating. For green terrain I use Woodland Scenics green blend and burnt grass; For dirt roads and bare earth I use earth blend and yellow grass. These shades give an attractive variety of color to the scenery. Other shades are available for greater variety.
To apply the fuzz, paint a coat of matte medium on your terrain and spinkle the appropriate shades of fuzz over it. Note that you can only paint about one to two square feet at a time before the matte medium begins to dry. After "fuzzing" the terrain allow the fuzz to dry on the terrain. The drying time can vary from about 20 minutes to about 5 hours depending on the temperature, humidity, and thickness of the coating.
Start with a small piece of terrain and develop your own techniques. If you stumble upon ingenious ideas please share them with us.
Back to The Herald 1 Table of Contents
Back to The Herald List of Issues
Back to MagWeb Master Magazine List
© Copyright 1994 by HMGS-GL.
This article appears in MagWeb.com (Magazine Web) on the Internet World Wide Web. Other military history articles and gaming articles are available at http://www.magweb.com