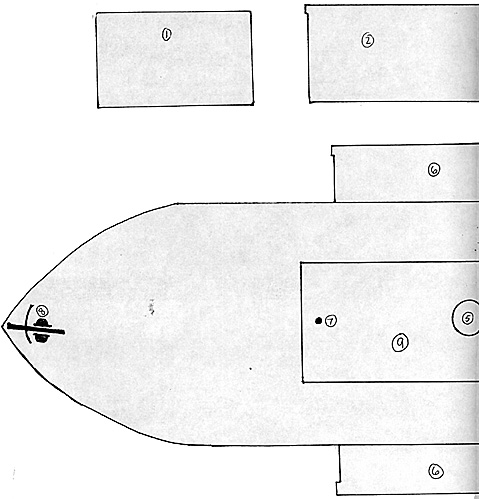
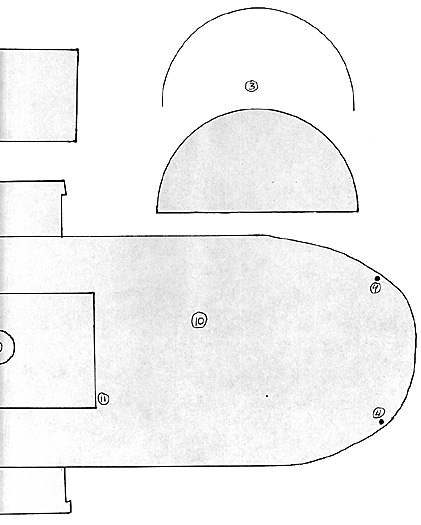
The numbers noted here correspond to the numbers on the foldout plan. It should be noted that the foldout plan can be made into a propeller driven boat by simply leaving off the sidewheels as it is drawn. If you construct the sidewheeler turn the deckhouse perpendicular to the deck rather than parallel as shown. As shown it is a better design without the sidewheels.
List of materials:
1 - 3/16' or 1/4' by 4' by 36' sheet of balsa
1 - 1/8' by 1 1/2 or 2' by 36' sheet of balsa
1 - 100mm by 15mm plastic tube
1 - plastic container from #33 3M electric tape
1 - 1/16' by 36' wood dowel or
3 - 1/16' by 12' plastic tubing
1 - package of HO scale 2 by 12s
1 - roll of scale nautical modelling rope
Various extras from The Richard Houston Collection of Colonial Naval parts and pieces
The first step is to trace on to the 3/16 or 1/4 inch sheet of balsa the ship outline (#10) and make two. The second could be slightly longer than the first. When both are glued together they can be sanded to give the deck some height or depth to it. The larger piece will be the top of the lower deck. When the two sheets are glued together, to prevent warping, weight the two pieces down with at least 15 pounds distributed equally across the balsa for at least 24 hours.
While that is drying take the inner 3M tape cannister and cut it carefully and slowly in half. The inner piece is used because it has a lip that you will later glue strips of balsa to. If a tape cannister is not available, I had mine for about 20 years, you will need to cut out a piece of thick balsa to match the dimensions on the drawing (#s 3 and 6).
With the cannister cut out, cut a piece of balsa to fit inside the cut cannister to give it stability and strength. Draw a centerline from the center bottom to the top of each half with a pencil or better yet scratch gently the centerline. Then taking the 2 by 12 scale lumber cut them slightly longer for the flat side and to fit the outside curve for both sides of the sidewheeler. Keep the pieces of balsa in order as the next step will have to move quickly. Cover the flat and outside curve of the cut cannister with epoxy, then using the centerline line up and put your scale lumber in place on the flat side. Then on the outside curve place the pieces against the lip as tightly as possible. All these pieces should be as tight together as possible.
Once the epoxy is dry, trim where necessary. The inner piece of basla could now be epoxied into place. Whether you use the plastic electric tape cannister or balsa block each should be covered with balsa strips to make it 'look right'. A decorative piece could now be applied to the flat side of the wheel, a square, triangular or round opening would be appropriate centered on the flat side. The inside should be painted black after painting the boat.
Next measure and cut the deckhouse (9,1, and 2) using the drawing as a guide for your measurements. For a sidewheeler place the deckhouse across the deck between the wheels. Cut a hole for the stack. For a propeller driven ship the deckhouse can be placed as in the drawing. When you are ready to glue the deckhouse in place take care not to let the glue get outside the structure or it will interfere with your painting of the deck. With the deckhouse in place set the stack and cut the opening. You can use a plastic or brass pipe as dimensioned above or if you have a model steamer use that stack. Glue in place both to the deck and the deckhouse.
I had a wide plastic window to place in the front wall, use what you like for the windows. Make sure you use something for windows to make it look right.
Next, place the sidewheels on either side of the deckhouse and glue in place with epoxy. With the deckhouse and wheels in place, cut the dowel to eight pieces of three and a half inch lengths. Then cut four pieces four and 1/4 inches long. Drill four holes through the deck along each side of the boat, evenly spaced, aft of the deckhouse, then drill four holes along the centerline, evenly spaced, aft of the deckhouse. Making sure that all the holes line up. Put the short dowels along the outside and the 4 1/4 inch dowels down the center placing a drop of glue into each hole. Make sure that you put the boat onto something like waxpaper to keep yourself from gluing the boat to the table, like I almost did. Remember to leave enough room for the davits and rowboat. Cut three pieces of dowel to fit along the tops of each row of dowels. This will provide support for the awning, glue into place with epoxy for strength. Let dry 24 hours.
Place the davits (4) in pre-drilled holes and any other 'extras' but not the guns.
A ladder (11) to the top of and aft of the deckhouse is a necessity, off to one side. Next I placed two bulkhead doors on either side of the deckhouse on the opposite side from the ladder making a 'pass through'.
Lastly, I added a bulkhead deck hatch aft of the gun position, forward of the deckhouse on the same side as the ladder. I cut a piece of balsa the same size as the hatch to give it extra height and painted the top side of the balsa black, then painted the hatch white and glued it in the open position. I then cut one of the crew with shells in half at the waist, painted it and glued it in the open hatch passing up ammo to the forward gun.
The last extra would be to place protective siding along the top of the deckhouse. If you have any 'sand bags' place them foreward around the gun (8) forming a V.
Paint the boat white with several coats detailing as you wish before placing other extras (guns). Cover as much of the boat with easily removeable strips of paper towels, or better newspaper. Take a kleenex tissue, it does not matter what brand as long as it has no aloe or other ingredients like that in it, place it over the dowels with the center fold over the center dowels. Now comes the tough part. Cut the tissue so that it over laps all edges about 1/4 to 3/8 inches, this will help form a wrap-around bond for the awning. Using a spray bottle with a mixture of 75/25 white glue to water and spray the tissue in place, lightly, with an even spray, no jet, get it all wet, but not soaking. While wet gently fold the overlap edges under making contact with the underside of the awning, this will keep the awning in place once dry. Remove the newspaper spray protective deck strips. Let awning dry, making sure that the ends do not move from the dowels or let detach from the fold and droop down between the dowels, you want the tissue tight.
Let tissue dry 24 hours. Then you can paint the tissue, very gently, with either white, linen, muslin, or canvas color.
Assemble and paint the guns, when dry place them on the sidewheeler (7 and 8) and glue into place. For a deck railing I used white thread and super glued it from the davit to the deckhouse on each side, but not between the davits. I used two rows evenly spaced at 1cm and 1.5cm. When the super glue dried I painted the thread with straight white glue. When that was dry I painted it white and detailed it with a light brown wash.
While the awning and railing makes it difficult to place troops on deck it makes the sidewheeler look so much better I'm glad I did it. I did not place any protective siding on the boat as I also plan to use it as a French, German and Belgian sidewheeler as soon as the troops are available. I set aside about 2/3s of all the Houston's naval troops I have, reshaping the caps as necessary and will paint them up as both French and German sailors. I have yet to find an illustration of a German paddlewheeler river craft but suspect that they might be purchasing British craft. The two French boat illustrated, see below, will fit nicely into what I have constructed with this craft.
If anyone has an illustration or information on German colonial riverboats I would appreciate either a copy or an article. As you can see with Giglio's Old Glory review figures will soon be available. Along with Foundry's Darkest Africa natives and Askaris, as well as Strategem's Askaris (which are German by design) will give a very nice assortment of larger 25mm figures.


Back to The Heliograph #108 Table of Contents
Back to The Heliograph List of Issues
Back to Master Magazine List
© Copyright 1998 by Richard Brooks.
This article appears in MagWeb (Magazine Web) on the Internet World Wide Web.
Other military history articles and gaming articles are available at http://www.magweb.com