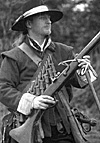
 Al Slater is a member of Col Edward Montague's Regt. of Foot, English Civil War Society. The following is extracted from his excellent guide for Reenactment musketeers. It combines C17th material with the experience of modern practise and is to be commended to any musketeers out there. For those wanting more, his website address is: http://www.btinternet.com/-al.slater
/musket/index.htm
Training
This section covers the basic drill needed for the safe loading and firing of a musket.. It is not intended to be a comprehensive drill book. It is assumed that the basic drill and dressings are already known.
1. The drill positions used by the musket block.
2. The procedures for loading and firing a musket.
3. Misfires
4. Clubbing musket safely.
Drill
These are the basic positions for the musket and are similar to those also used by the pike this is a explanation as to how they are used in the musket block.
"Order your Piece"
Stand with your right foot forward of the left foot. The Musket held upright with the Butt placed to the outside of the right foot and held about a foot down from the muzzle with the right hand. The trigger guard should be facing to the front and the barrel should be against the palm of your hand. Your left hand should be placed on the left hip or the hilt of your sword if carried.
"Shoulder your Piece"
Again standing with the right foot forward of the left foot. The Musket should be balanced on the left shoulder held on the butt just behind the rear of the barrel with the left hand. Care must be taken not to allow the muzzle to drop and point at the face of the musketeer behind you. This is the usual way of carrying the Musket when unloaded and on the march.
"Port your Piece"
Again with the right foot forward of the left foot. The Musket should be held across the body right hip to left shoulder with the muzzle pointing upwards on the left hand side. This puts the muzzle well above the musketeer to your left and reduces the chances of injury if the musket discharges accidentally. Make regular check to see that it stays there. This is the posture you will use to signify when loaded and is the safest way to carry the musket when moving when loaded.
Loading and Firing a Musket
At all times you must remember that the musket YOU are using is a firearm and that the purpose for which Firearms were invented was to kill people, a job that the muskets we use can do just as well if used in a careless or dangerous manner as the modern SA80 that is used by the British Army to day. Never point a musket directly at any one. Never fire at any one closer to you than 15 meters (20 meters for cavalry), and always be aware of where the muzzle is pointing.
Loading
There are variations on this, but these are the MINIMUM procedures for safe use.
"Make Ready"
This is the order you will hear most when on the battlefield. It is the condensed and simplified version of what is to follow. When this command is given you must follow it up to the second part of this section.
These commands or a variation of them are what you will tend to use at drill displays and living histories and will show why they are condensed into the command given above. At all times when loading care must be taken not to allow the muzzle to drop and point at the head of the musketeer to your left.
"Open your Pan"
Hold the musket in the Port position balanced in your left hand. The Match should also be in this hand, making sure that the lit end is well away from your hand and anywhere else that it may damage. With your right hand open the Pan Cover.
"Clean your Pan"
Using the little finger on your right hand clean any deposits left by the previous shot or, if this is the first shot, any oil left from the last cleaning.
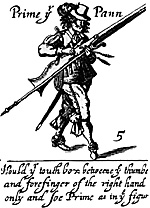 "Prime your Pan"
If using cartridge take out a cartridge using your right hand, bite off the end and spit it out then pour a little powder in to the priming pan. If using Bandoliers take up the Priming flask in your right hand and pour a little in to the pan, return the Priming flask to it's place.
"Shut or Close your Pan"
As it says - close the pan cover.
"Cast off Loose powder"
The musket should be turned so that the lock and pan are angled towards the ground and the stock should be tapped on the back to remove loose powder.
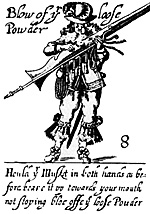 "Blow off Loose powder"
The musket should then be lifted to just below the chin and two or three quick "blows" given to remove any remaining powder grains. Taking care to ensure that the pan is angled away from your face so that if it does fire the flare will be away from you.
"Cast about your Piece to your left hand"
The Musket should still be held in the left hand with the match, allow the Butt to swing down to your left hand side but it should not be placed on the ground. You must ensure that the muzzle is pointing away from yourself or other members of the block. The musket should be upside down with the pan pointing downwards.
"Search out your Charge"
The next three commands tend to be used when using bandoliers. Find the next full bottle on the bandoliers.
"Handle your Charge"
Take the next full bottle of powder on the belt and lift it clear of the rest.
"Open your Charge"
Again this command needs little explanation.
"Charge your Musket with powder"
If using cartridge pour the powder that is left in the cartridge down the barrel. If using bandoliers pour the powder down the barrel from the full bottle.
"Charge your Musket with ball"
This command is optional but if you have the musketeers mime putting the ball down the barrel it can look quite effective at living histories and drill displays. As a precaution do not carry any balls that will fit down the barrel, just in case.
"Wad your piece"
Take a piece of paper or one page of cheap romantic fiction from your pouch or, the remainder of the cartridge and put it in the end of the barrel. Make sure that you don't screw it up too tightly as it is surprising how far it will fly and)ust how much damage it will do to someone if it hits them.
"Handle your Scouring Stick"
Using fingertips only, just in case of premature ignition, grip the scouring stick sometimes called the Ram Rod and pull the first three inches from it's slot in the underside of the stock. Never put your hand over the end unless you are into body piercing.
"Take out your Scouring Stick"
Pull the scouring stick the rest of the way from under the stock and hold it near the middle forward of the barrel but in line with it.
"Reverse and shorten to a hand"
Turn the ram rod through 180 degrees and place the end against your chest. Slide your hand down towards your chest leaving about 4 inches between your hand and your chest.
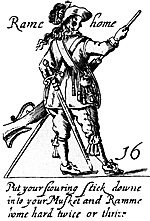 "Ram home your Charge"
Using fingertips only put the short end into the barrel and push the wad down onto the powder, once the wad is on the powder give it three firm taps to make everything secure. If you do this with a tight wad every time you will feel a recoil and you will know that your musket has fired.
"Remove your Scouring Stick"
Take the scouring stick from the muzzle and hold it near the middle forward of the barrel but in line with it.
"Reverse and shorten to a length"
Turn the ram rod through 180 degrees and place the end against your chest. Slide your hand down towards your chest leaving about 9 inches between your hand and your chest.
"Put back your Scouring Stick"
Return the Ramrod to its place belov the barrel.
"Give rest to your Piece"
Return the musket to the Port position.
You are now loaded and ready to fire. Again the orders you will be given differ as to the type of event you are taking part in. On the battlefield your sergeant or the ranks right hand marker will tell you when to put your match into the serpent, usually when your rank is the one behind the one firing.
"Cock your Match"
With the musket still in the Port position, place the lit end of your match in the fork like opening in the serpent and adjust the fit so that it grips the match firmly but not too tightly, you don't want it to fall out at an inopportune moment. As you gain in experience you will notice that the matchcord has a natural curve or bend to it and if you place the match so that the bend angles down to wards the pan the next step will be easier. Keep hold of the unlit end with your left hand leaving enough slack for the serpent to pivot freely. This stops the match from falling to the ground if blown out of the serpent when firing.
"Try your Match"
Making sure that the pan cover is closed, carefully pivot the serpent and match back to check that it falls in the centre of the pan when the trigger is pulled if it doesn't adjust and try again until it does. This is the reason you were so careful to ensure that there was no loose powder left in the pan area or on the pan cover.
"Guard your Pan"
Place your right hand over the top of the pan to prevent any sparks from the match falling onto the pan cover. Some muskets have a moulded cover handle to make this easier.
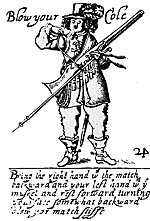 "Blow off your Coals"
With the match in the serpent, lift the musket so that the serpent is just below your face but angled away from you so that if it does go off the flare from the touch hole is away from you. Carefully blow on the lit end of the match to ensure that it is glowing brightly and has formed a sharp point or cone with no loose bits or ash on the end. Take care: if you have a loose pan cover it may now blow off and injure your face.
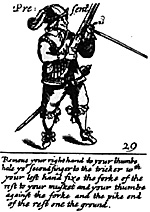 "Present your Piece"
Stand with the left foot 18 inches forward of and at a slight angle to the right foot. The Musket should be lifted up to the firing position with the Butt tight against the right shoulder and balanced in the left hand, leaving your right hand free to carry out the next steps in the firing procedure. NOTE at all times you- should aim above the heads of anybody in front of you. You must also be aware of any one moving into your field of fire from the left and right-hand sides.
"Prepare to give fire"
This command has four separate actions:
1. With your right hand open the pan cover.
2. Move your right hand back and place you right forefinger on the trigger.
3. With your left forefinger check that the ramrod is where it belongs under the barrel.
4. Check visually that no one has wandered in front of you within the 15 meter no fire zone. Steps one and three can be done simultaneously.
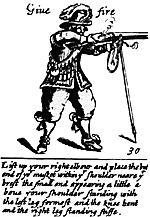 "Give Fire"
Firmly pull the trigger with your right forefinger, this lowers the match into the priming powder igniting it which will, in turn, ignite the main charge firing the musket. Once you have done this and the priming has ignited there is nothing you can do to stop the musket going off, so if there is any doubt as to whether it is safe to fire DON'T, it is better to hold your fire than risk the smallest chance of causing an injury to anyone. Could you sleep if you blew someone's face off?
"Dismount"
Once you have fired wait until your officer shouts this command before you move, then lower the musket from the present back to the port and step back to your place. Sometimes different manoeuvres put the other ranks into kneeling or stooping positions as well as standing to fire a volley. Don't move until you are told to this gives him chance to check that everyone who is going to fire has done so and that there are no misfires. If you do have a misfire shout misfire and make sure that the person in command knows you have a misfire.
Misfires
There are three basic types of misfire and all of them are potentially dangerous.
"Flash In The Pan"
This is by far the most common misfire. What this type of misfire involves is the priming in the pan ignites but for some reason the main charge fails to detonate. This can be caused by a number of reasons, too little powder in the pan, too course a grade of powder used for priming, or a blocked touch hole to name the three most common. The way to clear this is to, after getting permission to leave the body, allow a minute to ensure that is not going to fire then carefully, using your pricker and a gloved hand, prick the touch hole to ensure that it is clear. Re-prime the pan (using a teaspoon not a full priming flask) with a suitable amount or grade of powder. If all goes well when you repeat the firing procedure the musket should fire. If it falls to fire repeat the procedure. If it again fails to fire you may have the second most common type of misfire.
Blockage
This is where the musket is completely blocked and no amount of pricking and re priming will get it to go. This is often caused by too little powder in the barrel causing the wadding to obstruct the touch hole. If you get this type there is nothing you can do about it on the battlefield, apart from pouring water down the barrel in hopes that down the barrel in hopes that it will reach the charge to prevent it going off. Don't trust this too far as a good tight wad can be practically watertight. To clear it properly you will have to wait until you get back to the camp-site where you will have to "worm out" the charge.
Worming out involves the use of the cork screw like implement you should find in your cleaning kit. After attaching the worm to the end of the cleaning rod, carefully push the tool down the barrel until you feel it hit the charge then slowly turn the worm clockwise whilst pressing down so that, like a cork screw, it screws into the wadding. Once you feel you have a good grip on the wadding gently pull it out of the barrel. Repeat this until you get no more paper out then clean the gun in the normal way.
N.B. Be careful not turn the cleaning rod anti-clockwise as you may unscrew the worm and get this stuck down the barrel as well! If you do manage to do this ask your musket officer or an experienced musketeer to help you.
Hang Fire
The last, and thankfully the rarest, type of misfire is the "Hang Fire". This is where the powder in the priming pan, for some reason, fails to ignite explosively and instead, just smoulders for few seconds, then fires.
If you can see a glow in the pan and maybe a few embers then you probably have a hang fire. The length of time you have to wait is very hard to predict but I personally have had one that lasted almost thirty seconds. All you can do when you have a hang fire is wait in the 'Present' position and hope it will fire eventually. The average time is only about ten seconds. Unfortunately it is very hard to recognise a hang fire and, until you have had one, they are very hard to describe.
If you are not sure as to if you have fired or not then if you move your musket gently up and down you should get smoke both from the muzzle AND the touch hole. This only happens when the barrel is clear and there is nothing to stop the flow of air through it.
Competency Test Guidelines Basic Drill Commands:
Knows the basic drill commands and dressings understands the difference between the ranks and files.
Musket Block Drill Commands:
Knows the drill commands specifically used by the musket block in the loading and firing of musket.
Basic Firearms Safety:
Understands that a musket is a firearm and comes under the laws of the land regarding Firearms there use and storage. Is aware or the muskets proof marks and their meaning. That a musket is a potentially lethal weapon if used under the influence of drugs or alcohol or in any other unsafe manner. Understands the meaning of "Proof Marks" and where to find them
Safe Musket Firing Procedure:
Knows how to use the lock on the musket correctly and the minimum safe distance (15 meters for infantry and 20 meters for cavalry) at which it is safe to fire the musket at any other body.
Safe Misfire Procedure:
Knows the difference between a misfire and a hangfire and is able to signify a misfire to the officer supervising the block. Can clear or make safe the piece in a safe manner.
Back to English Civil War Times No. 54 Table of Contents
Back to English Civil War Times List of Issues
Back to Master Magazine List
© Copyright 1998 by Partizan Press
This article appears in MagWeb (Magazine Web) on the Internet World Wide Web.
Other military history articles and gaming articles are available at http://www.magweb.com