
The last Turkish attempt to break though across the Sinai to the Suez Canal was halted in August of 1916 at Romani. There, the ANZAC Mounted Division, recently returned from Gallipoli and reunited with its mounts, turned back the attack of the Turkish 3rd Division. (In all fairness, the British 42nd and 52nd Infantry Divisions arrived during the course of the battle, but the ANZACs carried the load.) With the Turks halted, the stage was set for the British advance toward Palestine.
The key to any advance by either side was the possession of the various water points that were scattered across the desert. While most of these water points could supply a divisional-sized unit for a short time, few could support a major offensive. To compensate, the British plans included a freshwater pipeline as well as railroad to support their advance. However, neither could be built forward until the Turkish units in the area were driven off.
In a campaign reminiscent of the later island hopping campaigns of WWII, the British found that they would have to leap forward to capture a point, then build their supply line forward, and then repeat the process. Each attacking force was limited by the water it could carry with it, so the British commanders found themselves working under a deadline. The Turkish posts would have to be captured as soon as possible, or the attackers would risk being caught in front of an enemy position short of water.
To facilitate the march across the desert, General Murray, the British Commander in Egypt at the time, created two formations. The first was the Imperial Camel Corps, a force of infantry mounted on camels recruited from his British, New Zealand, and Australian formations. Murray felt that this formation would give him the needed mobility to cross the Sinai. In addition, the "Desert Column" was organized and given to the command of Lieutenant General Philip Chetwode. Chetwode had served in South Africa and commanded the 5th Cavalry Brigade in the 1914 Campaign. An extremely competent commander, he nevertheless had to adjust to his new command. The Australian Official History records that, after one of his first visits to the ANZACs, accompanied by an escort of British soldiers picked for their bearing, dress, and horsemanship, he wrote their commander, Major General Chauvel that "Not only do your men fail to salute me when I ride though your camps, but they laugh aloud at my orderlies." It would take the actions at Magdhaba and Rafa to show Chetwode the type of men he was now commanding.
In mid-December, 1916, the Desert Column moved forward to attack the Turkish forward positions at the small coastal village of El Arish. On arrival there on December 21, it was found that Turkish forces, fearing the British Navy, had fallen back. However, the post at Magdhaba, 23 miles inland, still remained in Turkish hands and blocked the advance toward Gaza and Palestine. Accordingly, Chetwode ordered the ANZAC Mounted Division to proceed on to Magdhaba to carry that point and secure the wells there.
The problem with the planned attack was that there existed no reserve of water for the attacking troops. The force would move by night to Magdhaba, attack that morning, and hopefully carry the Turkish positions as quickly as possible. If the attack was unsuccessful and the Turkish positions not carried by late afternoon, the force would be forced to fall back on El Arish.
Thus, on the morning of December 23, the Desert Column closed up to Magdhaba, and prepared to attack the Turkish positions there:
ANZAC Mounted Division
Veteran, Morale: 10
Divisional Headquarters, with:
1 mounted command stand
1 recon mounted infantry stand
2 Light Horse Brigades, each with:
- Brigade Headquarters, with:
- 1 mounted command stand
1 recon mounted infantry stand
Brigade Machinegun Squadron, with:
- 1 mounted command stand
3 mounted machinegun stands (2 dice)
3 Light Horse Regiments, each with:
- Regimental Headquarters, with:
- 1 mounted command stand
3 Squadrons, each with:
- 1 command mounted infantry stand
1 mounted infantry stand
New Zealand Mounted Rifle Brigade, with:
- Brigade Headquarters, with:
- 1 mounted command stand
1 recon mounted infantry stand
Brigade Machinegun Squadron, with:
- 1 mounted command stand
3 mounted machinegun stands (2 dice)
3 Mounted Rifle Regiments, each with:
- Regimental Headquarters, with:
- 1 mounted command stand
3 Squadrons, each with:
- 1 command mounted infantry stand
1 mounted infantry stand
IV (Territorial Forces) Brigade, RHA, with: Experienced, Morale: 10
- 2 Batteries, each with:
- 1 command stand
1 horse artillery limber
1 gun crew stand
1 13# field gun
Notes
1. The 1st Light Horse Brigade has the 1st, 2nd, and 3rd Light Horse Regiments. The 3rd Light Horse Brigade has the 8th, 9th, and 10th Light Horse Regiments.
2. The New Zealand Mounted Rifle Brigades has the Auckland, Canterbury, and Wellington Mounted Rifle Regiments.
3. The two Territorial RHA batteries are the Inverness and Somerset Batteries. Apply the RHA to fire HE, using the weapons information for the 13# AA.
4. The organization of the ANZAC Light Horse/Mounted Rifle Regiments takes in account the need for horseholders, as well as low strength of these units in this action.
5. The stands of the ANZAC Division can move while mounted on the board. Dismounting takes a half turn. While moving on the board, the Turks do not get the +1 small arms modifier for firing at a mounted unit if the ANZAC stands are at long range.
Imperial Camel Brigade
HQ, 2nd Battalion, MG Squadron: Regular, Morale: 9
1st and 3rd Battalions: Experienced, Morale: 10
Brigade Headquarters, with: 1 command stand and 1 recon infantry stand
Machinegun Company, with: 1 command stand and 3 machinegun stands (2 dice)
3 Mounted Camel Battalions, each with:
- Battalion Headquarters, with: 1 command stand
4 Companies, each with: 1 command infantry stand and 2 infantry stands
Hong Kong and Singapore Mountain Battery, with: Veteran, Morale: 10
- 1 command stand
2 pack mule stands
1 gun crew stand
1 3.7" mountain howitzer
Notes
1. The 1st and 3rd Battalions were formed from Australian and New Zealand units. The 2nd Battalion and Machinegun Companies were formed from British garrison troops.
2. The Camel Battalion is considered to have dismounted off-board, and the camel escort is built into the organizations listed above. The camels were used to bring the troops to the battlefield, after which the troops were to fight on foot.
3. The Imperial Camel Brigade is considered as part of the ANZAC Mounted Division for purposes of command.
ANZAC SETUP
The Divisional HQ, all artillery units, and the Imperial Camel Brigade enter at Entry Zone A starting at 0800. The mounted brigades may enter the board under the following conditions. The commander of the ANZAC Division will determine the arrival points of his remaining brigades subject to the following (all plans must be made prior to the start of the game):
AT Entry Point A: One brigade may arrive every other turn after the 0800 turn. One brigade can enter there at 0830, a second at 0900, the third at 0930.
AT Entry Point B: One or more brigades may be ordered to arrive at Entry Point B. Starting at 0900, roll 1D6. On a roll of 6, the first brigade assigned to arrive there will arrive on the following turn. Add i to the die roll for every turn after 0900. However, a roll of 1 is never modified. Additional brigades can be ordered to enter here, and each will do so two turns after the arrival of the preceding brigade.
AT Entry Point C: One or more brigades may be ordered to arrive at Entry Point C. Starting at 1100, roll 1D6.On a roll of 6, the firstbrigade assigned to arrive there will arrive on the following turn. Add 1 to the die roll for every turn after 1100. However, a roll of 1 is never modified. Additional brigades can be ordered to enter here, and each will do so two turns after the arrival of the preceding brigade.
Stationed at Magdhaba were the following Turkish forces:
80th Infantry Regiment, with: Experienced, Morale: 9
- Regimental Headquarters, with:
- 1 command stand
1 staff stand
1 recon infantry stand
1 engineer stand
1 machinegun stand (ds) (3 dice)
2nd and 3rd Infantry Battalions, each with:
- Battalion Headquarters, with:
- 1 command stand
1 machinegun stand (ds) (3 dice)
2 Companies, each with:
- 1 command infantry stand
2 infantry stands
2 Companies, each with: 2 infantry stands
Attached Units:
- Mountain Battery, with: Veteran, Morale: 9
- 1 command stand
3 pack mule stands
1 gun crew stand (ds)
1 75mm Krupp mountain gun
Cavalry Squadron, with: Experienced, Morale: 9
- 1 command cavalry stand
1 cavalry stand
Rifle Battalion, with: Trained, Morale: 6
- Battalion Headquarters, with:
- 1 command stand
3 Companies, each with: 2 infantry stands
Notes
1. The elements of the Rifle Battalion present appear to have been Arab, and they departed the battlefield as soon as possible.
2. The Turkish Mountain Battery has two tons of ammunition present.
TURKISH SETUP
The Turkish position consisted of five redoubts, as well as a fortified area about the village. Each area is considered for game purposes as a ring of entrenchments. A weapons pit for the mountain guns exists within the village redoubt.
Turkish stands should be divided up and may be placed as wished, provided that not more than nine stands are placed in any one numbered redoubt, and not more than 12 stands in the village.
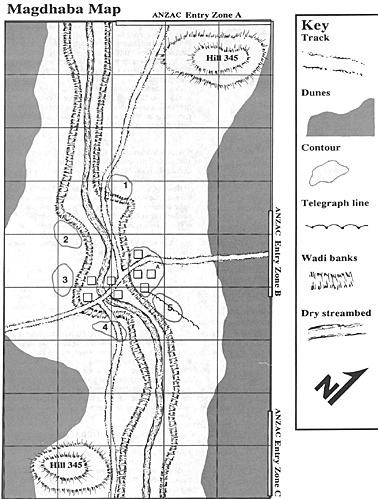 TERRAIN
The wadi banks should be considered as rough terrain for purposes of movement. The streambed was dry, and the bottom of the wadi is considered as open. Only stands on the edge of the wadi may see into it. Note that the Turkish redoubts are placed so that they can fire at troops moving along it.
The dunes are also considered as rough terrain for movement, and function as cover. Visibility into or out of the dunes/to the outside, or within the dunes themselves, is limited to six inches.
The buildings in the village should be considered as wooden for game purposes.
Due to the fact that Australian and British aircraft were over the area for most of thebattle, all Turkish movements along the wadi and from redoubt to redoubt should be done on the table. The ANZAC commander knew what was happening throughout the battle as far as the movement of Turkish forces was concerned.
VICTORY
Victory is determined by control of Magdhaba at the end of of the 1645 turn, which was roughly the time of the end of the day. Capture of that point is an ANZAC victory, failure by the ANZACs counts as a Turkish victory.
However, starting at the end of the 1400 turn, and each hour thereafter, the ANZAC player must check for a recall order. If he has failed at that time to have captured from the Turks the following number of redoubts for that turn, the attack is called off and the ANZACs must retreat. To have captured a redoubt, all Turkish stands within it must be either driven out or in a failed morale state, and at least two ANZAC stands in Good morale must be present. The levels of control needed are as follows:
1400-Must physically control at least one Turkish redoubt.
1500-Must physically control at least two Turkish redoubts.
1600-Must physically control at least four Turkish redoubts.
HISTORICAL NOTE
The ANZAC Mounted Division captured Magdhaba in a nearrun action. The recall order was issued at 1400, but not followed as the first of the Turkish redoubts fell at the same time. A minor diplomatic flap was caused when the French Military Attache, Captain Count St. Quentin, visited the battlefield and was seized by the Light Horse and thrown in with the Turkish prisoners. However, the Turkish post at Magdhaba had fallen, and was replaced by a British one. The first steps for the conquest of Palestine had been made.
BIBLIOGRAPHY
MacMunn, Sir George and Cyril Falls, Military Operations Egypt & Palestine. Volume I, London, 1928.
Gullett, H. S., The Australian Imperial Force in Sinai and Palestine, 1914-1918, Reprint, University of Queensland Press, 1984.
Back to Table of Contents -- Command Post Quarterly # 5
To Command Post Quarterly List of Issues
To MagWeb Master Magazine List
© Copyright 1994 by Greg Novak.
This article appears in MagWeb (Magazine Web) on the Internet World Wide Web.
Other military history articles and gaming articles are available at http://www.magweb.com