S-3 (OPERATIONS) this issue is offering a different scenario - one for OTT. Thanks is due to the Canadian Wargamers' Journal for permission to reprint the following article.
In April of 1917, the British and French planned a major offensive at Arras. Dominating the center of the battle area was a large whale-back hill called Vimy Ridge. The task of securing the battle area was given to four Canadian Divisions who were fighting for the first time under a unified Canadian command. Commanding the Canadian Corps was a former pharmacist from Victoria, BC., Aurthur Currie.
Currie took three steps to ensure victory at Vimy, all of which were considered unorthodox by his British superiors.
- First, he built a replica of the battlefield and had all officers and even NCO's practice their attacks on it for weeks before the attack.
Second, instead of the customary week long preliminary bombardment, on the morning of the attack 1,000 guns would open a highly concentrated barrage on the German front line. At pre-arranged times the barrage would jump forward and the infantry would follow.
Finally, the first wave of infantry were not expected to break the German line. Instead they would achieve a pre-planned objective, and "dig-in" in anticipation of a German counterattack. The second wave would "leapfrog" over the first wave, and dig in at their objective. The third wave would then pass through the other waves and break the German lines.
On the morning of April 9th the attack was launched. The 1st, 2nd, and 3rd Canadian Divisions reached their objectives by noon, by the 4th Division on the far left of the Canadian front was bogged down. The 4th had the farthest to travel to reach the German lines, and much of the ground that it needed to cover was swampy. The German second line of trenches was untouched by the artillery barrage (The Divisional CO had requested that it be untouched so as to give his troops some cover when they reached.)
Due to the slow going, the barrage barrage moved out ahead of the Canadians, and the 2nd trench line became the major defensive bastion for the Germans.
This scenario recreates the attack of the 4tb Canadian Division on Vimy Ridge. It may be played solitaire, or against an opponent.
FACE TO FACE PLAY
The German player starts by placing his units and recording on paper their locations. All machine guns are in bunkers, all other stands are in trenches.
The Canadian Player organized his command into waves, with at least two, and no more than four. Units in a wave can be from different brigades, but should be assigned by battalion. He notes the entry location for all attacking units in the each wave, as well as their objective. One battalion per brigade may be held out as a reserve. Reserve battalions may be committed to the game at any t me, but may only enter the table at a location already used by another battalion of their brigade. Reserve units are not assigned an objective until they enter the table.
All first wave units enter on turn one, and will move until they reach their objective and emplace. At the that time, the second wave enters, and repeats the process, after which the third wave arrives, etc. Note that once units reach their objective they must stop their advance.
On the first turn of the game the Canadian artillery barrage bits. The German player rolls a D10 for each stand in his forces, with a 1-6 eliminating infantry stands, and a 1-3 eliminating command and machine gun stands. The German player does not check morale after the barrage hits.
PLAYING SOLITAIRE
In the solo version, you play the part of the Canadians, while the dice control the Germans. The Canadian player makes the same plan as before, ie sets out his waves and objectives, but there is no Canadian barrage.
Instead, each time a Canadian unit advances to with 12" of a German trench section, roll 2d6 and check the SOLITAIRE CHART. As each German trench is 6" there are six trench sections which must be rolled for as Canadian troops move to within 12". Any German units which appear due to the die roll are placed in that trench section and may riot voluntarily move once placed. In addition, the "Pimple" and Hill 145 must be tested as well. Once a trench section, the Pimple, or Hill 145 are checked for, they are not checked again.
German stands will always fire at closest target. The Germans are not allowed more than 12 companies of infantry, 4 battalion command stands, and 5 machine gun stands. Treat a roll in excess of these numbers as "no German units".
VICTORY CONDITIONS - both versions
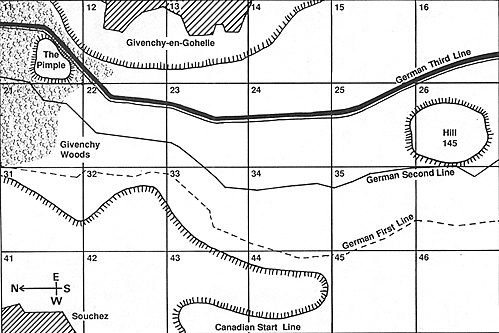
The Canadians win if they occupy Map Sections 11, 12, 13, 14, 15, and 16, having driven all German stands out, and having at least one Canadian stand in each square holding an objective.
SPECIAL RULES
1. THE 85th BATTALION: NOVIA SCOTIA HIGHLANDERS:
This was a pioneer battalion, which was held in low esteem by the Canadian Corps, who called them "Highlanders without Kilts". However here at Vimy Ridge this lowly battalion was committed to action when the 4th Division was pinned down, and swept over Hill 145 to crack the German line.
At the start of the game the quality/moral of the 85th is unknown. The first time that the need to check morale, roll D6 on the chart below t determine it for the rest of the game:
- 1 Trained, Morale 8
2 Experienced, 9
3/4 Veteran, Morale 10
5/6 Elite, Morale 11
2. WEATHER
The battle was fought in a blowing sleet storm. As such all visibility is reduced to 12".
3. WIRE
There was a wire belt in front of the First German Trench. However the barrage seems to have dealt with it for the most part. To simplify matters, for each Canadian stand which comes within 2" of the 1st trench line, roll a D6. On a roll of a 1 the stand is pinned in the wire for one turn. If a stand crosses the wire successfully, a gap exists and other stands can cross freely at the point without checking.
CANADIAN ORDER OF BATTLE
4th DIVISION
- 10th BRIGADE:
- 44th Bn. (Winnipeg)
50th Bn. (Calgary)
47th Bn. (British Columbia)
46th Bn. (Moose Jaw/Regina)
11th BRIGADE:
- 102nd Bn. (Wardens Warriers, BC)
67th Bn. (Grenadier Guards, Montreal)
54th Bn. (Kootenays
75th Bn. (Jolly 75th Mississauga)
85th En. (Nova Scotia Highlanders)
12th BRIGADE:
- 38th Bn. (Ottawa)
72nd Bn. (Seaforth Highlanders, Van.)
73rd Bn. (Royal Highlanders)
78th Bn. (Winnipeg Grenadiers)
All units per OTT, veteran, Morale 10, except for the 85th Nova Scotia Highlanders.
GERMAN ORDER OF BATTLE
103rd INFANTRY BRIGADE:
- 135th Bavarian Infantry Regiment (3 Bns.) Experienced, Morale 8
12th Prussian Grenadier Guards ( 3 bns.) Veteran, Morale 8
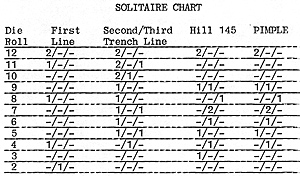 Solitaire Chart
The first number tells how many infantry companies are present, the second is machine gun stands, and the third is Battalion Command Stands.
Each time a German unit/stand is rolled for, reroll the die. On a an even roll the stands are Prussian, on an odd Bavarian.
Map
Back to Table of Contents -- Command Post Newsletter #4
To Command Post Quarterly List of Issues
To MagWeb Master Magazine List
© Copyright 1990 by Greg Novak.
This article appears in MagWeb (Magazine Web) on the Internet World Wide Web.
Other military history articles and gaming articles are available at http://www.magweb.com