If you began miniature wargaming as I did, your first and perhaps only wargaming table consisted of a 4' by 8' sheet of plywood or particle board. After playing a number of games on this board, you find your scenarios fall into two primary arrangements. However clever you try to be in designing scenarios and laying out terrain features, opposing armies either have narrow frontage and great depth or they have broad frontage and little depth.
If you play the "long" way, armies begin up to eight feet apart but have only about four feet of width to the field of battle. This arrangement makes the development of any serious flanking maneuver almost impossible and gives an unfair advantage to the defender.
If your scenario is set up the "short" way, opposing forces begin so close that any defense in depth is impossible and any maneuvers one might want to develop are restricted by the short time it takes for other units to come within effective range of each other.
This "long or short" dilemma may be decreased by terrain or by the objectives of a scenario or by utilizing some diagonal arrangement, but your field of battle is still a rectangle which is twice as long as it is wide. The solution to this problem is quite simple.
You will need:
- 4'x8' sheet of plywood
woodscrews
10' 1/4"x 2 1/4" lattice
drill
saw
NOTE: The saw you use, whether electric or a handsaw,should beableto cut plywood without tearing it up. Minor splintering can be repaired by sanding but if your board get screwed up, it will be a hindrance when you play.
1. Measure your board. is it exactly 4' by 8'? It it is not, use the alternative measuring procedure given.
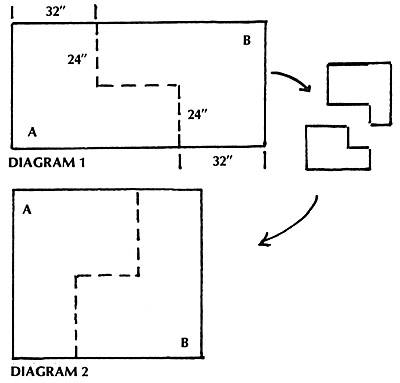
 2. (See Diagram 1.) From the lower, right hand corner of your board, measure along the 8'side a distance of 32". Measurements must be made CAREFULLY if a tight fit is to be attained. If your board is not exactly 8' long (96"), measure along the long side exactly one-third of the actual length. (i.e., If your board is 90" long, measure in 30".) From the upper left corner, measure along the long side the same distance, 32" if your board is8'long.
3. From the points you marked in Step 2., measure across the board 24". If your board is not 4' wide, measure exactly one half the width. These measurements must be accurate and must be made at right angles to the edge of the board. Any deviation from a right angle will cause a gap or mismatch after you are done.
4. Connect the two points you have found in the center of the board. Check your measurements. The distance between these two points should be 32". The line connecting them should be parallel to the long edges of the board. if this is not the case, start over.
5. Carefully make the three cuts you have just measured out (dotted lines in Diagram 1). You should now have two L-shaped pieces of plywood with the exact same dimensions. (A and B in the diagrams.)
6. Piece B is moved up and to the left so that the two pieces fit together as shown in Diagram 2. Do they fit together? If not, you have just ruined your plywood. Go back to board games until you have another piece of plywood.
7. Cut three pieces of lattice to cover the three seams in your board. Put the lattice on the rough side of the plywood and screw through the plywood into the lattice. Counter-sunk screws will eliminate most of the problem caused by bumping into screws with your figures. You can also fill in the screw heads with plastic wood.
8. Repaint and refinish your board as necessary. it is now 6' by 5'4" and your battlefields are no longer narrow rectangles.
Back to Table of Contents -- Courier Vol. VII #5
To Courier List of Issues
To MagWeb Master Magazine List
© Copyright 1987 by The Courier Publishing Company.
This article appears in MagWeb (Magazine Web) on the Internet World Wide Web.
Other military history articles and gaming articles are available at http://www.magweb.com