GUNBOATS IN WARGAMES
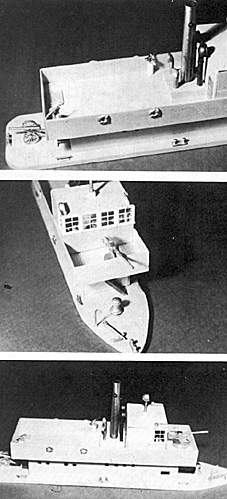
 VARIOUS VIEWS SHOWING THE COMPLETED GUNBOAT (EXCLUDING PAINT). NOTE POSITIONING OF GUNS AND OTHER DETAILING PARTS.
When planning the use of gunboats on a tabletop, possibly the most important factor to consider is size. In 25mm scale (about 1:72, or 1" =6") a 150' gunboat would be 25" long! I suggest that you limit the size of your gunboats to 100' or less. We in Seattle have found that boats about 60-80' (10-13") long are best for use in conjunction with tabletop wargames. Next in importance is outward appearance. Most wargamers are sticklers about how the uniforms on their soldiers look, so most will also probably be quite picky about how realistic their gunboat appears.
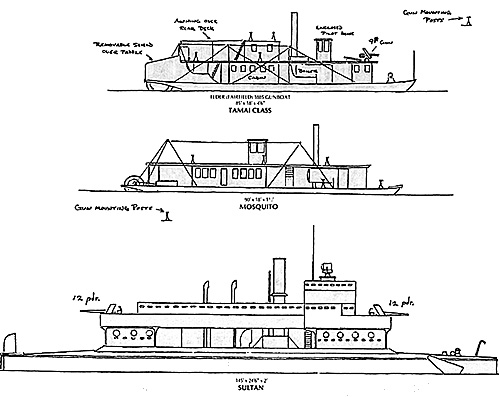
Plans are hard to find and realistic-looking guns and fittings may be even harder to come by. Plans, pictures and photographs can be found in some of the books and periodicals listed in the Bibliography and shipfittings can be obtained from the two companies listed at the end of this article. A listof actual gunboats can also be found at the end of this paper.
BUILDING YOUR GUNBOAT
Surprisingly, a decent looking gunboat can be built for under $10.00. The addition of some detailing parts (most cast out of white metal) will greatly enhance the "realistic" look of your gunboat and they are reasonably inexpensive. What follows is a listing of items which will be needed for building your gunboat.
MATERIALS
Required:
- Balsawood: 1/4" x 3" x 36" and various sticks
Basswood: 1/8" scribed 1/32" x 3.5" x 22", 1/16" x 3" x 24", 1/16" x 3/4" x 24"
some sort of tube for the stack
Wood glue
Wood filler/putty
Sanding Sealer
Paint
Optional:
- Detailing Castings: Guns, Wheel, Binnacle, EngineTelegraph, Cleats,
Blocks and Tackles, Anchors, Running lights, Searchlights, Ventilators, Davits,
Port holes, Etc.
TOOLS
- Hobby Knife w/blades, RazorSaw, Files, Steel Straight Edge, Rubber
bands and/or clamps, Sandpaper (fine and extra fine), and Paint Brushes
I suggest starting out by at least sketching a rough 1:1 plan of what you want your gunboat to look like. Since the balsa wood which you're using for the hull is 3" wide, it would be a good idea to limit the beam of your gunboat to three inches. Though paddlewheelers were more common, they are harder to build, so I think your first attempt should be a screw gunboat. If you must have a paddlewheeler, make it a sidewheeler rather than a sternwheeler. Virtually all sternwheelers had exposed paddlewheels (very hard to build and very fragile once built) while sidewheelers normally had their paddlewheels enclosed (so you don't have to build the actual wheels).
Begin your construction by tracing the basic hull form from your plan onto the 1/4" thick balsa sheet. Next, rough cut the hull shape using a razor saw. With a hobby knife, files and sandpaper, finish the hull shape down to your traced lines. Now cut the scribed (to simulate deck planking) basswood sheet to the proper length and trace the outline of the balsa hull onto the smooth (back) side of the basswood. Again, rough cut to the line with a hobby knife, files, and sandpaper. Glue the basswood deck onto the balsa hull and rubber band or clamp them together and let them sit until the glue has set (overnight if possible).
When the glue has set, finish the hull by filling any gaps between the deck and the hull with balsa filler or putty and sand the edge evenly all around the hull. Using sanding sealer, coat and sand the balsa edge several times until the wood grain is filled in and the edge is smooth. The hull is now done except for painting and the application of any detailing parts.
Next on the construction schedule is the deck house or houses. Depending on your plan, you will have several options at this point. If you plan to detail the interior of your deck houses, or if you plan to use them to hold troops, you'll have to make the upper deck (roof of the deck house) removable. The deck houses should be pretty basic box-like affairs made froml 1/16" basswood with balsa stick reinforcements in the corners and around the bottom edge.
If you're going to use the deck houses for infantry, be sure to make them tall enough for your men to fit in! Don't forget to leave an extra 1/8" or so for the "keys" which will be glued to the underside of the upper deck to hold it in its proper place. If you're on a limited budget, you'll have to carve, cut or drill any portholes, windows or rifle slits in the deck houses. If you're planning to detail your gunboat, you should add the window or porthole castings at this time.
The upper deck should be predominantly open, as it is where most of your troops will be deployed. If you don't mount your guns on the bow and stern of the main deck, they'll have to be placed somewhere on the upper deck. The best places for them would be ahead of the pilothouse and on the extreme stern of the upper deck. If your deck houses weren't the full width of the hull, you should make the upper deck full width in order to have sufficient room for troops. For the deck you can once again use the scribed basswood. I suggest gluing it to an under layer of plain basswood to make it more rigid.
The sides of the upper deck could be either open or solid sided. Solid sides are easier to build and will hold up better when the gunboat is in use. The sides should be made of basswood stripes about 3/4" high and glued to the deck using reinforcing balsa sticks along the bottoms and in the corners. Be sure to make the sides low enough for your troops to be able to fire over. At least one ladder to the upper deck should be provided, either atone of the ends or coming up to the center of the deck from the midships part of the main deck.
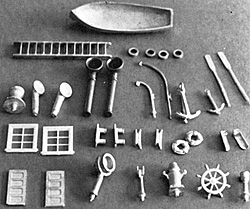
 SOME OF THE METAL & PLASTIC FITTINGS USED IN DETAILING THE
GUNBOAT.
Somewhere on the forward end of the upper deck should be the pilothouse. The pilothouse needs to be roomy enough for figures representing the Captain and helmsmen, and possibly some additional soldiers or sailors. If you're adding detailing parts, be sure to leave room for the wheel, engine telegraph and binnacle. The windows or portholes should be large enough to allow for a good view.
You may want to make some simulated bullet-proof shutters out of cardstock or thin styrene sheeting to be propped open above the windows. The roof of the pilothouse should be removable to allow access to the Captain and helmsman figures. If you're detailing the gunboat, the running lights and searchlight would be mounted on the roof of the pilothouse. The funnel and ventilators should be positioned behind the pilothouse on some sort of raised structure or casing.
Besides the detailing parts I've mentioned in the course of this article, any others which you have purchased should be added to the model at this time. Cleats should be positioned along the edge of the hull at either end of the boat. Though they would rarely find a need to use one, an anchor could be laid on the forward deck with a chain attached and disappearing through a hole into the chain locker below deck. A davit with block and tackle should be near the anchor for its handling.
If you want, a lifeboat could be hung from the upper deck on two davits with blocks and tackles. you might want to build a gangplank to have on your gunboat from some of the scribed basswood and balsa sticks. If you're using field guns instead of shielded naval guns (purchased from one of the ship fittings companies) you might want to build some sandbag walls to protect the guns. This can be accomplished by using commercial sandbags from WWII 1:72 or 1:76 scale armor detailing sets, or HO model railroad grain sacks or you can make the bags from modelling clay or epoxy putty.
| GUNBOATS OF THE 100' SIZE | ||||
|---|---|---|---|---|
| Country | Name(s) | Dimensions | Speed | Armament |
| Britain | Tarnai Class | 99' x 18' x 2.5' | 11.3 | 1 x 9 pd r, 2 x MG |
| Mosquito | 90' x 18' x 1.5' | 8.5 | 6 x 3 pdr | |
| Herald | 90' x 18' x 1.5' | 8.5 | 4 x 3 pdr, 8 x MG | |
| Heron Class | 107' x 20' x 2' | 9.0 | 2 x 6 pdr, 4 x MG | |
| France | Revolver Class | 82' x 16' x 5.5' | 4.5 | 1 x 24 pdr, 2 x MG |
| Niger, Mage | 60' x 10' x 2' | 5.0 | 2 x 1 pdr | |
| J. Davoust | 425 x 6.5' x 14" | 5.0 | 2 x 1 pdr | |
| Opale | 100' x 18' x 2.5' | 7.0 | 7 x 1 pdr | |
| Estoc, Mutine | 98' x 19' x 3.5 | 6.0 | 1 x 3.5", 3 x 1 pdr | |
| Bosart Class | 97' x 36' x 1.5 | 6.0 | 1 x 3 pdr, 4 x 1 pdr | |
| Zelee Class | 82' x 18' x 1.5' | 6.5 | 2 x 1 pdr | |
| U.S.A. | Mindoro | 100' x 16' x 6.5' | 7.0 | 1 x6pdr,2xMG,2x1 pdr |
| All of these were sternwheelers except for the Heron, Revolver and Estoc Classes. | ||||
The corners of the deckhouses, the pilothouse and the sides of the upper deck should be puttied and sanded smooth. When you're satisfied with the finish on the wood, your gunboat is ready to be painted. There is no real set color scheme, but I'd like to suggest the following possible ideas. In all cases, the scribed decks should be painted deck tan or teak. The hull, deck houses and pilothouse should be painted black. The funnel could be the same color as the houses or a contrasting color such as yellow or buff. The top band and inside of the funnel should be black. Ventilators would be the same color as the houses with a red inside to the "bell". The running lights are red (port) and green (starboard). Now your gunboat is done and ready to steam after the natives!
SOURCES FOR SHIP FITTINGS
Bluejacket Ship Crafters, P.O. Box 533, Shelton, CT 06484. Catalog $2.00.
(They have an excellent selection of guns.)
Model Shipways, 39 West Fort Lee Road, Bogota, NJ 07603. Catalog
$2.00.
Bliss Marine, 100 Allied Dr., Dedham, MA 02026. Catalog $2.00.
BIBLIOGRAPHY
Barnes, Elenor C., Alfred Yarrow, His Life and Work, Longmans, Green &
Co., New York, 1923.
The Graphic,
various issues 1871-1905.
Harper's
Weekly, various issues 1871-1905.
The Illustrated London News, various issues 1871-1905.
The Navy and Army Illustrated, various issues 1895-1905.
Jane's Fighting Ships, 1898-1905 editions.
The Naval Annual (Brassey's), 1887-1905 editions (especially 1899).
Randier, Jean, La Royale - L'Eperon et la Cuirasse, Editions de la Cite,
Brest, 1972.
Many thanks also to Mr. Richard Anderson of Seattle for the use of his extensive files on steam warships.

Back to Table of Contents -- Courier Vol. V #6
To Courier List of Issues
To MagWeb Master Magazine List
© Copyright 1984 by The Courier Publishing Company.
This article appears in MagWeb (Magazine Web) on the Internet World Wide Web.
Other military history articles and gaming articles are available at http://www.magweb.com