Throughout its short history, wargaming has been the subject of much discussion. The general topics of these discussions have ranged from the span of commander's control, hidden movement, time synchronization, terrain, scales, morale, fire power, and other topics, all of obvious importance to the accurate simulation of combat through the ages.
One topic, however, has been almost universally
passed over (other than as it applies to scale and space
occupation), is the mounting of figures to simulate
units. What I propose to do in this short article is to examine
the standard mounting in some detail, and offer some
possible alternatives to the current method of mounting or
stand design.
The first miniature wargame rules used the size and
shape of the stand to do two things: regularize the area
occupied bythe figure's represented strength, and assist in
movement. Generally all rules since the original have done
the same. We have come up with essentially two ways of
mounting. The first is a geometric shape, usually a square,
with one figure (some rules mount artillery on a triangle to
assist in projecting area fire), and secondly, a geometric
shape, usually a rectangle, with figures mounted in a line with
each figure assigned a regularized section of that line defined
as a frontage per figure. The first opinion maximizes the
flexibility a player has but requires more playing time to move
each figure. The second assists in movement and
"accurately" shows troops in a line formation that simplifies
movement and placement.
The second system of mounting has limitations that don't
show up until you place the units in column and realize that
the formation neither simulates the depth or width of a
column.
In combat both systems have disadvantages. Individual
mounting allows players to "create" uncharacteristic
formations, while the line mounting allows instant turns and
less "disadvantage" in frontal firepower while in columns.
What I propose is mounting the figures in such a way as
to limit or exploit the unit's characteristics. I will look at four
basic types of troop units: Greeks or Macedonians, Imperial
Romans, Barbarians and Napoleonic infantry.
Let's look at the Greeks phalanx first. Current Ancients
rules have the Phalanx mounted in neat lines that can wheel
and shift facing with great ease. I once watched in horror as
an Athenian phalanx of some proportion deftly turned and
attacked the rear of my peltasts. Although this event had a
particular impact, I am generally unsatisfied with the linear
system of mounting when it is used to represent anything
other than linear warfare.
The mounting that most accurately reflected the
limitations and capabilities of the Greek phalanx is the
column figures lined up one behind the other (for 15mm one
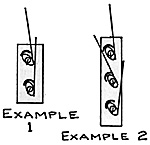
half in frontage, and one inch depth). The figures face the
long way of the base (See figure 1).
A Phalanx is made up by placing these stands side by
side. When formed, it is unbeatable in a straight ahead attach
over level ground. Ah, but to see their weakness, try to turn
this monster while trying to maintain an even frontage.
Compare this lack of maneuverability to that of the easy line
basing. The photographs show a sequence of turning over a
four turn time frame. The linear formation make the turn (pivot)
in a matter of 1 1/2 moves while the real phalanx lumbers into
position. Actually, the phalanx has been displaced
significantly and no longer occupies the same point in space.
Only now can we understand the nature of Hoplite warfare
and the rather set piece battles of Classical Greece.
Compare this to the flexibility of the Imperial Roman
Infantry at the turn of the Millennium. The Romans based
their tactics o the Century, two of which made a Maniple, of
which three made a Cohort. Eight to ten Cohorts made a
Legion, with the Century being about 80 men. I generally use
a scale of 20 to 1, which means I have four figures to a
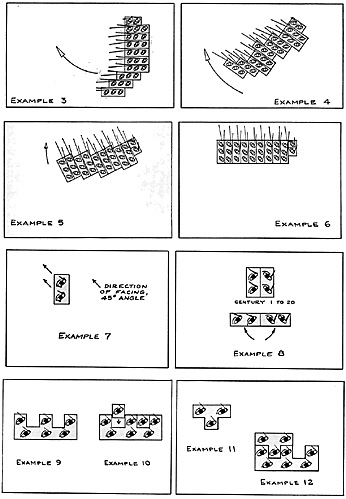
century. Again, rather than a line, I mount these figures on two
column stands. But, unlike our normal 90 degree facing
world, they are not mounted at a right angle to a stand side
but rather at a 45 degree angle. (See figure 7.)
The two columns are pivoted 45 degrees outward left and
right respectively. (See figure 8a). Although this may appear
strange it allows the century to be facing 270 degrees, covering
its front and both flanks. This allows the Century to come on
line formation again without exposing a flank. (See figure 8b.)
The Romans have the advantage of flexibility, but can
form into a column for mass when necessary.
Barbarians are more difficult to simulate because they
stressed individual warfare over group warfare. This meant
they were not able to put as many effective fighters in close to
the enemy, or execute sophisticated maneuvers or
formations. I find than an "E" shaped stand reflects barbarian
capabilities effectively. it reduces the number of castings in
contact without having long blank spots on the linear stand
while, at the same time, allowing me the capability to thicken
the formation, if I desired. The "E" tvpe stand also makes
movements of large numbers difficult.
The mounting is simpler than it sounds. (See figure 9.)
The forks of the "E" go toward the enemy. The castings
are mounted once behind the other on the forks. To
strengthen the formation, individual castings are mounted on
1/2 inch by 1/2 inch stands and inserted into the gaps between
the forks. (See figure 10.)
For added density a "T" stand can be used. (See figure
11.) it can also be placed into the "E" (see figure 12).
These combinations can be used to simulate two of the
major types of Barbarians; the Germans using the denser
type formation, and the Gauls using the "E" stands, with some
supporting troops.
I've heard a lot of rumblings about rules and remounting,
and also about the difficulty of cutting out "E" bases for
Barbarians. Come on now, any group of people that paints
eyebrows on 15mm tall figures cannot be discouraged by an
odd shaped stand.
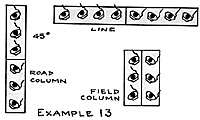
The 45 degree angle allows for line or field column
formations as well as accurately represents road column.
The Grenadiers and lights should also be mounted at a 45'
angle.
The British and other types could be mounted in the
traditional line but can also be mounted at the same 45
degree angle for added realism.
If you have doubts about this type of mounting and its
improved historical accuracy, try using some old balsa wood
or card board. Cut some stands and pencil in some "figures"
and give it a whirl. I'll bet you'll remount your figures. That is
unless you prefer the gaming to the history.
To improve your historic accuracy, give the depth of the
formation more weight in computing your melee casualties.
(A 20 rank phalanx easily handled an 8 rank phalanx).
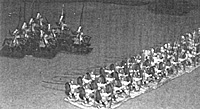
 PHALANX OF GREEKS (FREIKORPS 15MM) 16 MEN DEEP. THE CAVALRY IN
REAR IS A WEDGE OF THRACIANS
 If there are 8 to 12 men in a file then use two figures. For
12 or greater use three figures. (See figure 2.)
 3 ROMAN MANIPLES SHOWING OPTIONAL COLUMN MOUNTING
 To simulate the French and most others of the
Napoleonic period, the figures should be mounted in a
manner similar to that of the Romans, but with three or four
per stand rather than two. (See figure 13.)

Back to Table of Contents -- Courier Vol. V #2
To Courier List of Issues
To MagWeb Master Magazine List
© Copyright 1984 by The Courier Publishing Company.
This article appears in MagWeb (Magazine Web) on the Internet World Wide Web.
Other military history articles and gaming articles are available at http://www.magweb.com