The purpose of this series is not, as most such columns seem to be, a mere lecture on "how to." Rather, I'd like this to take the form of a kind of personal help column. At various times, I've done a column like this for such magazines as EMPIRES, EAGLES & LIONS and the old Minifigs House Organ.
As a means of introduction, I've been involved in gaming for over fourteen years (if you don't count my childhood Airfix days), and I've been a professional artist for magazines and paperbacks since 1967.
There, now that that's out of the way, on to other things. I'd like this column to follow a question and answer format with feedback coming from the readership and influencing the direction these articles take. I will also review any new painting, finishing, or various other aids that come my way. And I would like to examine some of the methods and practices that we old time gamers and painters take for granted but which newer hobbyists may not have tumbled to yet.
PRIME CUTS
Ah, yes, the mysterious art of priming. While some paints-mostly acrylics-can be used over plastic or metal figures without a priming agent, all paints will perform better and, better yet, will last longer if a figure is primed before painting. Before going into methods of priming, let me explain exactly what priming is.
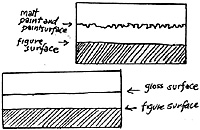
Primer is the coating spread over a plastic/metal figure to (a) Isolate the figure's surface from the paint; (b) give the paint a rough surface to cling to; and (c) provide a reflective surface for the paint.
The reason for (a) is that figures often have grime on their surface or, if plastic, can leak chemicals as they dry out. All this naturally affects the paint. To accomplish (b) you need a matt finish primer (see four years of art school in action here).
 The illustrations show the difference in a side
view of a matt finish (1) and a smooth/gloss finish (2).
Light is broken up by a matt finish and this increases the
richness of colors, but an even more important
consideration is that the rough matt surface provides a
"grip" for the paint while the gloss surface is hard for paint
to grip well.
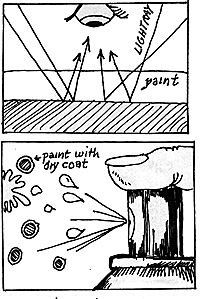
As to reflectivity (c), paint, no matter how dark it appears, is translucent. Color variations are a function of the differing absorption of light (don't you love this technical stuff). So when light strikes the paint, the rays pass through, strike the surface beneath and bounce back out to your eyes.
A bright primer surface makes a color brighter, darker, or even alters it, e.g. if you prime and then use an undercoat of bright green, your paint job will have a very green cast.
 Anyway enough of theory, I suppose you want some
facts too. Interestingly, some surprisingly good general
purpose primers are such assorted Humbrol colors as
Matt White, Unbleached Linen, and Unbleached Wool.
(These must be stirred completely though as Humbrol
colors have a tendency to go glossy if not thoroughly
mixed.) Acrylic primers are suitable but tend not to cover
or wear as well as Humbrol. I do use them to overcoat a
glossy primer.
Spray white matt primers are widely used by gamers since they go on fast and dry fast. Their drawbacks are as follows:
- 1. They tend to chip because they are not elastic. The reason for this is that when a paint is sprayed it begins to dry even as it's being sprayed. (Yes, here comes another technical drawing, readers.) Most paint droplets are surface dry when they hit your figure, so what happens is (imagine the photo of a droplet of water hitting and exploding in slow motion) the paint coating is very uneven in texture and, more important, the bonding of paint to paint and paint to surface is equally uneven, thus allowing chipping to occur more easily and often.
2. Because of the above situation and because that type of primer is a very thick paint, it's too easy to overpaint. The paint can quickly build up in thickness and obscure detail. Of course, this particular problem can be avoided by spraying a series of very light coats.
Remember again that most soft plastics will not accept most paints unless primed with a skin of some sort because the plastic leaks.
THE KNOTTY PROBLEM OF WOOD
Creating a convincing wood effect is sometimes a difficult or confusing task. The solution to this problem is twofold, and actually quite simple. First, don't think of wood as light brown. Wood comes in many shades from gray to dark brown to olive drab; just take a look at old sheds or fences. Raw wood looks a lot like plywood, I ight or dark fawn.
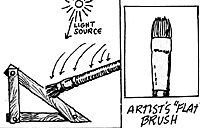
 The way to simulate this look is by the ancient
honorable method of drybrush. Drybrushing is a technique
in which a semi-dry paint of a darker or (more often) lighter
color is brushed over the already painted surface of a
figure or model; the semi-dry paint is picked up by the
relief work to create natural shadows. (Here it comes
again, an illustration.)
LIGHT DIRECTION
Think of light coming from one single direction or source (usually 11:00 or 1:00 high), and use your brush the same way, brushing from the sun direction down. This gives a natural highlight to all your woodwork or figures. It's best to use a stiff bristle flat type artist's brush.
READERS WANT TO KNOW
One of our first reader questions comes from Mark Keigwin of New Haven, Connecticut. To paraphrase him: "I'd like to see an article on painting 15mm Landsknechts." The Renaissance presents several problems for the dedicated figure painter. One is the complexity of the historical "uniforms," and the second is that many of the figures now being made represent them almost too accurately.
Just as model rockets or plastics have levels of complexity, so does figure painting. Without digressing into all the intricacies of the "uniforms," let me simply recommend that you get some proper color guides, and make use of drybrushing as outlined above. That will give you two shades of color. Then you can use a fine brush and a contrasting color to illustrate slashes, stripes, and the like. It's not like painting cuff flaps, but equally tough in its own way. just keep in mind that for a good job, there is no way to speed the process up except by doing your figures in groups of ten or twenty, green on a leg here, on an arm there. Each figure is semi-unique, so painting is bound to be a bit slower.
HINTS FROM THE READERS
BASE COAT TECHNIQUE
FROM: John Cape,
In all the "how to" articles on how to paint your table top miniatures, one very effective and fast technique seems to have been left out. One of the oldest methods of painting is "dip painting" and it is still used in many industries today.
The most important application of paint on a figure is the base coat/primer. Most hobbists apply this with a brush or expensive spray can. I suggest the following
Purchase a pint or 1/2 pint can of automotive primer, medium gray or reddish brown, and minimum container of laquer thinner. The initial cost will be high but will last you two life times.
Obtain a wide mouth pint jar with a good sealable lid. Fill 1/3 with primer and add thinner until the paint runs quickly off the stir stick.
Take a cleaned figure, hold base with large tweezers and dip into the primer, swish and remove. The trick is to adjust the viscosity so that the excessive primer runs off. If you have a poor casting with lots of voids, increase viscosity by adding more primer, for good figures add thinner to reduce viscosity. Reduced viscosity will preserve casting detail. Set the figure stand down on wax paper and let drain. You can easily completely coat fifty figures in 20 minutes and be assured of 100% coverage.
(This is a somtimes difficult task for the unexperienced. ED)
If you are not now priming your figures, it is best to do so for it will make them much easier to paint, far more durable, and there will be no bright metal shining through.
While dip priming is sensible and is interesting to experiment with, I have reservations on how this will work on 15mm figures-the primer may have to be over thinned. In any case the figure would probably have to be primed again with white-depending on the type of paint used. ED)
AIR BRUSHING MINIATURES (HORSES) (SHIPS)
Miniature wargamers are characteristically impatient to paint that new army and get it onto the field of action with all its regalia. Mundane items such as horses, etc., are often short-changed to hurry the name regiments to the front and often come out an unrealistic plain brown/black/white.
If you are fortunate enough to own or willing to buy an air brush, your days of drab lookalike horses and equipment can be over without spending any more time or painting than before. I have painted 40 horses in 1.5 hours.
The horses were mounted on easy to handle wood stands after being primed. Starting with white, several horses were air brushed. The white paint was then adulterated with some black paint but not fully mixed. The horses were touched up with varying degrees of gray highlights -WALAA- Scots Grey mounts. The process is continued until the paint is predominantly black. The same technique was used for the brown and palimino shades. By giving the figure a short, static burst you can paint "paint" horses. No two of the forty horses look alike, and without their saddles and bridles look like a color shot of a wild horse herd right out of a John Wayne spectacular.
On 1/2400 scale warships the same process works well The very fine spray of an airbursh does not fill in the small casting details. It is easy to simulate rust and coat discoloration, general neglect and corrosion with fine short shots of the contrasting colors that have beer thinned. The ships turn out with their own individual and realistic characteristics.
I agree with the usefulness of airbrush; a word to the wise and the cheap: airbrush is not cheap in money or in the time it takes for cleaning and care of your tools. Airbrush can be an aid or a pain to modelers and commercial users; if you can do it more power to you. ED.
And so ends this installment. All in all, the amount of data I can provide depends on questions coming from you readers, whether about painting techniques or things you'd like to see reviewed. I'd like to be able to give you all sorts of information on brushes, paints etc., where to get them, how to use them, but I'll need some help with the research, so let me thank you al in anticipation of your participation.
Back to Table of Contents -- Courier Vol. IV #3
To Courier List of Issues
To MagWeb Master Magazine List
© Copyright 1982 by The Courier Publishing Company.
This article appears in MagWeb (Magazine Web) on the Internet World Wide Web.
Other military history articles and gaming articles are available at http://www.magweb.com