The most important difference separating boardgamers and miniaturists is the representation and accuracy involved in the development of the third dimension. If this fact did not exist then we would all be content with the utilization of cardboard counters. If the figures are represented in the third dimension then why should not the terrain follow suit; for the effect of good terrain adds as much to a wargame as that of painted figures. One of the major problems with the terrain is the time consumed in setting it up before a game can commence and the cleanup time at the conclusion. With this in mind a solution that would meet this criteria was attempted; the design and construction of geomorphic modules.
It was felt that the panels must allow a very flexible arrangement of features from one battle to another and thus have the ability to create a greater variety of scenarios with the minimum amount of effort involved in the setup. With the use of a module it would be more convenient for storage; always a problem with terrain of any type. The modular system can be used with various figure scales, however in this case the intention was to use it for 15mm figures, and for this reason a module of 2'-0" by 2'-0" was established. This would allow the accommodation of almost all of the terrain features which might be used and is a relatively easy size to store.
For the base material of the module it was decided to use ordinary mineral acoustic ceiling tiles with a pin perforated surface. These were readily available as either a 2'-0" by 2'-0" tile or the more commonly available 2'-0" by 4'-0" tile which can be cut in half to obtain the required size. The tile material easily lends itself to alterations and adaptation for the various terrain features; is of a convenient size; is relatively economical and lightweight.
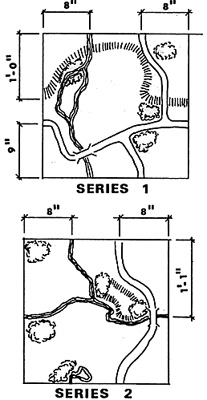
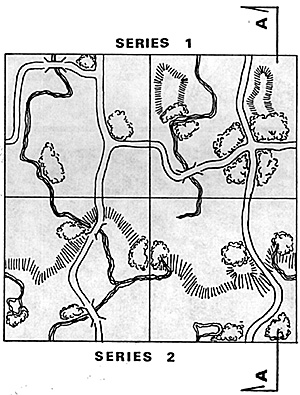
Each of the modules was to have a set of edge features (waterways, roads, elevations) which were to be precisely located and maintained on all modules. This would allow the interlocking of any one module with another. The system utilizes a simple butt joint to match the continuous key points of each to the corresponding feature of the adjacent panels. Each of the modules develops its own distinct terrain break- up, while maintaining the key elements on all sides. In the long run this well provide many unique problems in tactical mobility.
The procedure for construction began with the planning of the individual modules. It was established that there would be two separate series of modules. Each of these with different edge conditions and that these conditions would then be maintained throughout all of the modules built for that series. With the exception of a few modules which were used as transitional members between the two series this principle was maintained. The edge conditions were defined as elements which could reasonably be assumed to flow from one panel to another. These were rivers or streams (the definition of which is determined by their widths, from 1/4" to 1"); roads (with a width of 1 1/4 "); and changes in the vertical elevations.
All of these were considered to be permanent features. These then became the established rules which greatly simplified the maintaining of the correct orientation on all of the panels. The co-ordination of the waterways and elevations, (the natural features), was followed by the roadways, which paralelled the waterways, crossing them at fords or bridges, come from somewhere and always go somewhere. They usually skirt small woods, and pass through the larger ones, and if they terminate it is at some point such as the board edge, a farm, a hamlet, a town, or a permanant building such as a castle, fort or monastery (that which would be representative of the nature of the countryside to be depicted).
Once the roads and waterways have been laid out on the modules then the elevation changes are located and attached, as per the layout plans. A high density insulation is used for the contouring of the variations in the elevation on one panel. This particular type of insulation is used because it can be easily carved into the desired configurations and can be sanded to provide a smooth finish, without chipping off the corners.
Major variations in the terrain height can be accommodated by the raising of whole modules with the use of a 1" section of insulation under each module. This allows the modules to form a continuously rising plateau.
When the elevations have been glued to the base then the recesses for the streams and rivers are cut out. This is accomplished by cutting both edges of the waterway with a matt knife and removing the width of the waterway with a screwdriver or a dull rounded ended knife. This will leave a rough finished surface which is below the level of the surrounding terrain.
When all of the desired features were incorporated onto the module it was then ready to be painted. Initially this was done with the use of a primer coat (a flat white latex) and then the application of the individual highlight colours. For this a combination of artists colours (a flat darkblue is used for the waterways) and common latex house paints were used (for the roads - a tan or brown, and for all of the landscaped areas - green). The landscaped areas, including the hills, fields and all wooded areas were painted in the same colour. When this was completed then the wooded areas were defined by the outlining of them with a yellow pencil which denoted the edge of the wood. The areas of foliage should be such that they are used to complement the waterways and should restrict the mobility while channelling the movement to the more open areas where the enemy will provide the only barriers.
When all of the wooded areas have been designated then the final treatment of the open areas is applied. This comprises a textured material commonly used for model train layouts and available in bags at most hobby stores. Several different shades of green and brown were mixed together to produce a general mixture. This can also be used on the bases of the figures if so desired. This material was applied by first painting the surface to be covered with white glue and then sprinkling the mixture over all. This should only be done to small areas at any one time as the glue hardens quite quickly. When it had dried the excess was removed. The areas contained with the yellow lines of the woods were not covered so as to give a sharp edge to wooded areas. With the application of this covering the permanent features of the modules are complete.
The balance of the work to be done on the modules can best be described as the accessories which are to be used in conjunction with the terrain. All of these are either available commercially or can be constructed without much difficulty. These include the foliage, which can be constructed by the gluing of lichen or sponge to pieces of wire (paper clips), small branches or twisted copper wire. This feature can be either permanent, that is glued in place, or can be removealbe for ease in storage and for economy.
It is applied to the module by using the pin perforations of the tiles or by making new holes in the tile as required. The height of the foliage should correspond to the scale of the figures that will be employed. Other features which can be added to the modules are: fences - constructed from wooden toothpicks or balsa wood, bridges - constructed from sheet plastic, thin cardboard or balsa wood, building, engineering features and fortifications. These last two items are considered as transient elements and therefore their locations cannot be permanently fixed except were they might be incorporated as part of a town or a city.
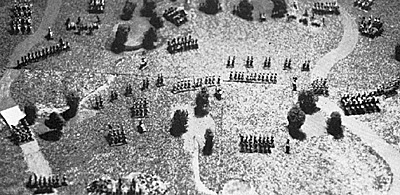
Several of the terrain modules that were built were used for the W.R.G. 15mm Napoleonics demonstration at Origins 80 as put on by the Northern Wargamers Group and sponsored by THE COURIER. While in this case they were used for the Napoleonic game their terrain can be used for almost any period, and the size of the playing surface can vary from a 2'-0" by 4'-0" for a two player game to a 4'-0" by 12'-0" for multi player games.

| 
|

Back to Table of Contents -- Courier Vol. III #2
To Courier List of Issues
To MagWeb Master Magazine List
© Copyright 1981 by The Courier Publishing Company.
This article appears in MagWeb (Magazine Web) on the Internet World Wide Web.
Other military history articles and gaming articles are available at http://www.magweb.com