 The following report is reprinted from the P.W. Review, the monthly publication of the Potomac Wargamers. The report fulfills the requirements for a good battle report in that the
article is interesting and informative, indicating features of the rules or tactics of playing which were emphasized by the scenarios. - CLIFF SAYRE
The following report is reprinted from the P.W. Review, the monthly publication of the Potomac Wargamers. The report fulfills the requirements for a good battle report in that the
article is interesting and informative, indicating features of the rules or tactics of playing which were emphasized by the scenarios. - CLIFF SAYRE
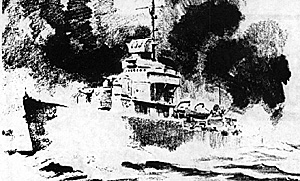
A sight to behold. Four dedicated wargaming practitioners gathered around the table, secret orders clutched to their chests. The group included Cliff Sayre, who designed the scenario, John Victor of WARGAMER'S CORNER, Jim Butters the Besieger, and that man of many parts, the Lion of Ostlandt, General Simon. The encounter used GENERAL QUARTERS rules, 1:2400 scale ships and pitted Sayre and Victor, as the British, against Butters and Simon as the Germans. Figure 1 shows the locale, an area on the Northwest perimeter of the North Sea. The salient features in the initial setup were:
- a. A British convoy heading south from the northeast.
b. German Force 1 and Force 2 to the northwest.
c.Two small islands to the south ... one containing an anchorage at which there were a British cruiser and two merchantmen.
d. A minefield strewn by the British.
e. A squall line running east-west and moving northwards. Visibility north of the squall line was 20 inches, while south of the line, the entire region was clear and visibility unlimited.
THE BATTLE
The most effective way to describe the encounter is on a turn-by-turn basis, with sketches showing the movements of the forces concerned. No doubt the reader has seen other descriptions of naval battles in which all movement was superimposed on one map, the result being an unrecognizable squiggle of lines purportedly indicating the tracks of the vessels involved. With any luck, we can do better than that.
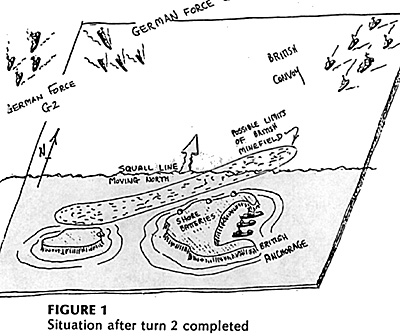 Turns 1 and 2: (a) Figure 1 shows the position of the ships
after the movement phase of the turns was completed.
German Force 1, G1, came on the table commanded by
Butters: 3 destroyers and a light cruiser. The second
German group, G2, would remain offboard until the fourth
turn; (b) A German air attack on the anchorage was quickly
disposed of, all attacking planes either being dispersed or
shot down; (c) At a most inappropriate time, a hidden timer
went off signalling that something bad was in the offing for
the Germans.
Turns 1 and 2: (a) Figure 1 shows the position of the ships
after the movement phase of the turns was completed.
German Force 1, G1, came on the table commanded by
Butters: 3 destroyers and a light cruiser. The second
German group, G2, would remain offboard until the fourth
turn; (b) A German air attack on the anchorage was quickly
disposed of, all attacking planes either being dispersed or
shot down; (c) At a most inappropriate time, a hidden timer
went off signalling that something bad was in the offing for
the Germans.
A chance card was drawn and it turned out that one of Butters' destroyers was called away to the north - immediately - by the High Command. The G1 force chose to follow the destroyer northeastward, partly to escort it and partly to join it to bash the British; (d) An item foonote is that, if the German air attack had been focused on the convoy, it would have caught the ships in a refueling mode and caused lots of British tears to flow. Refueling was completed on Turn 2, however, and the Germans lost their chance.
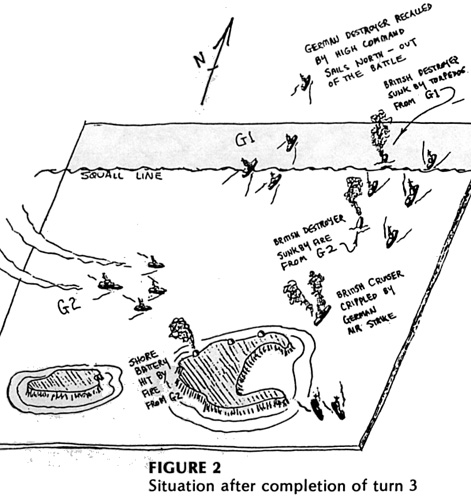
Turn 3: (a) Both forces had sent out spotter aircraft and, with their help, an exchange of fire took place. See Figure 2. The firing procedures for GENERAL QUARTERS are fairly simple. Three six-sided dice are thrown, each with a separate function ... Red die - correlates with a range table to indicate whether or not a hit was scored. White die - Each gun has an offensive factor, and each ship has a defensive factor. The offensive:defensive ratio is correlated with the die throw to determine the extent of the number of "hull boxes" crossed out. Green die correlated with the offense:defense ratio to determine hits on the target armament; (b) the exchange of gunfire produced nothing noteworthy. The British cruiser at the anchorage and the two merchantmen slowly set out to sea. The merchantmen planned to head south to shelter; the cruiser went north to help in the battle; (c) Both sides launched torpedoes.
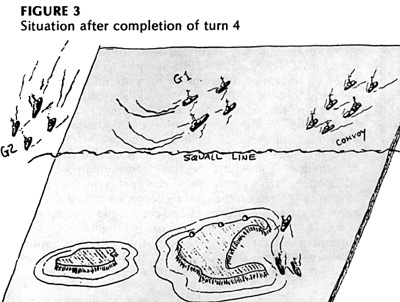
 Turn 4: (a) It was time for G2, the second German group,
to enter. A heavy cruiser and three destroyers, all under
the command of the Lion, came on the field from the
west. See Figure 3; (b) the German torpedoes, however,
sank one escorting British destroyer. Torpedo fire under
GENERAL QUARTERS is conducted as follows . . . 1.
Firer notes the target ship, the number of torpedoes
fired. and the direction he thinks the target will move
next turn, i.e., straight, turn to port, etc. 2. On the next
turn, this note is compared with the direction in which
the ship did go. If the guess was a bad one - no hit. 3. If
a hit was scored, then the distance the torpedo traveled,
the number of shots, and the target speed are correlated
with a six-sided roll and the result looked up on a
torpedo hit table; (c) A second German air attack was
launched, this time at the cruiser coming out of the anchorage. Although one wave was pretty much wiped out, the second German wave scored four "hull boxes" on
the ship ... she was now dead in the water. Several German fighters strafed the motor torpedo boats accompanying the cruiser, but to no effect; (d) A most excellent gunnery dice throw, the result of years of practice, was tossed by the Lion for his force C2. The result was the
sinking of another British destroyer, and the destruction of a British shore battery protecting the anchorage.
Turn 4: (a) It was time for G2, the second German group,
to enter. A heavy cruiser and three destroyers, all under
the command of the Lion, came on the field from the
west. See Figure 3; (b) the German torpedoes, however,
sank one escorting British destroyer. Torpedo fire under
GENERAL QUARTERS is conducted as follows . . . 1.
Firer notes the target ship, the number of torpedoes
fired. and the direction he thinks the target will move
next turn, i.e., straight, turn to port, etc. 2. On the next
turn, this note is compared with the direction in which
the ship did go. If the guess was a bad one - no hit. 3. If
a hit was scored, then the distance the torpedo traveled,
the number of shots, and the target speed are correlated
with a six-sided roll and the result looked up on a
torpedo hit table; (c) A second German air attack was
launched, this time at the cruiser coming out of the anchorage. Although one wave was pretty much wiped out, the second German wave scored four "hull boxes" on
the ship ... she was now dead in the water. Several German fighters strafed the motor torpedo boats accompanying the cruiser, but to no effect; (d) A most excellent gunnery dice throw, the result of years of practice, was tossed by the Lion for his force C2. The result was the
sinking of another British destroyer, and the destruction of a British shore battery protecting the anchorage.
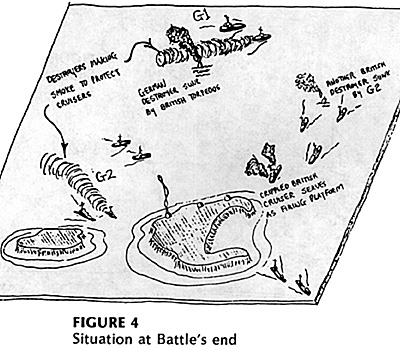
 Turn 5: (a) Once again the Lion struck . . . yet another British ship went under. All that the British return fire did was to knock off a few German "hull boxes". see Figure
4; (b) Finally, the British come into their own. A salvo of
torpedoes, fired on Turn 4, took out one German
Destroyer of G1. The reader will recall that, several turns
before, one of the G1 destroyers and the light cruiser; (c)
Another German air attack came in, and it quickly
discovered that the tricky British had saved their fighter
aircraft fot this last onslaught. No German planes survived, so thick was the air with British aircraft. Air combat by the GENERAL QUARTERS rules is as follows. . . 1 .
Each side designates the number of fighters it desires to
employ. These numbers are matched with a die roll to
determine the number of enemy planes shot down. 2.
Turn 5: (a) Once again the Lion struck . . . yet another British ship went under. All that the British return fire did was to knock off a few German "hull boxes". see Figure
4; (b) Finally, the British come into their own. A salvo of
torpedoes, fired on Turn 4, took out one German
Destroyer of G1. The reader will recall that, several turns
before, one of the G1 destroyers and the light cruiser; (c)
Another German air attack came in, and it quickly
discovered that the tricky British had saved their fighter
aircraft fot this last onslaught. No German planes survived, so thick was the air with British aircraft. Air combat by the GENERAL QUARTERS rules is as follows. . . 1 .
Each side designates the number of fighters it desires to
employ. These numbers are matched with a die roll to
determine the number of enemy planes shot down. 2.
After the fighter-versus-fighter phase is over, the surviving aircraft are subjected to anti-aircraft fire from ships. 3. The surviving aircraft then bomb, strafe, etc. 4. If, therefore, one can overwhelm the attacking enemy with fighters, none will survive to enter the bombing phase, which is just what the verdammte British did!
 At this point in time, the situation was assessed and it was decided that the Germans had had the best of it, a decision wildly applauded by both Butters and Simon.
FINAL THOUGHTS
A most enjoyable afternoon, for which Cliff Sayre was profusely thanked. Both John Victor and your chronicler were not at all familiar with modern naval rules, and were very pleasantly surprised with the action. Movement in GENERAL QUARTERS seemed to be rapid; the dalaying phases of the game were centered on the gunnery and torpedo sequences. Special "ship-shaped" data sheets were used for bookkeeping. GENERAL QUARTERS handles ship movement and gunnery on an individual ship basis. This is in direct contrast to the symbolic methods used to decide air combat and the firing of torpedoes. These latter two procedures might be termed "paper transactions" since the forces involved are never really seen on the gaming table; each side merely notes its strike requirements and the results stem from a comparison of table values. Because of the particular requirements of the given scenario, there was no opportunity to note how the rules handle hidden movement, as would be necessary in playing out a submarine attack.
The scenario was defined by a general intelligence summary which was made available to both sides. Each side had a special summary, not available to the other, which defined the objectives and constraints for the engagement. Examples of these "special orders" are given in my article in COURIER 3-1 which also describes the use of the chance events which Wally mentions during Turn 2. The action was played on two adjacent sewing pattern boards which provided the reference grid for locating the islands and minefields. We have subsequently used the grid to implement hidden movement for ASW engagements which I hope to describe in a future article. - CLIFF SAYRE
Back to Table of Contents -- Courier Vol. III #2
To Courier List of Issues
To MagWeb Master Magazine List
© Copyright 1981 by The Courier Publishing Company.
This article appears in MagWeb (Magazine Web) on the Internet World Wide Web.
Other military history articles and gaming articles are available at http://www.magweb.com