Peasants getting uppity? Rumors of marauders? Or do you just have a nasty neighbor? If these are some of the problems you seem to be facing, it may well be time to get busy on that stronghold you have been planning but putting off because you just weren't sure quite how to go about it or what the cost might be We'll start off with a basic "Keep" Once that is conipleted you will have a base of operations and a focus around which to build more elaborate works as time and inclination permit.
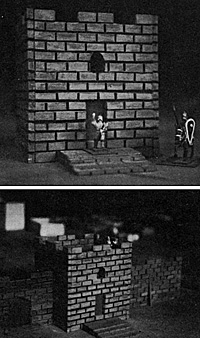
 Figure 1: The completed Keep.
Figure 2: Wall sections added.
The basic material is 1-inch wide lattice which can be found at the local lumber yard. It comes in strips and is inexpensive. The wood is comparatively soft which makes the carving of the blocks easy but not too soft so that the finished product is extremely durable. You will also need a heavy duty hobby knife, grey and black flat hobby paint and a wide hobby paint brush (about a number 5). Decide how large a tower you want, remembering that this will eventually be the keep of your completed castle so you can go a little on the large size if you like. Mine is about 4 inches square and 4 3/4 inches high.
The height is determined by how many widths of lattice you want to stack up. I chose three for my towers and two when I got around to making my walls. Four feet of lattice will make the tower. Cut all the four inch lengths before beginning the layout of the lines for the stone blocks. Pick a length and width for the blocks that will come out so that all the blocks will look about the same size. Mine are about ]/4 high by % long and they are not perfectly uniform. I think this lends a pleasantly irregular appearance to the structure and it also takes a lot of pressure off when you are doing the layout.
Lay in the Iines with a pencil and a ruler, remembering to stagger the blocks from layer to layer. When you do the next section to be glued above, check to see where your blocks were staggered on the section below so you can continue the pattern. Once all the lines are drawn in you are ready to start carving. Using your hobby knife, make a long scoring cut down the length of the strip on each side of the pencil lines, angling the knife slightly so that you wind up with a "v" groove.
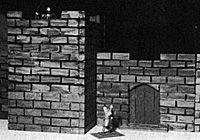
 Figure 3: Detall of the sliding door.
When you lift out the strip of wood from the groove the pencil line is removed along with it. Next make all the short vertical cuts. You should now have a brick like appearance. At this time you can remove some of the blocks from the top edge to make the crenallations for the defending archers to fire through. If some of the other blocks break off, not to worry, just put a little Elmer's glue on the piece and stick it back and it will be stronger than it was before.
Don't forget to carve the blocks out on the back side of the top sections where these will show. About three rows should be enough. When this is all done, glue each section of wall together from bottom to top with Elmer's (it doesn't take much, so don't overdo it) and set the four completed sides aside to dry. If you are going to have a door in your keep you can cut that in before or after you have glued the sides together, whichever you think is easier.
I actually built my whole tower before I decided to bother about a door and wound up hacking it into the completed structure. Make the door on the narrow side so that one good man can defend it easily from the inside in the event someone is rude enough to try and force his way in. Don't make it at ground level, either, so as to make it difficult for a horseman to ride in (a low overhead clearance will also discourage this).
When all four sides are dry (24 hours is more than adequate) glue the sides to the front and back and put a few rubber bands around the whole thing to make sure it dries properly. All that is left is the painting and the construction of the floor for the fighting platform at the top. Painting is simple. Start with flat black and cover the entire structure with a generous coat, being sure that you really soak it into the cracks between the stones. Leave this to dry for about a half hour and then using the grey paint, dip your brush and wipe off the excess (you almost want a dry brush) and holding the brush at an angle, paint the surfaces of the blocks. Use long sweeping strokes.
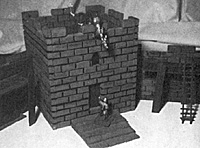
 Figure 4: More walls.
Some of the black will bleed thru the grey and some will mix with it giving varying tones. This gives a weathered appearance. If you accidentally fill in some of the cracks with the grey you can always go back over those with a small brush using the black. The black in the cracks gives the impression of shadows and helps to accentuate the stone work. Now for the flooring. This is easier to do at this point since you can measure exactly what size the floor needs to be when the whole thing is together. I used popsicle sticks with the ends trimmed for the floor boards with a couple of supporting peices glued to the inside of the walls for the sticks to reat on at their ends. The sticks were then painted dark brown and rayed in so as to be removable in the event of damage from catapult fire. You need not be so elaborate. Anything that covers the space, is reasonably well supported and looks like a floor is fine.
I also made a sliding door for the main entrance by glueing a piece of popsicle stick above the door on the inside with a second piece glued onto that one but set down a little lower so as to make a groove for the top edge of the door to slide in. A small platform was then built on the inside to accomodate the stalwart defender of the door. I also cut a small window for a defender on the ficticious second floor to throw nasty things onto the heads of unwelcome callers. The small stone staircase is made from sections of popsicle sticks cut to the desired lengths and laid cross-hatched until the desired height was reached. The same painting technique was used.
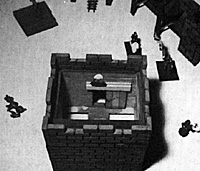
 Figure 5: Detail showing firing platforms.
Walls, gates, and smaller towers are simply variations on the same theme. Parapets for the walls can be constructed from 1 x 2 lumber covered with poster board and painted grey or more elaborate (and rickety) platforms can be constructed using popsicle sticks, but these require a lot of bracing. Since most castles and walled cities were sited with one or more unapproachable sides (usually protected by a precipice, lake, sea shore, etc.) it is not necessary to build a four sided castle/city.
It is also much easier when playing a game for the defending player to move his hard pressed defenders about the grounds if at least one part of the castle is against the edge of the table and is open. If you prefer round towers you might try using an idea that I haven't tested yet but should work.
Use a one pound coffee can and cover it with poster board that has already had the stone work lines scored into it with a semi-sharp object, such as a nail or an awl. After the covering has been glued in place, paint the tower grey first, then use a black wash (a much thinned down mixture of flat black and thinner) and gop over the entire thing after it has dried completely. The black will soak into the poster board where you have broken the surface with your scoring tool and accentuate the lines. I have used this painting technique for model buildings and its is commonly used by model railroaders who do a lot of scratch building. When you get around to walls don't forget to make a pair of short, broken looking sections for the inevitable breech.
Back to Table of Contents -- Courier Vol. 1 #5
To Courier List of Issues
To MagWeb Master Magazine List
© Copyright 1980 by The Courier Publishing Company.
This article appears in MagWeb (Magazine Web) on the Internet World Wide Web.
Other military history articles and gaming articles are available at http://www.magweb.com
