MATERIAL AND EQUIPMENT REQUIRED
- 3/16 x 3/16 balsa
1/8 x 1/16 balsa
1/16 dowel
Round toothpicks
Straight pin
Heavy weight sewing, carpet, or button thread
Flat, dark brown paint
X-acto knife
Elmer's glue
A quick-setting contact cement such as Walther's "Goo" is also helpful.
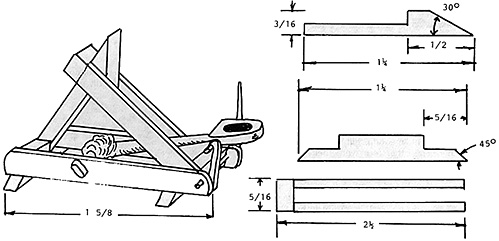
The drawing shows a sketch of the completed catapult and two detail drawings, one of the end pieces and one of the check block which receives the blow from the throwing arm.
Start by cutting the component parts from the balsa. Build the base first. Make the throwing arm from the 1/16 dowel. A lifetime supply of these dowels can be found at any drug store in the form of long cotton-tipped throat swabs. If you can't find these, thin square balsa can be shaped with fine sandpaper. The scoop is made from a small piece of 3/16 square balsa.
Gently cut the shape of the scoop on the surface of the wood and scoop some out, then press the shape into the wood with a small blunt object, crushing the wood slightly. You may spoil one or two of these before you get the feel of it, so make sure you have the hollow the way you want it before you bother with any fine shaping of the rest of the scoop.
The crossbar that the arm is fastened to can be round or square. It doesn't matter since it will be covered with crossed wrappings of thread to simulate the twisted ropes that produce the torque for operating the prototype. One-eighth x 1/16 balsa is used for the check block supports.
When the supports are glued in place the sides will angle in to meet the check block in an inverted "V". The length of the supports and possibly the length of the check block may have to be adjusted until it looks right. Use the sketch to get the feel of how it should look. A piece of dowel goes through the rear of the base.
The small restraining hook is fastened to this as is the capstan bar for winding the prototype down in preparation for firing. A small piece of a straight pin is used to engage the hook and is placed into the side of the scoop. Use a very fine sandpaper to round the corners of the base and for shaping the outside edges of the scoop.
These few light touches with sandpaper make a great deal of difference in how the completed model will look. When working with small objects, very small things often make the difference. Finish with a dark brown, flat paint.
Building time for your first attempt should run about three or four hours. Once you have built one you can mass produce two or three in little more time than it takes to build one if you cut all the parts at the same time and do each step on each model before going on to the next step.

Back to Table of Contents -- Courier Vol. 1 #1
To Courier List of Issues
To MagWeb Master Magazine List
© Copyright 1979 by The Courier Publishing Company.
This article appears in MagWeb (Magazine Web) on the Internet World Wide Web.
Other military history articles and gaming articles are available at http://www.magweb.com