 In the spirit of enhancing miniatures wargaming, by way of simplicity, to help grow the hobby and attract new blood, I have endeavored to do so not only in the adoption and development of rules, but also in methods of building the terrain.
By definition, wargaming terrain must be invisibly different from a diorama or a train layout. The difference must be invisible, so that it looks at least as good as those other artistic endeavors. Different, in that it must permit mobility and provide for troop deployment—or troop concealment in the case of densely wooded areas.
With these goals in mind, below is a brief description of a terrain building method I’ve used successfully for many years. Although the work presented is for 1/300 (micro) scale, the method applies equally well to any scale.
We will examine woods for troop concealment first—features which, like buildings, allow placement of troops within—unlike walls, hills or gullies which must use more complex forms of concealment such as rostered markers, annotated maps and/or umpires. For our purposes, we want to have the troop units physically present on the table, which simplifies concealment without need for record keeping.
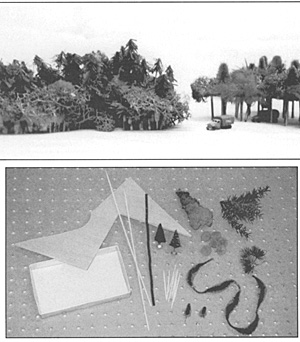
First, the materials and tools required. Many will be found in our households in the form of junk mail and other throw-away items. Some may have to be purchased at craft stores and some are already in our workshops. Among the latter should be paint, glue, scissors, tooth picks, a small wood saw, and wood or plastic scraps left over from other projects. Craft stores will yield pre-formed greenery strips, plastic flower greens, pom-poms in various sizes and woodsy colors, lichen and similar landscape materials. Your waste basket could be mined for small cardboard boxes which once contained jewelry, hand calculators, watches and other small items.
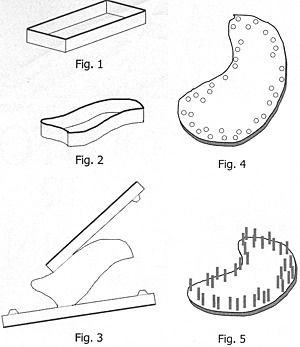 I use two variations of a simple construction method. The first is for thick woods which block visibility so that units deployed there cannot be seen from outside the wooded area. Assuming normal 1/300 scale units are no higher than 1”, basic material is a small, thin cardboard box, say 4”x 6”, about 1” deep with open top (see Fig. 1).
With some judicial trimming with scissors, the 4”x 6” rectangle can be fashioned into an irregular shape more appropriate for a wooded area. As long as several joints between box bottom and sides remain uncut, the 1” wide side strip can be bent to conform with the new contour and glued in place (see Fig. 2). Basic shape of the woods is now done. What remains is the more time consuming task of detailing and finish.
If box material is not too dark for the required contrast, use a charcoal gray or brown magic marker and draw lines to represent tree trunks. Then turn the box upside down and glue lichen, green pom-poms, miniature Christmas tree tops, and other similar stuff all over what will now be the top of your forest. Make sure some of this foliage overhangs the box edge to hide it and give your woods more depth. (I found Bond 484:Tacky glue very effective for this and easy to use).
When the new woods are placed over your troops, only you know they are hidden there. They also make great looking islands in naval sail wargames.
Optional method of constructing the cardboard box version wooded area is to use a flat sheet of thin cardboard, instead of a box. Draw a pattern similar to one shown in Fig. 3, bend into the desired shape and glue the joints. You should end up with something that looks like Fig. 2—the same as one made from a box.
A large number of small, independent wooded areas is better than one big one in that when hidden troops in one are revealed, the rest of the woods may still be suspect, and if additional troops are there, it is still to be confirmed.
The second variation of this construction method is for wooded areas which may impair troop movement, provide partial cover, and prevent spotting from the air, but do not hide troops from the enemy on the ground. For this, the base material is a thin sheet of plastic or wood. 1/16” to 3/16” works well for all scales. You will also need toothpicks cut to a 1” length, or whatever is greater than the tallest vehicle to be deployed in the woods. For larger scales use wooden skewers or dowels instead of toothpicks. These will represent tree trunks and should be stained or painted the appropriate color. Cut the wood (or plastic) sheet to the desired shape of your wooded area and drill holes for toothpicks randomly around the perimeter, leaving the central portion intact (see Fig. 4).
Glue the stained or painted, pre-cut toothpicks into the holes, making sure they all project the same distance (1” minus material thickness) from the surface of the base and let the glue dry well before additional handling (see Fig. 5). Optional method is to glue the toothpicks in at their full length and trim them to 1” size after the glue dries.
Next step is exactly the same as with the cardboard box version. With toothpicks projecting downward, glue the foliage all over the top as before. More foliage overhang will be needed here to accommodate the extra thickness of the wood or plastic sheet.
Now, when the wooded area is placed over your troops, they will appear to be in a clear forest, without undergrowth, and will be visible from table level, but not from the air. The toothpick version has the additional benefit of allowing easy modification into dense woods for total troop concealment. All that’s required is a 1” wide ribbon of heavy paper, decorated with magic marker “tree trunks” (as in the cardboard version), threaded among the toothpicks or wrapped around the toothpick perimeter below the foliage, to block visibility into the woods.
Using the above method, vast wooded areas of many shapes and sizes can be created at very little cost. By using different combinations of pom-poms, lichen, miniature Christmas trees, plastic flower greens, etc., many varieties of evergreen and deciduous woods can be fashioned. Other scales may require other materials, but only limited imagination will limit the possibilities.
Back to Table of Contents -- Courier # 91
To Courier List of Issues
To MagWeb Master Magazine List
© Copyright 2004 by The Courier Publishing Company.
This article appears in MagWeb.com (Magazine Web) on the Internet World Wide Web.
Other articles from military history and related magazines are available at http://www.magweb.com