 There is a huge number of 1/285, 15mm, 20mm, and 25-28mm buildings on the market. Some are resin, some plastic, some made of hard foam. They usually come unpainted – although there are some painting services available, including some advertised in the pages of The Courier. Painting buildings is easy using the technique below. It is easier with the larger buildings but the system can be applied to the smaller scales as well.
1. Clean the building of flash and bubbles. You can fill-in holes with white glue. Be careful with resin buildings and foam buildings - the material is toxic when it is dust and cutting, drilling, sanding will create dust. Make sure you wear a protective mask. You also have to be careful using enamel paint, spray paint, glues, and fillers with these materials. Test your material with samples of the building material to make sure it doesn't melt the material. You can wash the building with a mild detergent in warm, not hot, water and white glue and acrylic paint is normally always safe to use. Most buildings will come with information on the paint to use and whether the material is safe or you need to take precautions.
2. Undercoat the building. Some paints in spray cans can be used for the undercoat if the building is plastic, but resin and foam usually can't take any paint with petroleum products in it, which includes all enamels. Check with the model building manufacturer and in the packaging for information on what paints are safe to use. As said above a safe bet is to use water based acrylic paints. I use enamel automobile black flat primer on plastic or metal buildings since enamel based paint won't hurt this material. For the others I have brushed on a mixture of black hobby paint, water (50/40) and white glue (10%). This mixture is thin enough to completely cover the building and the white glue helps seal the surface. You want to undercoat with black paint whatever the paint used. Seal the bottom of the building as well. Here water and white glue will work.
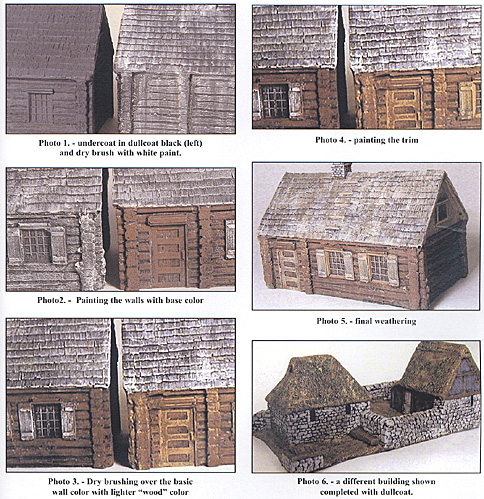
3. Dry brush the building with white paint. The white acrylic hobby paint from a craft store is excellent for this. It is a bit thick direct from the plastic bottle. Use a square slightly stiff brush with most of the paint brushed off. A paper towel or newspaper is good for getting the paint off. If there is any liquid paint on the brush you have too much. A big brush can be used on large surfaces and a small one for the hard to reach areas. When done, the building will have white paint on the raised portions and the depressed areas will be black from the undercoat. This will lighten the paint/building color when painted. If you want a darker color skip this step. See Photo 1.
I did two buildings, named B1(on right in the photos) and B2, which are exactly the same, except I did one step in painting the building on B1 so it could be compared to B2 to show the changes. I also did B1 as a plain building and B2 as a fancier version. Both buildings are foam made by Hudson & Allen Studio and sold by Vatican Enterprises, www.wargamescenics.com, in Clinton Township, Michigan. These are 25mm. Keep in mind ANY plastic or foam building can be painted this way.
4. The next step is to do the main wall colors. In this case the buildings are from the "Log Cabin Village Set" with wooden logs as the main construction material. I used craft store paint again, this time Delta Brown Velvet. To really make this dark brown color "pop out" you lightly dry brush the dry dark brown paint with Polly Scale (PS) "wood" color, which is a raw light wood color. I also used this color for the trim under the roof edges. When dry brushing try and brush against the grain of the painted surface. This will keep the detail showing. See Photos 2 & 3.
5. With the outside wall colors done the next step is to do the windows, trim, and the wood at the end of the building under the roof. You can use different colors for each, or the same. For B1 I used the PS wood color for the wood in the triangle under the roof ends, for the door trim, and for the windows and window shutters. Trim was limited to the minimum. For B2 I used Delta white for the triangular piece at the end of the building, Delta Hauser Green Light for the windows and window shutters, including the windows on the end of the building. The trim under the roof was also painted this color, as was the trim over the front door. See Photo 4.
6. The chimneys can be painted with Delta Bright Red or Delta Light Grey. You can also use PS Rust instead of the Delta Bright Red. In Photo 4, the roof color on B1 is the Light Grey, the roof color on B2 is Folkart Dark Grey. Brush against the shingles and make sure you don't have too much paint on your brush. If you do you will lose the shading.
7. Almost done. The final step is to weather the building and touch up any errors. ALL of the above paint steps used dry brushing. When careful, for example, you can dry brush window sills and the wood holding the glass without touching the panes, which should still be black. Now you touch up any panes you colored. You also weather the roof - the B2 dark gray roof was weathered with the PS Rust. B1's light gray roof was weathered with the Folkart Dark Grey in patches to break up the color. Folkart Thicket (a green color) was used near the base of the houses to represent the mold and moss that would grow near the ground on a wooden building. Dry brushing the triangular ends of the buildings with white weathers the natural wood and the green painted wood. Finally, a touch of PS Dark Earth lightly dry brushed on the building can be used to dirty them. Just do it to those locations that naturally get dirty.
8. Last step. Dullcote with a flat spray. See Photo 6.
Back to Table of Contents -- Courier # 91
To Courier List of Issues
To MagWeb Master Magazine List
© Copyright 2004 by The Courier Publishing Company.
This article appears in MagWeb.com (Magazine Web) on the Internet World Wide Web.
Other articles from military history and related magazines are available at http://www.magweb.com