 This is the first in a series of scenarios to provide ideas for the reader to recreate battle on his tabletop. We get a lot of requests for article of this kind. Bill Abrams and hid group play an open, friendly game without rules-lawyering that can ruin the best scenario for its participants. Bill has kindly agreed to present some of the best from his group. - Dick Bryant
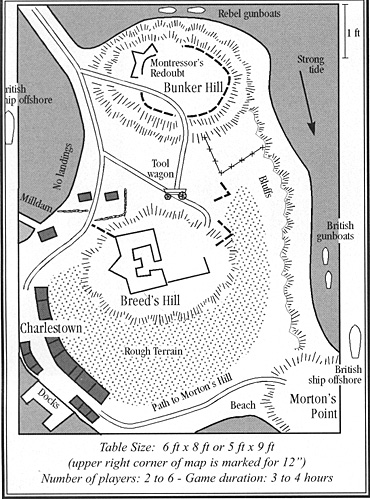
Table Size: 6 ft x 8 ft or 5 ft x 9 ft (upper right corner of map is marked for 12”)
Number of players: 2 to 6
Game duration: 3 to 4 hours
All scenarios in this series were laid out on a 6 ft x 8 ft table with a mat-green, painted surface, suitable for accepting sidewalk chalk (the dusty kind) markings. We have become accustomed to blending and smudging chalk markings until an almost 3 dimensional effect is created. This works particularly well for rivers and roads. My buildings are not exactly to scale, being on the small side. 25mm buildings seem to take up a disproportionate amount of our precious table area for what they do. Woods are done with chalk outlines and a few model trees, and hills are ˝ inch thick contours in near-ovals and near-circles. The miniature soldiers are the stars of our “play” and attention is focused on them. The scenery need not be super realistic to be satisfactory, just like a stage play often only needs to suggest much of the setting to be effective.
WHAT IS GOOD ABOUT THIS SCENARIO
1. There are 3 possible avenues of approach; the Charlestown docks, Morton’s Point, and the north beach.
2. There is a major and a minor objective; Breed’s Hill and Bunker Hill.
3. There is no “sudden death” possibility that would terminate the game abrubtly.
4. Can be played by only 2 players or as many as 8.
5. Can be played to a conclusion in 3 to 4 hours, a comfortable afternoon or evening.
6. Sub-commanders, even on the losing side, can claim local successes.
7. Early action is precipitated by the penalizing of the British if they dawdle as the rebels will continue to create more breastworks and accumu8late more reinforcements.
TAMPERING WITH HISTORY
In an attempt to create a more even-handed game, a few things were added or changed.
1. Rebel gunboats were added on the north shore to allow them to contest any flanking move by water.
2. The supporting batteries in Boston were changed to additional artillery that needed to be landed. Being on the peninsula also made it more vulnerable.
3. The fairly extensive road network on the peninsula was greatly simplified and is used only as a guide for retreating stands of infantry to show where they go.
4. The supporting broadsides of the British ships was reduced to a broadside of 3 guns near “The Neck” and a another near Morton’s Point to make the Morton’s area unattractive for an advanced rebel deployment position. These ships can be treated as “off board” if desired.
ORDER OF BATTLE FOR THE GAME
British battalions are 8 – 4 man stands. Rebels vary from 6 - 3 man stands to 10 – 3man stands. Field guns have a crew of 3, gunboats 2.
British
3 Elite batallions
8 Line battalions
2 Light guns
2 heavy guns
2 heavy mortars
2 gunboats w/heavy guns
2 off-board ships
12 landing boats (boat holds ˝ btn or 2 guns)
Rebels
8 battalions (4 off board at “The Neck”)
4 light guns (2 off board at “The Neck”)
1 tool wagon
1 reserve ammo wagon
2 gunboats w/heavy guns
A FEW COMMENTS ABOUT THE SITUATION
The British are often criticized for failure to land directly on “The Neck”, thus cutting off and trapping the rebels on the peninsula. However, the authors that I consulted indicated that there was good reason for not doing this. First, the south side of the neck was not readily accessible, being blocked by a mill dam and marshy area. Batteries located on the other side of the neck could also make any boats in this area very uncomfortable. On the north side, in addition to the consideration of the batteries, is the tide. The British felt that the longer they waited, the stronger would be the rebel position, so they needed to get going, but the tide would be making against them shortly. This meant that while an initial landing could be achieved, reinforcement would be a problem, creating the distinct possibility of a defeat in detail. The end result was a landing at Morton’s Point with an attempt at a flanking move up the beach which was lower, and not under fire from the rest of the peninsula. Reinforcement would be much more feasible at Morton’s.
SPECIAL RULES
It doesn’t matter what 18th century rules are used for the game, as long as a few key points are included:
1. Most important! A ˝ move is required to fire muskets and another ˝ to reload. This is what creates the dynamic that forces choices between fire and movement which creates the tension in the game.
2. The musket range and movement rate must allow the rebels in the redoubt the opportunity to fire up to 3 times before the British can climb over the wall to melee the occupants. 1 volley should be possible at long range (whether or not this is wise is another problem), and 2 at close range. The climbing of the redoubt can be factored into this.
3. Limited ammo for both sides: The British start with 4 volleys. They will never get more, relying on the bayonet when necessary. The rebels start with 4 and have another 4 in a reserve wagon that is trying to cross “The Neck”. The cart is not a valid target for artillery in our game, but does have to check morale to cross “The Neck” if it is under fire. Any unit contacted may have another 4 rounds.
4. Men behind works are not exposed to musket fire until they begin firing. They are exposed to artillery, but at a reduced accuracy as some of the shot will be blocked by the parapet. Mounting and dismounting from the fire step behind a parapet takes ˝ move.
5. The British howitzers and mortars may fire flaming carcasses into Charlestown, setting fire to the town by scoring “hits”, but this will create negative press and takes the shine off of any victory. Not their first choice.
6. Morale: British morale is checked at 50%. Units may be voluntarily withdrawn. The regrouping area is wherever they landed. Partial units may be combined to recreate whole units, but never stronger than the original (extras are lost). If elites are combined with line, they become line. Any British unit that falls below 25% strength is removed from the game. Rebel units, including wagons that attempt to cross “The Neck” must throw a successful (4+) morale to do so if “The Neck” is under fire by the British ship. If fail, try again next turn. Infantry are also subject to casualties if hits are scored.
Units that successfully cross “The Neck”, must move along the road, dicing for direction at each of the junctions, thus they might divert to Bunker’s rather than continuing on to Breed’s. If they go to Bunker’s, they need to be motivated to move on (see “Old Put”).
Rebel forces must check morale by area whenever even a single casualty is suffered in that area. A failure results in that number of stands retiring in a telescoped move to either the next rearward position or all the way back to the other side of “The Neck”, where they begin to form a new unit of recovering deserters(dice for choice of direction, if there is a choice). Use a single die roll. 4+ is good morale, 1, 2, or 3 is the number of stands that will desert.
In normal combat, a rebel unit failing morale is not magically telescope-moved to the rea, but rather retreats as per your normal combat rules.
“Old Put” is the rebel general Israel Putnam, famous veteran Indian fighter from the French and Indian Wars and former Roger’s Ranger. He is a roving officer responsible for moving reluctant reinforcements off their arses on Bunker’s Hill and/or encouraging men on the wrong side of “The Neck” or who are advancing in the wrong direction, and is the only mounted figure on the table. He moves at a suitably faster rate than the foot and creates a second chance dice throw with a +1 factored in for any single area or retreating unit that he can reach during his move. A morale failure under “Old Put” does not create deserters, but they won’t advance, either.
The “areas” where the Rebels tend to congregate are Breed’s Hill, Bunker’s Hill, The fleches, Charlestown, and the fence.
GRAY AREAS
Are there gray areas? Sure. Any interesting scenario is apt to create them. This is not necessarily a defect. Remember that even football and baseball, popular games of long standing, still require a plethora of umpires and judges to interpret the unexpected and unclear. These can be resolved in our game either by a single umpire, by common sense discussion, or by cold steel at dawn (my favorite).
What we experienced
In our game, the British shied away from a Charlestown landing, fearing an ambush. “The Neck” was not an option. One of my historical sources indicated that the British did not attempt a landing there because they feared the rebel batteries beyond “the Neck” would devastate their boats on the approach. The west side included a dam which blocked movement by water. A major landing also was not attempted on the north side of Bunker due to the tide, which would have interfered with the landing of reinforcements. The troops had to be ferried from a point opposite the south side of the peninsula.
A conventional landing was made at Morton’s Point and a flanking force was started in boats along the northern beachfront. However, when the boats began to take hits from the rebel artillery, the troops were landed approximately opposite Breed’s Hill before entire boatloads were lost from sinking (2 hits to sink a boat). The rebels fired off 3 of their 4 rounds from the redoubt and breastwork and then retreated to Bunker where additional breastworks had been prepared. The British opted to halt after taking Breed’s as the casualties sustained had made any further prepared position assaults doubtful. There was also a fight at the north fence, which took its toll of the Regulars. Both sides claimed victory.
Back to Table of Contents -- Courier # 91
To Courier List of Issues
To MagWeb Master Magazine List
© Copyright 2004 by The Courier Publishing Company.
This article appears in MagWeb.com (Magazine Web) on the Internet World Wide Web.
Other articles from military history and related magazines are available at http://www.magweb.com