 DeKalb, Illinois. This city is the home of the inventor of barbed wire, whose development allowed the taming of the West. Barbed wire fences were cheap, effective, easy to put up and maintain. Introduction of this new "invention" allowed farmers, and ranchers to enclose fields and grazing land in fences. It spelled the end of the open range.
Barbed wire found another use from 1914-1918. It was used to form obstacles against infantry on foot to prevent them from closing with defensive positions. It has been used for this since then.
Modeling a barbed wire entanglement is a relatively easy project. This article will explain how it can be done for a 25/28mm battlefield, and how to modify this method for smaller scales. You need the following tools:
- Pin-vise or Dremel© Tool with small bits (drills)
Elmer's© Wood Putty. This comes in a squeeze tube and is water-based.
Square or round toothpicks OR straight pins.
Plastic, wood, or cardboard sheet. Plastic and wood is best. This should be thick enough not to warp (which is the problem with cardboard). 1/16" is fine. Note that it doesn't have to be flat. A hill can be used. Cutting tool to cut the sheet.
Fine copper wire. I like the armature wire from the elec tric motors the model manufactures put into their "motorized" kits. You can also get wire at the local hobby store or hardware store.
Super Glue. I prefer the thick gel version I can get at my local hobby store.
Elmer's© white glue.
Hobby knife or sandpaper, or a sanding attachment for your Dremel© tool.
Breath mask
Safety glasses or goggles.
Spray paint and a bottle of "green" acrylic paint (Seminole Green from a craft store is good).
Black Spray paint for primer.
Brown Iron Oxide paint, "Rust" acrylic paint (orange rust preferably)
Steel paint.
Woodland Scenics fine grass in greens and/or browns or a mix of both.
Pliers or wire cutters if you are going to use straight pins for posts.
 STEPS IN MAKING A BARBED WIRE ENTANGLEMENT
This assumes making six inches of wire. It is better to have shorter (six inches in 25mm, 3" in 15mm and 20mm) entanglements. You can also use this technique to add entanglements to fortified positions. You should do two to eight entanglements at the same time.
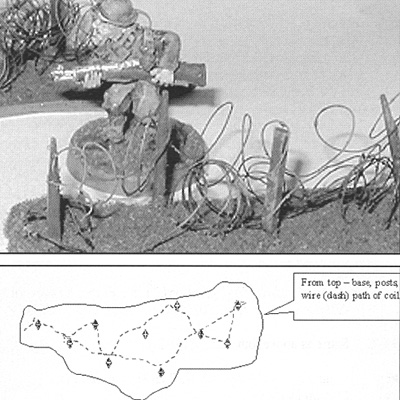
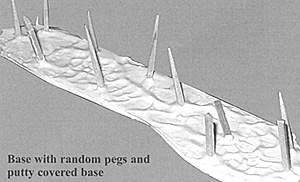
Cut the sheet material into bases. These should be six inches long and one or two inches wide, and do not have to be a rectangular shaped base. Irregularly shaped bases look better. See BASE WITH POSTS picture. Next, using the sandpaper or Dremel© Tool sand the edges of your base at an angle to provide a slope at the edges. Then, using the putty spread a generous amount onto the base and using a wet finger spread it over the base. This shouldn't be a smooth coat of putty, mess it up to look like rough ground. It can also be uneven in height. You now have an option. If using toothpicks for posts, cut them in half, then push them into the putty after it has dried some. The putty should be the consistency of thick toothpaste when you push in the toothpicks.
You will find that the putty will hold the toothpicks up without glue. Let the putty dry completely. However, if using wire instead of toothpicks, drill holes in the putty/base using a bit the thickness of your straight pins. Add a drop of super glue to the pointed end of the pin and push it into the hole. Loose toothpicks can be glued back into the base using super or white glue. If the metal pins are going to be too long you should cut them off. Waist to chest high is the right height. If doing a smaller scale, use the pins and cut the extra length off after they dry on the base. A good pair of pliers will do this, or wire cutters.
Wear safety glasses!!! The pins should be placed in a rough line from one end of the base to the other along the long axis. A staggered pattern is best. See the illustration. Let this dry.
Spray the base with the posts on it flat black using your black primer and let dry. Once dry coat the base with a mix of water (20%), white glue (50%), and green acrylic paint (30%). This is then dipped into or has the Woodland Scenics grass dropped on it. Let this dry. The posts should NOT have grass on them.
You need your thin wire and a cylinder-a pencil, pen, or rod. The smaller the scale your wire entanglement will be, the smaller the cylinder you need. I get fine wire by unwrapping it off the armatures of electric motors in motorized tank kits. Wrap the wire around the cylinder from one end to the other. A wire 6ft. long (Yes 6 feet! - ED) works well for a six inch 25mm entanglement. Carefully slide the cylinder out. This gives you a long coil of wire. Spray these coils with flat black paint.
You now have a six inch long grass/dirt covered base with pin or toothpick posts in it. Paint the posts steel. Now, using a square old brush, put some Brown Iron Oxide paint on it, then wipe this brush on a newspaper until most of the paint is gone. Then brush this across the posts. (Dry brush the posts in Brown Iron Oxide). Use the paint on the paper to refresh the paint on the brush. This will rust your posts. A light brushing of the orange rust color,just a little bit, will highlight the brown rust.
Take your first coil of painted wire and place it over the posts, letting the coil open up. This should fit over the posts without too much trouble. Using the super glue, or white glue, put a drop of glue wherever the wire touches a post. Let this dry. This will glue the wire to the posts. Now, dry brush the black wire with the Brown Iron Oxide. Make sure you rust any glue. You can touch this up a bit with the orange rust. Now, give your wire entanglement a spray of clear flat (Dull Coat works well) for protection. You are done.
If doing this on a piece of terrain, like a resin trench system, you drill the post holes in the terrain, add the pins for posts, glue the wire coils to the posts, then spray the entire piece with black primer. Then paint as described above. You can gently lift the wire when putting the paint/water/glue mix on to add turf, or if painting the terrain piece. If you want to speed up making wire entanglements, you can use the cut/post/wire/glue paint process above using this technique.
On both projects, you can also add brush or trees to the entanglement base, to allow the entanglements to better blend into your terrain.
Side note. If you make a short coil and then compress it, wrap a piece of wire around the coil on one side to hold it closed, then prime and dry brush it as described above, you will have a coil of wire you can glue to a vehicle. If you want it less rusty, then paint it in steel and only very lightly use the Brown Iron Oxide on it, and no orange rust at all.
Please let the editor know of any other terrain projects you are interested in.
Back to Table of Contents -- Courier # 90
To Courier List of Issues
To MagWeb Master Magazine List
© Copyright 2004 by The Courier Publishing Company.
This article appears in MagWeb.com (Magazine Web) on the Internet World Wide Web.
Other articles from military history and related magazines are available at http://www.magweb.com