So far I’ve shown you some basic techniques and where they can go. I’ve shown you how to make flat ground, slight irregularities, woods, told you how to make trees, forests, roads, and streams, and shown you some neat things. Before I go on I want to take a break and show you some techniques to use in putting them all together, that is, how to make them work well. This might seem rather too simple to deal with but I assure you it is not. I made a lot of mistakes over the years, and wasted more time and money than I care to reckon up.
The first thing about modeling any terrain, is the planning. By doing a little planning you can save yourself a lot of time and effort. Just going ahead and building elaborate terrain is nice, but unless that’s your thing, you will soon tire of it. The three things that you must consider when making model terrain are effectiveness, utility, and durability. You will notice I did not say realism. Whatever realism you get must be through “effectiveness.” By effectiveness I mean that the piece, and when I say “piece” I mean the scenery on one of the hex-plates, gives a striking and pleasing visual effect of the thing it wishes to represent. If it is supposed to be a hill, does it “look” like a hill? If it is supposed to be a small farm-house in a clearing, does it look like it? Here the best is always the enemy of the good.
You can go and create super-detailed pieces for games, spending inordinate amounts of time and effort on shingles, gingerbread carving etc, and make absolutely beautiful pieces, but unless you are simply making a “show piece” or a diorama base, your artistry will be wasted. In the game you are not interested in the “show piece” in more than a representational function. When we are playing a game we won’t notice the individually carved shingles on the roof, the super-detailed door, and the scale chickens in the coop “out back.” We are interested in the tactical function, and you could have saved yourself all that effort. Thus we can accept certain “out-of-scale” features, and exaggerations or abridgements provided it gives a pleasing visual effect. The three sections shown in Slightly Irregular are a good example. I made all of them in a matter of 72 hours! They are by no means “finished” presentation pieces, and purist could find lots of things wrong with them. But they are visually effective and that is all that counts.
Utility
The second factor is utility. That is, they must “fit” into the game and fulfill an effective game role - they must assist in the play of the game and not hinder it. This means that troops must be able to line up behind the walls, stand on the hills, get “into” the buildings, and be “in” the forest. The terrain must also serve a utilitarian purpose in that they “aid” the rules. If an area is to be of limited penetrability, that is, perhaps only a few stands could operate in the area, then if you construct the terrain to model that, it means you can write simpler rules and run faster games. For example, I have one section I made with a tall craggy hill on it, sort of an exaggerated “Big-Round-Top. The sides all were steep (the piece stood 6” off the table top) and were modeled rock sculpture with trees and brush up and down the slope. The top had a small flat area which could only accommodate one stand. In effect, only one stand could pass through the hex in a turn. I did not include a photograph because it does not photograph well.
Durability
The final point is durability, and I cannot stress this enough. Wargame terrain gets rough handling! I will be the first to admit that all of what I make is pretty crude artisanship. It’s not meant to be much more. Even though it’s built to take abuse, as I sit here and gaze at a table full of my hexagons I see how much of a beating they have taken in the past 5 years. Remember, this is the stuff that couldn’t even be destroyed by being run over by a car - gives you an indication of how rough wargames are! Try and build your sections so that they are disassembleable.
Make the houses removable for separate storage, the trees too, and even fences if you can. It takes a lot more work, but it will last a lot longer. Okay...Okay... end of sermon.
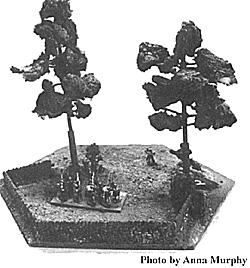
Shown above is a very simple section that showcases many of the techniques I have shown. Once again I have my stand of Landsknechts in the front, and a single 25mm in the back for scale. The stone wall was made by taking several old Britains 54mm stone wall sections and placing them around the periphery of the plate. Then spackling putty was used to smooth the seam along the base and to affix it to the plate. You could use Celluclete with the same effect. A simple dyed polyfoam shrub covers the open end of one wall to disguise the locking pins on the end of the last section of wall.
A similar “bush” has been removed on the left hand side to show this. A small piece of slate is just beyond the right hand tree, representing a large rock slab outcropping. It has a “2” painted on it, which in the rules means it confers a benefit equivalent to that number. It was attached with hot melt. You will notice the apparent roughness of the ground in the center of the section. This is intentional. After painting and spreading with glue, a rougher mixture of polyfoam was used to represent small shrubs, trees, tufts of gras etc. that would naturally grow up in an untended field like this. The trees are made by the “chop-stick” method and the branches by solid BX cable cores run through holes drilled in the trunks. The trees are simple polyfoam blobs. This is a good example of what I mean by visual effect. If you look closely at the trees, and focus on them, they don’t look that good. In fact, they look like... well chopsticks with globs of something sticking to them. If you look at the troops on the other hand, you can still see the trees but they look much better.
The reason is that though you are not looking at them, you still see them, and this time your mind is really substituting its own picture of a tree... fleshing out the details as it were, to complete the picture. The point is it has the “look” of a tree, and as long as you’re not examining it minutely, it looks pretty good! The trees themselves you will notice “plug” into thicker tubular trunks. This allows them to be removed and laid flat on the section for storage. They are not, by the way the trees made for this section... the ones made to go with this have lower branches which “cover” the unsightly joint. This goes a long way to protecting them when in storage. Finally you can see two small “wire” bushes at the base of each tree.
Presentation Piece
Another way to make terrain effective besides super-detailing is to prepare what I call a “presentation piece.” If your table is large enough so you can afford to not use every hex, you can make one section that troops cannot enter at all, and really create a work of art.
For example, you could make a highly detailed forest section and put it in the center of more ordinary forests, or put it on the edge of the table and put other forests around it. The presentation piece is only for visuals, and troops can’t enter, but the eye, much like when you are looking at the troops in the above picture, will gravitate to the presentation piece, and the details in it will be mentally transferred to the plainer sections, just as the trees look more “tree-like” in the photo above when you are looking at the soldiers. I use these when I want striking visuals. Of course, once again, these presentation pieces, where I lavish detail and time, are very fragile so I never take them to conventions. They also don’t photograph well in a magazine format, so I have not given Dick Bryant a picture of them.
Superdetailing any piece is really about the small stuff, so here is a compendium of things to look for, a list of do’s and don’ts to make better terrain.
Unless you’re gaming on the salt-flats or on the plain of North China, flat ground is anything but. Remember to put a small shrub or brush here and there to break up the monotony.
A lot of “texture” can simply be effected by alternating patches of “green-brown” and “yellow-brown” and “yellow-green” and mixing various grades or coarseness of shredded polyfoam.
Crops and fields can be easily made. For small crops in small plants you can paint the base plate a dun or dark brown. Then Lay down long parallel strips of “Elmers” and drop bright green poly-foam on this, and then dust it off.
Vineyards generally don’t make successful models as they require a lot of low-relief and detailed work, however if you must have them you can enclose them with a small fence and again put them in the margins. A good way of making vineyards is to make a light rail fence and place a “wire bush” in the center, only making the stripped portion 1 3/4 to 2 1/4” long, and entwining it around the stick fence.
Most trees have taller shrubs and grass growing near their base, and all of them will accumulate bits of bracken, and piles of leaves, deposited there by the eddies of the wind. Also note that grass rarely grows around the base of the tree. It is more likely to be a moss, or a clover or even bare.
Pine trees accumulate a bright yellow-brown bed at their base, the result of the dyeing of the needles on the inner branches. Also, being evergreens, they choke out the sun from everything below them.
Forest floors are quite uneven. Remember the occasional dead-fall, pile of rocks, or low, wet spot. Dead-falls are of two types, older ones, where the branches have rotted away and the trunk is resting on the ground, and recent ones where the toppled tree, though bare of leaves, is still propped up on branches, as below.
Roads in the pre-modern era are meandering things that were easily turned into quagmire in a rain or with heavy use. A huge amount of effective detailing can be done by using several distinct tints (blending white with a base color) and tones (blending black with a base color) or other combinations on several parts of the hex, and working them together by “feathering” (blending them along the edge). Make sure that the ditches though, are always darker and browner then the road as these areas are always more wet.
Especially in woods or along the road, make small pools and paint them and glaze them as you did the streams. These tiny bodies of water are ubiquitous in nature, and their colors add a lot to realism. It also goes a long way to break up unvaried terrain. When you make a dead-fall, you should also Unless you are modeling a park, it is nature’s way to accumulate things at the base of things. Because of the vicissitudes of nature.
Remember the light. The interiors of things always are darker than the exteriors, this is especially true of trees. You may want to make the bunches of poly-foam purposefully darker than you would think for trees, and then, when the tree is complete drybrush a lighter shade onto the outside to give it that effect.
Messy Battlefields
Battlefields are messy. So are wargamers work tables. The sweepings of your work-table may be the showcases of your battlefield. Small weapons, shields, hats, capes, bits of equipment can be scattered about here and there. This is especially true in the modern period where old tires, bits of bogey wheels, guns etc can be cannibalized from plastic kits.
Rifled projectiles in the pre-modern period (before the advent of effective high-explosives) and cannon balls tended to make long “gouges” in the surface. By using a blunt tip you can prepare these in the celluclete and finish in painting later.
Remember to make a small bit of brightly hued (reds, yellows, blues, and violet) polyfoam to scatter in small clumps here and there, as flowers.
If you want to spice up a forest section you can make a small pile of cord-wood by a deadfall, like a woodsman was chopping it just before the battle.
Rock faces are rarely free of rubble or scree at the base, lay down a line of hot melt and dump small pebbles and fine gravel over it to make them more realistic looking.
Farmers in plowing always turn up rocks. These are then moved off to the side of the field and piled up. If you’re tired of making walls and fences, you can delineate a field my making a nice swell of celluclete, and then, when painted, covering the top with a coat of Elmers and dumping gravel over it to form the top of the pile.
Stream and river-beds, even in forest always have more brush and small trees by their edge. This is because the light can get in under the canopy provided by the tall trees. That and the combination of nutrient rich, abundant, flowing water, makes them ideal places for new growth. Make sure you crowd the banks with brush.
This is by no means an exhaustive list. The best thing I can suggest is when you are going out in the country next time, be sure to look for details. Remember the Words of Pooh-Bah in the Gilbert and Sullivan Operetta, the Mikado...”Merely corroborative detail meant to give artistic versimilitude to anotherwise bald and unconvincing narrative.”
 Planning
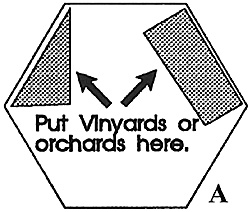
 Larger crops can use the same method and then put every inch or so a dot of “hot-melt” and stick into it a larger tuft of polyfoam. Remember though, this will not take stands of troop as well so it would be wise to confine it to the margins of the “plate” as shown below in illustration A.
 To make the “newer” deadfall, simply make the tree as explained in either the tubular or the wire-armature manner, and cut off the branches on the side the tree is resting on in a constant angle. Place the cut-off pieces beside the tree. Then stuff a tangle of small copper-wire beneath the tree and paint with rust-oleum. Then liberally spread with Elmers and put a yellow-brown polyfoam on the base, laying it on quite heavily. This will look like the leaves from the tree that have fallen off and are blending in with the forest floor. If you can get them you can make a very effective “surprise piece” by placing a small reclining deer or faun under the tree.
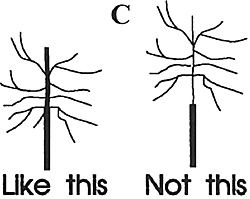
 Nature abhors and empty space or a straight line. When modeling things be sure to pay attention to the joints. Build up the ground at the base of a wall to make it look like it is sunk into the ground, not just laying on top of it. Disguise the base of trees, or make the “plug” the tree goes into sectional so the seam is hidden by the first tier of branches rather than sunk into the ground as in Illustration C.
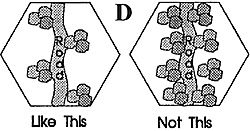
 In many places roads, which were also, naturally, boundaries between fields, became places for trees. Farmers would often grown oaks or chestnut trees for food, profit, or to allow pigs to graze on the mast. Trees were also planted there to shade the road and to act as a wind-break and prevent excessive drifting. This is a way to get trees onto an otherwise flat surface. However, when you plant the trees, be sure to “stagger them” as shown so you can easily get troops on and off the road.
Back to Table of Contents -- Courier #81
To Courier List of Issues
To MagWeb Master Magazine List
© Copyright 2001 by The Courier Publishing Company.
This article appears in MagWeb (Magazine Web) on the Internet World Wide Web.
Other military history articles and gaming articles are available at http://www.magweb.com