Now before I get into the body of the article, once again I have to admonish you. Remember that these things aren’t really rivers, they are actually small streams and rills. Major rivers are too broad to be portrayed successfully on the table top (except in 15mm) and in any case are rarely encountered in battle except as a guard on the flank, or in modern war where you have extensive forced crossings.
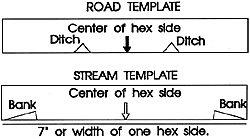
Each strip is 7” wide, the width of one of my hexes. I make the roads about 2” wide, with a half inch additional on each side for a “ditch”. The stream template is the same but with 1.5” on each side for low sloping banks.
Wait a few hours till it is nearly dry. Then take an old pair of wagon wheels on an axle of the scale of your troops and run it up and down the road several times to give the road a “rutted” appearance. Here is where the detail maniacs may get out their scale horseshoe die and begin punching in the tracks if they wish. That is pretty much it.
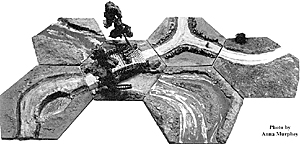
For streams, the procedure is pretty much the opposite. Here lay out a long bead of celluclete about a half-inch thick along the edge of the stream. Then smooth down the outside of the bead (that is the part of the hex that will be land) to where it gradually flattens out to the bare hex. Leave the inside a little more precipitous to give the illusion of a bank. It should come out looking something like the picture on the first page of this article when viewed from the side.
In the center of the stream spread some thin celluclete in little “nits” to give the stream the impression of some rocks and obstructions below the water-line giving some turbulence. Highly effective stream sections can be used by modifying the techniques shown in “Slightly Irregular” to form deeper banks. Small twigs can be sawed off and stuck in the center of the stream to represent trees half submerged etc. Small rocks can be attached with hot melt glue on the edge, or tumbling rapids made in the same way.
One Note
The triangles on the edge of hex on the stream template are not “parting patterns.” You don’t have to build up the edge of the hex here like you did hills. They are meant only to mark the “width” of the bank section so the stream, when painted, matches up whichever configuration you make. You can taper it down to table top level. It is simply an indication of where the edge of the stream starts and the bank begins. This creates small undulations and flat spots, which if you view any stream, are present a-plenty.
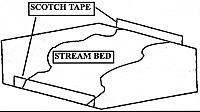
Then paint the base of the stream with a medium blue, not too dark. Now paint the banks a dark muddy color or a light sandy color, as your fancy strikes you. When this is dry use acrylic paint and put a line of heavy dark blue down the center of the stream. Put a line of light blue on each edge near the banks. Then, working slowly, “feather” these together to get a gradual blending of the shades from center outward. Add in a little green blotch here and there and work it in till you have a nice mottled hue. If you have textured the stream with rapids and the like, or small groups of rocks around which the water is eddying, be sure to dry-brush some white on top of these to look like foam and splashing water. Once this is dry take some acrylic high gloss varnish and pour a layer about 1/8 inch thick into the center of the stream and let it flow out till it covers all of the water area. This is why you put the scotch tape on the ends, to keep it from leaking out. It’s a good idea to do this over newspaper anyway!
The acrylic varnish, once dry will not only give the stream a glossy surface, like water, but the thickness will “curdle” a little of its own in the drying process (it’s not meant to be put on so thick.) This will look like ripples in the stream and be quite effective.
Bridges can be made quite easily by cutting a few of the members from the scrap left over from the hexagons. The picture shows one that I made for my set-up (no it’s not the fabled one I was telling you about, that’s still unfinished)! In this case I smeared carpenters putty all over the bridge to disguise the plywood members and then painted it to look like stone. The small boat was once from a model of the U.S.S. Constitution that I cannibalized.
 I have put these two things into the same heading because they really are mirror images of the same technique. They are remarkably easy to make and offer some good opportunities for modeling very nice scenes. At the same time they are the most dangerous of all in their allure for super-detailing! Players could get lost in putting all sorts of effort into a simple road section, down to small tufts of brush hanging over the roadside ditch, or to scale 25mm horseshoe prints in the road, and highly realistic Budweiser cans in the bywater eddies of the streams. Where the two meet, that is, at bridges, is the worst of the worst, and I once found myself spending days and days on making a bridge section with a small boat half-sunk in the water, a boy fishing on one side of the bridge, and two lovers trysting under the shade of a pine tree on the other. I never finished it... it still sits unfulfilled, like the love of the two little lead figures under the pine tree, on my work table.
 Thus, the watercourses I am dealing with will largely be within a single hex.
The first thing to do is decide on gauge. By gauge I mean how wide your streams or roads will be. They don’t have to be the same, that is, roads can be much narrower than streams, but you should establish a standard size so that when you put your stream sections together they match, just like the hills in “Hills and Dales.” You should, once again, make a simple rectangular “pattern” for each, so that you can save time measuring. Here is what I use for mine.
 For a road, take the Celluclete and lay it between the lines in a thin, but even carpet. Make it a little wetter than normal so that you can pat it smooth. Then using your finger, run it along the edge of the road, but somewhat inside the edge to press the Celluclete out on both sides. This will form a “ditch” on both sides as shown below.
 Painting is where most streams run awry. The land parts of the stream we have already dealt with. In the stream itself the best thing to do is first take a piece of scotch tape and place it over each edge between the triangles on the template, and covering the whole width of the stream as below.
Back to Table of Contents -- Courier #80
To Courier List of Issues
To MagWeb Master Magazine List
© Copyright 2000 by The Courier Publishing Company.
This article appears in MagWeb (Magazine Web) on the Internet World Wide Web.
Other military history articles and gaming articles are available at http://www.magweb.com
