 For the general, either on the real battlefield, or the tabletop, and for the modeler besides, woods is a pain in the ass! First of all, woods are far more prevalent on battlefields than hills are, and they actually are far more decisive! They form an excellent protection against fire. When the leaves are on the trees they form an impenetrable block to vision, and even in winter more than a hundred paces in they are just as opaque. They are an excellent block to movement. They have rutted rock floors, brush, undergrowth, and fallen limbs that will soon tear the careful alignment of any formation to bits, and any cavalryman who charges into a woods deserves everything he will certainly get. Sound in woods is sometimes muffled and at other times echoes and is amplified in an eerie manner.
Finally, they are EVERYWHERE! Each little farm has its copse or tree line at the edge of a field, and nature, abhorring a vacuum, soon fills every bit of waste and untilled ground with undergrowth and then trees. If one is inclined to doubt this then pick up any atlas of battlefields and you will see those infernal blotches of green everywhere! Quite often armies anchored a flank on woods, knowing full well that a few skirmishers would serve to hold up even a determined enemy for hours. No Civil War battlefield is without its "Peach-Orchard" and I haven't even gotten to talk about the deep woods that were found at Shiloh, the Wilderness and Spotsylvania!
The problem with modeling these things is that they are as effective a barrier to table top generals as to real troops. It is difficult to put troops into and get them out of woods without sending them tumbling over, and often players shun them because of this, or take the expedient of crowding troops against one edge "to show they are inside." A poor substitute. The problem is not the forest but the trees, and it is a big problem. This article will deal with the organization and construction of the forest hex itself, and in the next one I'll get into trees.
Now remember that in modeling terrain it is not expert modeling we desire, but visual effect. We will be primarily interested in the action of the game, and the trees, as all terrain, exists as rather elaborate "stage-props" decorating the arena upon which the drama our model soldiers are acting out unfolds. The first thing to do is some thinking about the forest and its design, and more important how they will dovetail with our rules, and, how we can achieve the effect with the least cost and trouble. There are two ways of making forests, what I call the open and the closed, and the second is used if you really want to hide troops in them. However let us deal with the open forest first. Here planning is essential.
It is in the arrangement of trees that the forest becomes effective as a visual battlefield piece. This does not require a lot of trees, especially with the hex-terrain system. The boundaries of the forest are defined by the hex, so you don't need a lot to delineate that, and by clever use of materials you can economize on trees. Shown below are two illustrations of how to position trees.
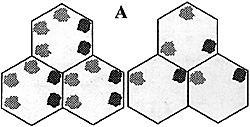 You will notice in each a forest of three hexes. In the one there are six trees per hex and on the other three per hex. You will notice that the trees are also arranged on the periphery of the hex in each corner. This is done to allow the space in the center to be open so you can move troops in and out of the forest easily. As to how many you put in the hex it is up to you, but you may want to use both "three tree" and "six tree" woods. If the forest is going to be small, only one hex or so, the six trees make it look more like a forest.
 On the other hand the three-tree forest hex works better if you are going to have large forests on the table top simply because the visual "mass effect" of the trees is only slightly lessened on the "three tree" hexes. I tried it the other way, that is, putting a few trees in the center of the hex and allowing the troops to stand "outside" the actual trees, but theoretically "inside" the forest hex (as in illustration B), but it raised too many arguments in the game because, ...well, ... the troops weren't "inside" the tree line.
As to the rest of the forest you can make a highly satisfactory forest floor by using the "slightly irregular" terrain mentioned before, and painting it a dull or rusty brown. Most forests do not have green and grassy floors, but instead are beds of old decaying needles and leaves. Remember to scatter bits of real twigs here and there to represent deadfalls, imbed small rocks in the cellulite and bits of poly-foam as brush and small shrubs. Once again, keep these things on the edges of the hex as much as possible to avoid cluttering the center and making it difficult to move troops in or out of the hex.
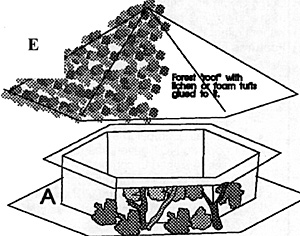
Hidden Forest
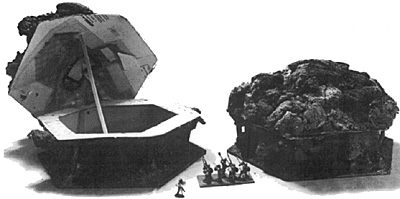
The second type of forest is the "hidden" forest. This is a bit more difficult to make, but it is worth it, and it has a sort of quaint charm all its own. It also makes real hidden movement possible! I can't say this idea is wholly my own. I saw it at a convention more than twelve years ago at a demo game put on Chuck Craine of Ral Partha, and someone had used an old shoe-box glued on a base with trees placed around it and lichen on top to simulate the tops of trees. The box could be opened and troops hidden inside. I was taken with both the look and functionality of it, and it (like me) had its own hokey charm, and therefore was absolutely essential for my own set up. I took the basic idea and adapted it to the hex system.
Now before I get into making these "hidden" woods I have to tell you that I can only give you a few dimensions and some general technique tips. A lot of it will have to be done on your own and figured extemporaneously. This is a "cut-fit" job at times, but this is not always a bad thing. It will mean your forests will be more varied and "natural" rather than looking like cookie-cutter productions. Below is a basic illustration of how the thing is made.
The first thing is to make an inner hexagon of bristol board or heavy (at least 1/8" thick) pasteboard. This is done by cutting a strip 30" by 3". Then divide the 30 inches into 6 equal 5-inch sections. Do not cut these, however, but only "score" them. Scoring is where you cut only halfway through the thickness of the board. This means that you can bend them easily along the cut, but they will not break or come apart. The reason for the scoring is that it preserves most of the natural strength and integrity of the board, and you don't have to handle six individual pieces.
You can, if you wish, use ordinary box corrugated for this part. I don't use it, but it's cheap and strong. If you are, you don't even have to cut the corrugate as a simple crease with the blunt end of a ballpoint pen will break the scores (and be careful to cut it across, not with the scores) form a fold. Now curl this hexagon around by creasing the scores and put in the center of the wooden hexagon, in effect placing part B on part A. Hold it down and closed with a spot of hot-melt glue on the seam. Lay down a thick bead of Elmer's glue on the inside and outside of the base of part B and allow to dry. The Elmer glue will bond far better with the paper and the wood.
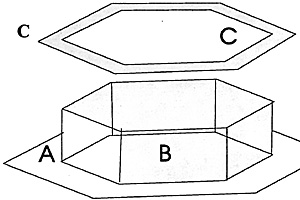 Now go back and cut out the "flange" part "C." You can dispense with the flange if you like, but your finished product won't look as nearly as good as it might. The flange is made by drawing on a sheet of bristol board a hexagon six inches on a side. Then in the center draw a hexagon five inches on a side. Cut out the inner Hexagon. Don't use corrugated cardboard for this, it isn't strong enough and will fray at the edges, and cutting out the center hexagon of the flange will destroy most of the strength of the piece. Now mount this flange on top of part B as shown. Once again tack it down with a spot or two of hot glue and then swab with the Elmer's. You may want to wait till the base is dry to do this, or you may want to secure the parts with pins.
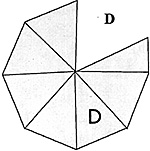 The last part to make is the worst and here you will have to simply use your best judgement. Take another sheet of bristol board and the pattern for your basic hexagon. Place the Hexagon on the board and trace one side. Then rotate the hexagon on one corner about an inch and draw the next side. Then rotate it on that corner and draw another side. In this way you will arrive at a figure something like "D" below.
Draw about one half of a side past the sixth side to make a gluing flange. Now score on the radius lines from the center as shown. Fold on the scores and smear Elmers on the glueing flange. Place the flange under the opposite side, lining up the scores with the edge to make a low, flat, six-sided cone. This will be used to make the domed appearance a forest clump has. Staple the flange to the side several times as shown.
Now I have to tell you, this is going to be the hardest part, and you will probably have to make several tries before you get it right. The aim though is to have a cone of some sort to place over the flange (the flange is there partly to support the cone), and still cover the outer edge.
 Next day, once everything is dry, you can begin to finish off the piece. First spray-paint or paint the cone with watercolors and let it dry. Then take a lot of the green foam I told you about in the first article and tear off irregular clumps of it. Glue these to the top of the cone closely packed together using hot-melt glue or Elmer's glue and set to dry. Make sure you put enough on so you can't see the slab-sides of the cone, and be sure to stick irregular pieces around the edge to hide the straight lines.
Now take the base. You can do this in one of two ways. You can simply paint the sides of "B" various blobs and streaks of mottled green to represent the tones "inside" the forest when seen from the outside. If you are a perfectionist, you can clip pictures of woods from magazines (make sure they are ones taken from a distance and glue them to the flat panels, hiding the edges with paint. In front of these stick a few lumps of the plastic foam like the stuff you tore up for the "roof" of the forest. These will look like bushes. Here and there you can cut short sections of twigs and sticks (leaving the bark on) and imbed them in cellulite placed on the base of the plate and sticking up to the flange.
The flange will help secure these, and by gluing and mortaring them in, you make the whole assembly far more durable. Now at last you see the need for the flange. Not only as a support for the "roof" or top of our "forest-box" but as a securing place for these twigs and for lumps of foam to represent the low-hanging branches of trees. You can also put small rocks and sticks on the ground to represent bracken and deadfall, and one section I have I even built a small section of house into the side to look like a wood-cutters cottage. Once the whole thing is painted and touched up it looks quite convincing because the sticks, foam, painted walls, and rough celluclete floor give the woods section a depth and layered look that is quite effective. Once the roof is dry you are ready to go.
I have not spoken much about making trees. The reason is quite simple. I don't think they are worth the effort! Hobby stores sell HO scale trees so cheaply that it's probably easier to buy them than to make them. Nevertheless if you want to make trees I will tell you how to do it in the next article.
The first thing to get firmly in your mind is that whatever you are going to do is not going to look great. Oh, to be sure there are artists, especially in model railroading, who can create real arboreal works of art, miniature trees that look amazingly like the real thing, and any book on advanced model railroad scenery techniques will tell you how to do it. The problem is that these things are very, very, very time consuming to make, and they are extremely fragile! They simply would not survive even a single battle, and indeed, might not survive the wear and tear of being taken up and put down into storage! For those of you who are confirmed masochists, in the next article I will get into making trees.
Back to Table of Contents -- Courier #78
To Courier List of Issues
To MagWeb Master Magazine List
© Copyright 2000 by The Courier Publishing Company.
This article appears in MagWeb (Magazine Web) on the Internet World Wide Web.
Other military history articles and gaming articles are available at http://www.magweb.com