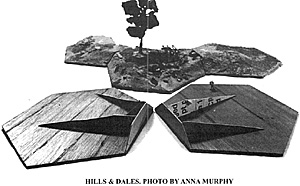
We are talking about major hills and meandering ridge lines, with roads running over and through them. Specifically we will be dealing with hills that occupy more than one hex. We will also be talking about hills that have to be constructed a little differently to allow troops to stand on top, which means a more or less flat surface. Hill with totally curved tops may look realistic provided you don't have troops with large stands. The greater the curve and the larger the stand, the less the stand will lay flat, and it will, in the most extreme cases, look a little goofy.
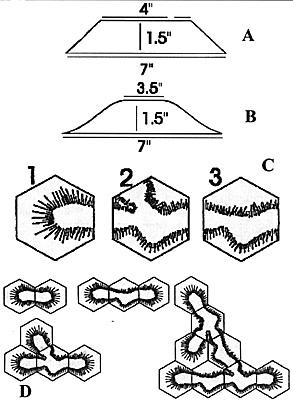
It doesn't matter which one you use, but once you chose your type you will have to stay with it forever, so be sure! This piece is used to trace the cross section through the hill as it meets the edge of the hex, and will therefore be exactly the same as the matching piece on any other hill section. By constantly using this pattern as the universal "joint" so to speak, you will make sure your hills are truly "modular" and can fit together as you wish. This means that if you create several hill sections of each type as in illustration C and you can you can re-arrange them in combinations as shown in illustration D. Note that hill section 2 has two parting faces and so can join together several end sections and section 3 has three faces, allowing you to make twists and turns and "meandering ridge lines". Once you have chosen the type of parting pattern you wish, construct the pattern on a piece of stiff bristol board. Once the pattern is made you can begin. To make the parting faces take some of the scrap from the "off-cuts" from the hex and trace the outline of the pattern onto the plywood. Then cut them out with a saber saw, though a scroll-saw would do much better. Once done, carefully sand off the edges. Mount with the long side down againts the very edge of a hex you want to be a hill.
Note that in both cases the center-spine serves to reinforce the support of the pattern pieces and to provide a framework of support for the netting and celluclete cover in the center. Construct the hill the same way as the irregular sections, adding any details like tree-sockets, stubs, stumps, brush etc. When building the hex or putting the finishing touches on the hill, remember to leave most of the flat space on the center of the hill open so you can place troops there. Put things like brush, small buildings, walls, gates, and fences near the edge, if you can. Don't put too much on top of the hill. Feel free to brace the hill with the off-cut plywood as much as you want, it only makes it stronger. If you wish, you can use bristol board instead. I prefer the plywood because the supports can be screwed in with the wood screws, and the combination of wood, screws, netting, and celluclete makes a piece that is so tough you can stand on it with no ill effects. In fact, once at a Council of 5 Nations I inadvertently dropped a section in the parking lot and a car ran over it. It was only slightly squashed. I had to rebuild it, but not by much! So much for the method. Now there are a few things I want to talk about. First, you should give some thought to how you want your set-up to look, and the construction of hills. Contrary to what most players think, most battles take place in relatively open flat countryside. Even the American Civil War, with the exception of such places as Spotsylvania, the Wilderness, and Kennesaw Mountain, follow this pattern. The reason is simple, the movement of troops in formation, the deployment of weapons, the necessity of fields of fire, all means that armies generally shun crowded or cut-up terrain, and do not usually chose to fight over an Alp unless they wish to be attacked there. Tour any battlefield and you will be struck by the gentle slopes and small elevations. At Gettysburg, although you can see Little and Big Round-Top from almost anywhere on the field, when seem for the first time they are far less impressive than one is led to believe by written accounts of the battle. Likewise the "little clump of trees" at the high-water mark does not, when you are standing by it, seem to be on the center of a ridge, and in fact seems on completely level ground. Viewed from where the Confederates started however, you can see a small incline, but not much, and one is not, when walking across the field, conscious of going up any great slope. The point is the same for many fields of Europe. Most of the hills and elevations we hear about are quite trivial, and we would normally pay them no mind. Yet in the military dimensions such things become consequential. You may not need more than a few low ridges and hillocks to make your battlefield historical, and though all wargamers tend to build an Everest when they make these things, the actual situation is quite different. The angular template shown above is one that I used on my first set up, and I actually made it too HIGH! I am now using one that is lower and more curved and it yields far better results. Now, the other thing to remember when you do this is to consider the "slope of repose" as I call it.
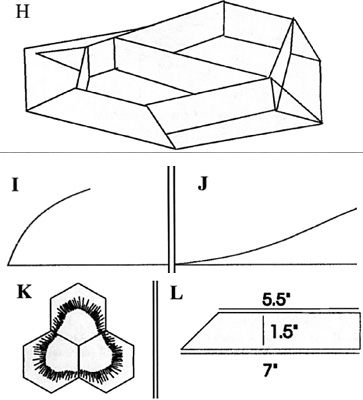
Note that in this latter case the curve of the hill is concave rather than convex, and tapers off to the ground level rather than meeting it sharply. Using this concave cross section however means once again that the height of the hill must be lower than perhaps originally desired. Generally when making hills one or two parting patterns on two sides will be enough to make simple hills and short ridge-lines. Now and then a three-sided hill might be used. Let us assume you want to make a broader, bigger hill. Something like that shown in illustration K. Now you are getting into problems because you will have to make parting patterns of completely different configurations. To make a hill like the one above would require a parting pattern as shown in illustration L. This would, of course have to be mounted on two adjacent sides of the hill. To be absolutely a purist about this I might add that this type of section could only be used with other sections to make a "three-piece" hill as above, and if this were the case you might as well make one big hill out of three sections and save yourself the trouble of making them individually! On the other hand, if you're not a purist (and I am not) you could paint the flat parting side to resemble a bare rock face. This would not then be a problem if matched up with other, regular hills. This is OK so long as you don't have too many of them. Also remember that these things usually do not show up on a battlefield too often! You will notice that I have not gotten into things like contour lines or multi-stepped hills. Frankly I think these things are nothing but a nuisance in the game. They are a big hassle to set up, and they have almost never factored significantly in battle! It is rare good fortune to have an enemy attack you in such a position, and event the most stupid commanders do not do it often, so unless you are modeling Kennesaw Mountain, 203 Meter Hill, or Alymut, (and you have the opponent of required stupidity to attack you) then you are not likely to need massive hills. Even the fabled "Battle Above the Clouds" on Lookout Mountain outside Chattanooga was fought on the lower slopes, the summit serving only as a look-out and signaling station
 In this article we will get into making hills. This is really not terribly different from the undulating and rolling terrain in the last article. We are doing pretty much the same thing only bigger. What is different however is the amount of planning you need.
  To make hills you first have to make a "parting pattern." This is very simple, and can be either straight sided (see illustration A) or curved (see illustration B)
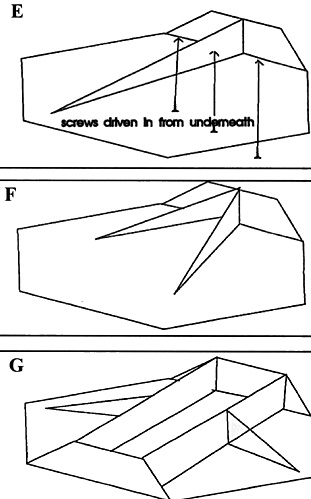
 Use the aforementioned carpenters hide glue and use three small 3/4" #2 screws, driving them up from below the plate as in illustration E. Now figure out the bracing you want inside of the hill to hold up the general form, just like you did with undulating terrain. If you want just an end section if could look like that shown in illustration E or F.. A center section would be like that shown in illustration G or H.
 If you go out and study nature you will find few examples of the type of downward curve shown in illustration I, but rather a lot more like that of illustration J.
Back to Table of Contents -- Courier #77
To Courier List of Issues
To MagWeb Master Magazine List
© Copyright 1999 by The Courier Publishing Company.
This article appears in MagWeb (Magazine Web) on the Internet World Wide Web.
Other military history articles and gaming articles are available at http://www.magweb.com