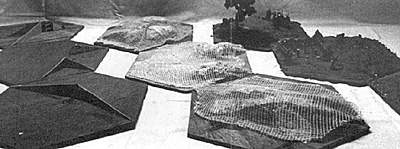
Now the good thing about these small undulations is that all of them are not larger than one hex, which means you do not have to make parting patterns or cutting diagrams. Further, all of them can be detailed quite extensively and will make a nice base for other more complex terrain sections like forests and rivers, and in all of this you will see in simple form the techniques used to create larger pieces. In the examples shown I have done three specific types of irregular ground. One is a small slope or hump, another is a small prominence or a cut, and the third is a swale, or minor depression in the ground. In the picture below you can see all three of these right to left, in the three stages of construction. On the left is the basic section with the supports and struts in place. The second is the same base with the netting and stuffing in place and part of the celluclete shell, and the last is the finished product after painting and some detailing. I have not made these sections overly detailed because I just want to show the basic method. Remember too, our terrain is made to stand up to rough abuse and occasional dropped stands of troops. I have placed a stand of 25mm troops on the knoll with the tree on it in the right rear, and a single 25mm before the small cemetary on the center section. It's hard to see the latter, but it does give you some idea of scale. The key to making these sections is first to determine the supporting structures. That will hold up the terrain. Generally it should follow the pattern, and can be made out of triangles of stiff Bristol-board. You can, if you wish use corrugated cardboard, but I find that in the small pieces required it does not stand up so well.
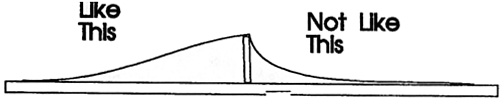
Once you have cut these out you can position them on the base in a line of Elmer's glue and let them set. One very handy tool to use for this type of modeling is a hot-melt glue gun. They can be purchased at a relatively inexpensive price in a craft store or hardware sop. All it is really is an electric heating element into which you place a stick of solid glue. The heating element softens the stick, and when you press the trigger, it squirts it out of a small orifice in a steady stream. Then you simply stick what you are glueing into the dot or stream and as the glue cools (and it cools very quickly) it solidifies. This is an excellent modeling tool because of the quick drying time, and it allows you to work very fast, unlike liquid adhesives where you have to wait, or two-part epoxy which is messy and expensive. The drawback is that the hot-melt has no penetrative power, and so it is only a surface adhesive, unlike the Elmers or the hide glue which will penetrate wood and paper. The hot melt, also, while it is rather strong, does not make as strong a bond as the liquid solvents either. Hot melt guns are useful for this "strutting" step because you can attach the sections quickly with a small "dot" of glue, and then, when it dries in a moment or so, put a heavy bead of cement down on each side of the strut. This will then make a better bond, but the hot-melt will hold it in place till the Elmer's dries. I should also point out that if you wish you could cut the struts and supports from the numerous off-cuts of plywood from making the hex. The technique is the same, but you can, if you wish, attach the supports with wood-screws (3/4" #2). In addition to Carpenters glue. Once the struts are up you should take some newspaper and lightly crumple up some small pieces to a sphere about 1" in diamenter. This should not be a tight pack, but rather loose small spheres. Place these between the supports as shown in the diagram below. What these are for is to keep the netting suspended between the sections so it doesn't "droop" down and make an unsightly looking piece ike this.... Once this is done you are ready to begin the next part. To make a base for the covering, the best thing to use is a wide gage mesh. The best I've found is the stuff that's sold in hardware stores to wrap up shrubs, small trees, and flowers to prevent the deer from nibbling on them. It is dirt cheap, very flexible, easy to cut, safe to use, and takes the modeling Celluclete best of all. It is porous, which means that the glue can penetrate the fibers, and of wide enough gage so that it can really be impenetrated into the Celluclete. Don't use metal window screen mesh, and definitely don't use chicken wire! It's too tough and inelastic, and hard to cut, and you will have small cuts all over your hands from the attempt. Plastic window-screen mesh is acceptable, but I find it's too stiff, and once you use the other stuff, you will be hooked. Cut a piece of netting about the size you need. Don't worry if you cut too much, it's cheap enough, and also forgiving enough so you can use the pieces if you make a mistake. It's also a good idea to cut a generous patch to give you an edge to grip onto when stretching it out for the glue joint. Stretch the cut piece over the hex. You will notice on the swale I used two pieces one on either side of the support sections. Now get out your hot-melt gun. (This is where you will really appreciate this) and lay down a dot or two of glue on the base plate to tack down the mesh onto the wooden hex. Be careful! This stuff as it comes out of the nozzle of the glue gun is VERY HOT and you can get a good second degree burn! Don't touch it right away, but use a small stick, or swab to press it down into the fibers of the mesh, or press the mesh onto it. Now, holding the other end over the support, push down the spheres of newspaper you crumpled up till it has the general shape you want. Don't be afraid to be ruthless. The bulging out of the ground that you don't usually want would only be needed if you were modeling a small bluff, or exposed rock, as the natural effects of erosion tend to flatten out the land. Once you have the contour generally where you want it, take the hot-melt gun and lay a line of glue along the top of the support, pushing it down in to get the netting. You can either use the hot-melt or just dot here and there and then finish with Elmers. The Hot-melt is easier, and you may have to pin stray sections down if you use elmers. Once the glue joints are dry trim off the excess material with a scissors or xacto-knife. Once it is done, check the slope again, and if needed push down the newspaper filler again. The next step is the Celluclete. I spoke about this in the first article, and how its used, and the techniques will be generally the same. Remember to use this stuff as THIN as you can. The best method to use is to make it a little wetter than the recipe on the package calls for, and to mix a little Elmers glue with the mixture to give it an added adhesive strength. Take out a ball about 1.5" in diameter and put it in your hand and slowly work it with your fingers, flattening it out in the palm of your hand till you have a nice, large irregular pancake.
 In the last article (See The Courier, #71) I gave you the method for construction basic flat hexes with slight texturing. In this article I want to show you how to make small furrows and ridges in the ground. Not that these will confer any tactical advantage but it will be a good way to experiment with scenicking techniques that will be useful in all situations. Now it may not seem worthwhile to spend more than minimal energy necessary on a hex which is, from the standpoint of tactical utility and the rules, any different from a plain flat hex, however it adds a tremendous visual impact to the game to use these. If you walk across any ground on battlefields you will notice that even on the allegedly "flat" plains" there are small undulations and gullies, rills, and bumps that break up the entirely level ground. In this article I will show you also how to make simple "one-hex" hills.
 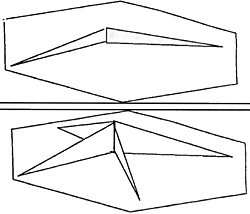 For example the pieces used to make the small ridge look like shown in the first illustration.
Another tip... if you want to make the celluclete very strong, mix about 1/8 of the volume of water with Elmer's glue. This makes a surface like iron, but you have to work quicker than normal because the Elmers will start "setting up." Don't worry if there are any stray nits of netting poking out of the celluclete on the edges, these can be trimmed with a knife one the Celluclete hardens, and even better... a light sanding will take them off too! That's why I say, you can't beat the netting.
Once the celluclete starts to harden you can smooth down the final lines of the slopes, or smooth out rough edges. As it hardens, you will see a natural texture or "graininess" to the ground. If you want a smoother ground you can, when it is partially dry, go over it with moistened fingers and smooth the textures down, and if you want a very smooth surface, when it is fully dry, go over it with spackling putty, or a very wet mixture of Celluclete.
This actually brings you to the point where you know all of the techniques used to do hills, forests, and a lot of other terrain features. As I said the rest is up to you and your imagination. Now for the rest of the article I want to tell you about super-detailing.
Now in most parts of the world super-detailing is stuff model railroaders do on brass engines or on scenery which includes stuff like finely painted signs, iron filigree work on gates, and perfectly painted scale beer cans in eddies in streams. This is all beautiful and wonderful stuff, but it is far too fragile for most war games. If this is what interests you, as it does me, then by all means go out and do it. I do some of this for my special sections or for display pieces, but they are rarely used in a battle... they would be broken or chewed up too easily. I won't therefore be talking about that, nor should I.
Even the most inept model railroader is far more able than I, and there are dozens of excellent books by prize-winning masters to be had on this subject. What I am going to be giving you is cheap, quick, easy, but effective ways to model scenery.
The first way to do it is simply to stick, here and there, some small bits of shrub from the painted poly-foam, here and there on the plate. Remember to keep them near the edge so as to leave the center of the hex free for troops. Small stone or rock walls can be made from the pebbles in your driveway. This was how I created one of the walls of the small graveyard I put in one of the sections. The gravestones were cut from basswood (not balsawood). Basswood is much stronger and more durable.
Again, I left the stones low so stands of troops could be supported on them. The one large gravestone you will notice is in the corner. The other walls are made from piled up twigs. All of this was constructed with the glue-gun by simply building it up stone by stone. If you don't want to do that, you can use the other method, which is simply a strip of 1/4" plywood glued on and painted.
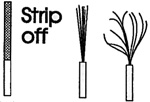 Another method of making shrubs, especially if you want to have long-stemmed ones like forsythia, is to take braided electrical wire and cut a section about 1 inch long. Then using a stripping tool take off 3/4" of the 1" of wire, a shown below...
Then spread out the wires into a bush shape as above, and spray with Rustoleom Rusty metal primer. This will leave the "shrub" stalk a rich brown color. Once it is dry, or even better, while it is still wet, drizzle the fine sand-type polyfoam you ground up to make the grassy texture over the piece. Wear rubber gloves for this... it gets messy if you do it wet! Let it dry. If you want you can paint on a daub of red, blue or yellow here and there to resemble flowers. Once this is done you can embed the bush into the wet celluclete, or you can drill a small hole in dry celluclete and glue the bush in. Hot melt glue is good for this.
For making the small knob or bump you will notice I put a tree on the top of the precipice and had it hang over the edge. I will show you how to make this type of tree in a subsequent article. For now a simply model railroad tree will do just as effectively. You will notice something odd about the tree, namely it doesn't look quite right near the stump. This is because the stump is actually a piece of plastic tubing with 1/4 inch diameter set into the Celluclete and allowed to dry. The base of the tree has the wires drawn into a "plug" which allows you to remove the tree for easier storage.
The back of the knob simply tapers off to the ground in a grassy sward. The front of it though falls off precipitously into a small rock face. You can make this by piling up small pebbles and grains culled from your driveway, but that doesn't look as effective. Larger rocks imbedded in things like this are nice, but unfortunately they don't look quite right!
What I did was to smear spackling putty (not carpenters putty) along the face. Then when it was dry, I scribed it to show the cracks and crevices with a dentists pick. A pin or tip of an exact-knife will do just as well. Then I stained it with a weak solution of rapid-graph ink made by mixing black and brown ink with a lot of water. The split-rail zig-zag fence was made by driving five small 1" finishing nails through the plate. Glue them on with a daub of 2 part epoxy on the base. Pain them and when dry, stack up the rails one on top of each other, securing with the hot-melt glue or Elders if you're more patient. The rails can be made from small twigs filched off the trees or picked up on the ground. Actually the best source for these are old Christmases Trees. When you throw out your tree, carefully clip off as many of the small end branches as you need. Strip off the needles and split the larger ones with an X-acto knife. The sticks will prove surprisingly strong. The nails are to make a secure joint between the fence construction and to anchor it to the base. If you just do it with hot-melt and Elders the joint tends to be too fragile. You can texture the flat surfaces as you wish with the shreded foam, or with simple painting.
The last thing I want to show you is a small "one-hex hill." To make this the only thing that you have to do different from the above is a different change of supports. The internal supports are as shown.
The final thing to mention is the use of Celluclete. Some may be inclined, rather than to make the internal struts and supports, to simply pile up a mass of Celluclete. This would be foolish. In the first place it's fairly expensive to use wastefully this way, and second, it will take a long time to dry. Most important, it will actually be WEAKER than if you use the support and mesh method given above. Also, so much water may warp the wood the plate is on, in which case your whole project will be ruined.
While I am at it I should mention a bit about one of the problems with this type of terrain... space. Once you start getting into these sections they can take up a lot of space. The flat open sections are not too bad, and you can get a lot of them in a box. Likewise with road and tree sections. However once you get into hills and forests the amount of cubic footage this takes up is substantial. Consider - the average 6x9 table top requires about 60 hexagons to cover. Assuming half of these are open terrain and you can get them into a box 18 x 18 x 12 that's 2.25 cubic feet.
The other 30 sections may consume up to .46 cu ft a piece, which means an additional 14 cubic feet or 16-18 ft total. This doesn't sound like much but it means a space 3ft by 3ft, by 2 ft at minimum, and if you have very bulky things like "hidden" forests, castles, and the like, it could soon be double or triple that size with no effort! As you can see you will have to give some thought to this problem. This gives you some insight into the reason why the detailing is not made too fine. Even if we allowed for the wear-and-tear of a battle, the simple dynamics of sorting may mean out set-up being tightly packed, and that means the potential of being crushed.
Back to Table of Contents -- Courier #76
To Courier List of Issues
To MagWeb Master Magazine List
© Copyright 1999 by The Courier Publishing Company.
This article appears in MagWeb (Magazine Web) on the Internet World Wide Web.
Other military history articles and gaming articles are available at http://www.magweb.com