The following paragraphs are excerpted from MINISCAPES -How to build Table Top Terrain by Gary Leitzell and Lee Howard with their kind permission. The book also includes chapters on making roads, rivers, buildings and contains plans for various types of buildings.
These are probably the single most prolific terrain feature in any rural setting. They are extremely easy to build and you can make dozens of sections in just a few hours. This is a good project to start with if you have never built any terrain pieces before. For any of the projects described in this book you may want to work with a few of your friends to produce some of these pieces in an assembly line type of fashion.
The following project describes building walls and fences for 15MM scale miniatures. For HO, 25 MM or larger scales simply double the measurements and use bigger material pieces. For the following you will need these materials:
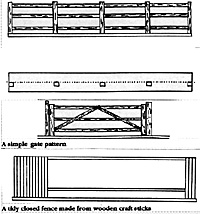
Fences come in a variety of styles, those depicted here are the simplest and most common. There are a number of fence patterns displayed for reference at the end of this chapter.
First cut out a base from thin cardboard. These can be any size desired but 5 inch x 1 inch strips would be ideal.
Glue one of the long sections to the base as illustrated in the following diagram and then glue one of the short pieces to it as illustrated.
Next, glue a long section onto the end and at a right angle to the first piece and repeat this as illustrated until you have used 8 of the 16 pieces. Note that the remaining 1/4 inch piece is attached at the opposite end of the fence in a similar position to the first short piece. Allow this to dry before proceeding to the next step.
To complete this fence section simply repeat laying a second layer of long sections over and parallel to the first layer until the project looks like the diagram below:
When this has dried, paint the section and add scenic grass (flocking) to the base (Painting techniques are described in the painting section of the book - ED).
Another variation of fence is the standing rail fence. For this you may want to use thinner bases, say 1/2 inch wide. You may also choose to utilize 1/16 inch round dowel instead of balsa strips to provide round posts or round rails.
Large illustration (slow download: 74K)
Draw a straight line along the center of each base. This will ensure that the bases and fence posts line up properly when placed next to one another.
Next cut six 1 1/4 inch sections and glue these across the posts as illustrated below. The first row of rails should be at least 1/4 inch from the base, the second row should be close to the top of the posts. Allow the glue to dry before painting and adding scenic grass.
When gluing wood or cardboard it is wise to cover the work surface with a piece of waxed paper to prevent the piece you are gluing from sticking to the work surface. Balsa wood may be pinned to a pinboard, use waxed paper on the surface of the pinboard before you pin and glue.
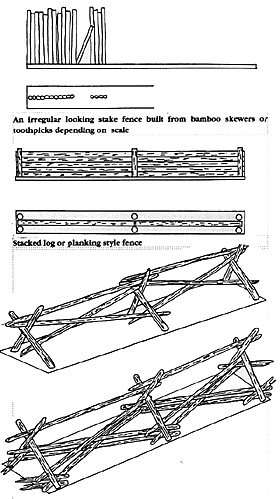
Other patterns for fences are shown below:
For larger scales of these you can substitute thicker balsa strips or dowel. Other great and often cheaper materials include bamboo skewers or long wooden matches as well as wooden coffee stirrers or popsicle sticks. The latter can be purchased in bulk at craft stores.
In a military scene or diorama, barbed wire may totally replace fences, walls or hedges. It was used profusely during World War I and in many fortified areas during World War II. For those of you who wish to build terrain for science fiction settings or any futuristic scenario, barbed wire will give a technologically advanced appearance
Next, glue the stakes to the base in either a straight line or a zigzag pattern. These stakes can be made out of toothpicks, balsa wood, dowel or bamboo skewers. For a more modern look use structural plastic I-beams purchased from a model railroad supplier.
There are two simple ways to make barbed wire. The first is to twist two or three strands of 26 or 28 gauge wire loosely together. For the ultimate realism of actual barbs attached to the wire, knot two strands of thread at regular intervals along the wire and cut the thread close to the knot leaving four thread barbs. See below.
To produce the fence, twist one end of the barbed wire around one of the stakes at the edge of your base. Fix this in place with a drop of "Superglue". Attach the barbed wire across to the next closest stake and twist the wire around this, again fixing it in place with a drop of glue. Repeat this process until reaching the final stake on the base, then cut off any left over wire with a pair of wire clippers or sharp scissors. To add variety to your work, make a few sections appear as if they have been trampled, cut or run over by a tracked vehicle.
To make concertina wire the same technique applies except use five strands of wire and twist them a little tighter together. For 15mm scale wrap the twisted wire around a 1/8 inch diameter piece of dowel. For HO or 25mm scale, use a pencil instead of the dowel. Be sure to wrap the wire at evenly spaced intervals so that the wire resembles a loosely coiled spring. Slip the twisted wire off the dowel.
Attach one end of the wire to one of the end stakes as described above. Stretch the coiled wire to the adjacent posts but glue it in place rather than twisting it around each stake.
If using thread instead of wire for the concertina wire apply varnish or white glue to the thread to stiffen it so that it maintains the coiled shape. To do this without attaching the thread to the dowel, soak the thread in a stiffening solution (White glue and a little water) then wrap it around a dowel or pencil that has been wrapped in wax paper. Be certain not to apply too much glue to the thread.
For the 1/300th scale enthusiast a single strand of wire would be sufficient. Unless you are really patient and precise it would be wise to forget about using stakes. Concertina wire can be made by twisting a single strand of wire around a ball point pen refill or by using the springs that are attached to these refills.
Simulating chain-link fences for modern or futuristic scenes is easy. Make a base out of matte board or stiff cardboard. Use dowel, bamboo skewers or plastic rod for fence posts and attach them to the base.
The chain-link fencing is made from window screen material from the local hardware store. This material comes in plastic or metal and a variety of mesh sizes. Use a mesh sizeappropriate to your figure scale.
Cut the mesh to size and glue it to the fence posts. For a more realistic combat setting or for a security fence, make the posts taller than the mesh strips and attach barbed wire to the top of the fence. Complete the fence sections with paint and scenic grass. Aluminum paint is available in spray cans at the local hardware store.
For the first project you will require small pebbles which are available from pet stores (used for aquariums) and from model railroad suppliers for 25mm scale or larger. For smaller scales, cat box litter can be used. White glue, and artist board or thick cardboard for a base are also required
The first step involves making bases for the wall to be placed on. It is often wise to make several short sections of walls rather than one long section. The bases should not be more than 6 inches in length and 1 inch in width. Maximize the flexibility of use of the walls by making the bases irregular in shape. At least cut off at the corners to simplify 90-degree corners.
The next step is simple and designed to save time. Rather than gluing individual pebbles together and building up the wall one stone at a time, cut a strip of cardboard the same length as your bases and approximately as wide as you want your walls to be in height. For 15mm scales this may be 1/8th inch for 20-25mm scales this may be 1/2 - 3/4 inch. Glue the edge of this strip along the center of the base in a vertical position (as the diagram illustrates) and allow to dry.
When using "coarse ballast" or fine stones (approx. 3mm dia) for smaller wall sections it is not necessary to glue the stones on one side at a time. It is simpler to pour some of the stone material into a shallow box or tray, apply glue to both sides of the cardboard section (balsa wood may be substituted for cardboard) then place the wall section in the tray and push the stone material onto both sides.
Once the glue has dried, paint the sections and add scenic grass to the base.
For the second method you will require cardboard for bases; 3/16th inch thick foam core board; thin cardboard (cereal boxes or manila file folders); spackling compound and white glue.
Step one is similar to the first wall project- cut out the bases. Since the foam core is going to represent the wall section the next step is to cut strips out of the foam core board that are equal in length to the bases and of a width appropriate to the height of the walls. This method for making stone walls is not suitable for the smaller figure scales.
Next, cut small irregular "stone shaped" pieces out of the thin cardboard these can be rectangular or circular in shape. Glue these to the sides of the foam core wall sections at regular intervals to represent individual stones that protrude from the side of the wall. When satisfied with the wall section glue it to the base and allow the glue to dry.
Put some spackling compound into a small glass and add a little water. Mix this into a paste that is about as thick as white glue. A mixture of flour and water can be substituted for this if you do not have any spackling compound. Using a moderately thick brush (#4 or #5) "paint" this paste onto the surface of the wall to give it a rough "stucco" type texture. Be certain to cover the entire surface or the wall paying close attention to covering the "paper stones", especially their edges. Leave the model to dry overnight before painting. Add scenic grass flocking to the base.
The following two methods for making walls will require a degree of artistic skill and a little more expense.
For these methods you will require cardboard for a base; and modeling clay or two part epoxy putty.
For the fourth method of making walls, quite simply make molds of the clay or putty walls and cast them in plaster or resin.
To do this project you will need 24 Gauge wire; wire cutters and pliers; foamboard or hardwood for bases; caulking compound or spackling compound (from hardware store); black acrylic or spray enamel paint; and model railroad scenic foliage (woodland scenics).
Trees can be made in a number of ways. One of the simplest is to an actual piece of a twig or small branch and glue lichen or coarse scenic foam to it. This will provide table top trees but they often will not look realistic due to a lack of branches. Branches can be added using wire around the twig to form branches like this.
For realistic deciduous trees cut several strands of wire (24 gauge) into different lengths. At least 16 strands of wire are required. Hold these strands with a pair of pliers and twist together to form a "trunk." As this trunk forms, separate groups of wire and twist these to achieve the effect of varying sized branches, maybe in groups of 4 or 5 then forming branches with two strands and ending in 1 strand at the ends as shown in the diagram. The strands at the base can be splayed out to form the "roots" at the base of the trunk and glued to a base of wood, plastic or foam board.
To make thick truncated trees twist 6-7 strands of wire together and form 5 or 6 such pieces. Attempt to twist these together as best you can then wrap wire around the trunk as shown.
Branch out the 6-7 pieces as for the example below. To save time and wire, drill several 1/4 inch holes into a twig that is approximately 1 inch in diameter and 5-6 inches long. Now, instead of making entire trees, make the branches using the method described above. Insert the wire branches into the holes and glue them into place. The branches require wire cut into 2-3 inch lengths.
brush. I have found caulk to give the most desired effect since it does not go on smoothly and leaves a rough, flaky bark texture. Let this caulk or spackling compound dry completely then paint the tree. It is easiest to spray paint the tree black as an undercoat.
To paint the trees, drybrush light brown onto the black base coat then wash the entire tree with a dark brown and then black wash. Many trees have gray trunks so you may wish to mix a brown/gray color and drybrush it onto the trunk.
The wire method is great for trees for use with 15 mm, 25 mm and HO scale models. For the 15mm scale, use lengths of wire that are 1 1/2-3 inches in length. For the larger scales use wire that is 3-7 inches in length.
There are several other methods for making trees that involve less artistic talent. These include the "bottle cleaning brush" method and the "string sack " method.
For the bottle brush method two thick pieces of wire (coat hanger wire will do) or 6-8 strands of 24 gauge wire are required. Also required are many short lengths of fibrous string, sisal string or thread. These should be 2-3 inches long.
Fold the wire in half or line up several thin wire pieces and attach one end of the wire to a fixed point. This is best provided by a nail in a flat block of wood. Hook one end of the wire around the nail or fold the center of the wire around the nail to firmly attach the one end of the wire.
Lay the string along the center of the wire strands as shown in the following diagram. Be aware that different types of string or fiber material will produce a wide range of tree designs. Carefully position the other half of the wire over the string and begin to twist the wire in the same direction.
The twisting is best accomplished by connecting the free end of the wire to a hand drill. An adjustable speed power drill used at low speed can be used if the wire is pulled taught.
Trim the tree into shape using a pair of sharp scissors. This method of tree manufacture will produce deciduous trees as well as firs.
Separate the individual strands of string to produce finer "branches" using a wire brush. The trunk can be textured using caulking compound as described in the wire method.
Spray the tree black and allow the paint to dry. Next, brush or spray glue on to the "branches" and cover these with scenic flocking then paint the trunk of the tree.
The string sack method of tree manufacture involves drilling three or four holes through a piece of dowel or a small twig, then, inserting lengths of wire into these holes and gluing them in place.
Paint the tree trunk at this time. Lay some pieces of string sack material over the structure and glue into place (this sack material can be obtained from vegetable suppliers as well as some craft stores - onions come in bags made of this material). While nylon sack material is not as effective, Cheese cloth can also be used.
Cover the sack material with black paint being certain to cover the inside areas. Cover the sack area with glue and coat with scenic flocking.
To spray your glue more effectively use a "pump action" hair spray bottle. Be certain to clean it out first. Diluted white glue will be adequate to spray onto the trees but be sure to rinse out the spray bottle with water after each use.
FENCES AND WALLS
1/16 inch X 1/16 inch balsa wood strips
Thin cardboard for a base
White glue
Scenic flocking or fine sand to represent grass 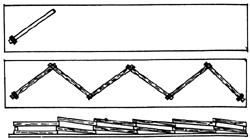 To make zigzag rail fences, cut the balsa wood strips at into several 1 1/4 inch length pieces. Save any small bits left over from the ends and cut them into 1/4 inch sections. For each base you will require 16 of the 1 1/4 inch sections and 2 of the 1/4 inch sections.
 Standing Rail Fence
 Cut 1/2 inch sections of balsa wood or round dowel for fence posts and glue these to the base at 1 1/4 inch intervals as illustrated below. Allow the glue time to dry before completing the fence.
BARBED WIRE FENCES
![]() The first step involves cutting out bases as described earlier, using matte board or thick sturdy cardboard.
The first step involves cutting out bases as described earlier, using matte board or thick sturdy cardboard.
 Another way to make barbed wire uses thread only. Loosely twist six strands of sewing thread together and tie knots in the thread at regular intervals. Then, cut three or four of the strands between the knots out as shown below to produce the barbed wire effect.
CHAIN-LINK FENCES
STONE WALLS
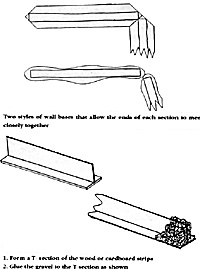 Stone walls can be produced in several ways, four of which are described below.
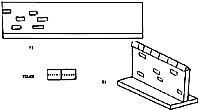 Apply white glue to the side of the vertical strip and sprinkle this surface with pebbles. Adjust some of the pebbles so that they lay in the proper manner and add a few to fill any gaps. When one side has dried repeat this process on the other side. Any irregularities in the top of your wall section can be covered up by individual pebbles glued to it.
 Quite simply, after you have cut the bases roll small pieces of clay or putty between your thumb and forefinger to make small spheres that can be pressed onto the base and subsequently build a wall section piece by piece. To speed up the process, roll out a long piece of clay or putty into a line approximately 6 inches long and 3/16th inch thick. It is best to work on a piece of plastic or metal for this but waxed paper will also do. Using a sharp hobby knife, cut out individual stones and use these to build upthe wall.
HOW TO MAKE REALISTIC TREES FOR PENNIES
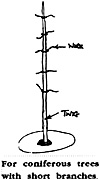 This effect is good for making certain coniferous trees that have short branches. Coarse foliage material can be added to these "branches."
 Now that your trees are made cover the wire with either caulking compound (this is a rubbery substance used to fill gaps between window frames and walls and can purchased at a hardware store), window putty or spackling compound. If spackling compound is used, make a paste by adding water to the "putty" and applying it to the tree with a moderately thick paint
Back to Table of Contents -- Courier #67
To Courier List of Issues
To MagWeb Master Magazine List
© Copyright 1995 by The Courier Publishing Company.
This article appears in MagWeb (Magazine Web) on the Internet World Wide Web.
Other military history articles and gaming articles are available at http://www.magweb.com