 Attend any of the major wargaming conventions throughout the
country, and you'll soon realize we are living in the age of premium
scenery and buildings for tabletop gamers. Some of the display games
are approaching the level of quality model railroad scenics. Scenery is
detailed with life-like trees, flexible roadways and streams, plowed
fields, standing corn and wheatfields, and the outstanding landscapes
from Geo-Hex or GHQ.
In the last few years, a quantum leap has been made in the availability of scale resin cast buildings for the wargamer. From the numerous companies have come ranges of structures covering every period, from ancients to modern warfare. Detail on most of these miniature buildings rivals that of the British companies, who turn out collectable cottages for our wives' knick-knack shelves. However, they are offered to us at a fraction of the price.
As one of the suppliers of painted buildings for the wargaming community here in the states, I thought it would be great to share some of the tips I picked up, in over five (5) years of painting battlefield scenics. I will do this by covering the following (6) six areas of information:
- 1) Preparing Castings for Painting
2) Tools of the Trade
3) An Artist's Eye
4) Painting Tips
5) Extra Detail
6) Finishing Touches
Fellow gamers have always been more than ready to share their secret techniques and tips. In the spirit of sharing and fun, I will try to improve you ability to turn out painted buildings your friends will say, "knocked their socks off!".
PREPARING CASTINGS FOR PAINTING
Getting started on buildings involves some preparation and priming before you can begin to paint. The majority of these items are made from some form of plastic resin, which is fairly light and durable, with a few companies using hydrocal or some type of poly-foam for their buildings. Some of the pieces should be washed in a mild dish soap solution, to remove a mold releasing agent, used in the casting process.
Take a Stanley utility knife and cut off any excess flash from the vase, around roof overhangs, and chimneys. A Dremel tool can come in handy for routing out any excess material from under room overhangs, and inside door and window openings. Fill in any surface holes with either ribbon epoxy or spackling compound using a flat edged tool. Before proceeding to the priming step,let the casting dry out completely.
Any flat primer with an acrylic vase will work well. Most of my work is done using flat black as a base coat. If you have brick or stone walls where mortar showing in the cracks is needed, use a flat grey primer. Flat white primer is best for frame buildings where the final color will be a light color or white. It takes a number of coats of white to cover up a black primed house.
With black primer, be sure to get underneath roof overhangs and block in all window openings, as they are usually left black. Apply spray primer in several light colors to avoid running, and to fill in any fine detail on the casting. Remember that doing buildings in batches speeds up the priming process. From personal experience, keep pace in the family by spraying outdoors or in the garage so that fumes do not overpower the household. Allow the primer sufficient time to dry, and you're ready to carry your work to they painting bench.
TOOLS OF THE TRADE
Be prepared to spend some cash on quality brushes that will last and perform well. Don't skimp! Buy the best pointed sable brushes you can afford such as are found in better artist supply shops. You will need a few fine pointed, 1/0 to 3/0 size, fine sable pointed brushes for doing detail work. For good dry brushing, a flat, stiff nylon bristle brush of between 1/4" and 1/2" width will suffice. A crisp, flat edge is what to look for in these brushes. The remaining brushes will have to be worked into shape from your collection of cheaper camel hair brushes.
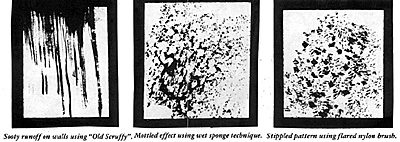
To do special weathering effects, I have a favorite brush I call,"Old Scruffy". It's an old Grumbacher #2 camel hair that is worn down beyond recognition, with half the fiber hairs worn down to the base, and a few scraggly hairs randomly jutting out of the center clump of hairs. A brush like this is not found on any store shelf, but has to be "grown" at home. This ragged, bristly stump is used to apply stained washes down the sides of houses and barns, showing the drip stains that come with age, rust, and chimney soot.
 Another tired old warrior in my brush collection has nylon
brisles flared out in a wide circle. When dipped straight down into a
spot of paint, and applied to a flat surface in the same fashion, it gives a
stippled effect, similar to bird droppings on a shed roof.
Additional tools include a random selection of sponge pieces, which when moistened and saturated with paint, leave a mottled pattern on walls for a weathered look. Artist pens, holding permanent black ink in sizes 1/0 to 3/0, are great for drawing in cracks in stucco walls, detailing signs, door trims, or for applying shell holes to damaged houses. A sampling of some of the effects that can be achieved are shown in the figure.
Having gathered the needed assortment of brushes, you should also have a small jar of water for initial brush rinsing, and an additional quart jar of water for final rinsing. A sheet of plastic is handy for a mixing palette for paints.
AN ARTIST'S EYE
Before putting a brush to any piece, give some thought to color scheme. Colors should reflect what would appear realistic for the period, while still being bright enough to stand out on the battlefield. I have found that many people are afraid to stray away from earth tones, but are pleasantly surprised by the effect of a blue roof, or green gables. Remember this ... the worst that can happen, if a piece turns out too gaudy, is that you'll have to start over with a new coat of black primer.
As you leaf through books and magazines, cut out color photos of old buildings that catch your eye, making a file folder of these for future reference. Note things that occur in nature, such as the shades and colors of walls and roofs as they fade and age. Pay attention to how soot runs down roofs from chimney's, rust running down walls from gutters and metal fittings, and green moss growing in the valleys of roofs. Thatch roofs don't look like yellow field straw after a season of aging, but take on a nice grayish hue. Where a building rests on the ground, note that moisture will usually stain the lower portion of the building a darker shade. Log cabins and stockade forts always fade to a light grey after a number of years.
PAINTING TIPS
The simplest and most economical item a new painter could start on would be fortified earth works and redoubts. These are black primed, and dry brushed with shades of dark brown. Any raised detail, such as gabion baskets and planking are highlighted, using the dry brush technique. The baskets are done in shades of buff, and the boards in a lighter brown.
Avoid additional painting of the earth works, by painting them with white glue, and covering them with scenic soil. More glue is applied along the case of the piece, and scenic grass is sprinkled there. Using these simple tricks, you can turn out quite a few sections in one evening. As a final touch, glue some extra barrels, crates, broken boards and damaged wheels to the sections.
For our initial example of painted buildings, we will use a 15MM European house with stucco walls on the main house, and a small addition with brick walls. Wooden shingles will cover the main roof, with thatch on the roof of the addition. This will allow us to cover most surfaces on one house which has been black primed. For this example, I will concentrate on the dry brush technique, using a black primed building and water based acrylic hobbyist paints.
Take your flat 1/2" nylon brush and load it with a small amount of the darkest shade you want to apply to the stucco walls. Brush out most of the paint onto a clean, flat surface, and dry brush the remaining paint onto the walls. The raised detail in a structure picks up more paint as a highlight. Dry brushing is a technique that takes some practice, but with time, you'll get the feel for having just enough paint loaded on the brush.
WALLS/CHIMNEYS
Always block in the larger areas of the structure first, leaving the doors, window frames and fascia boards, for last. Having dry brushed the stucco walls in a dark cream color, let it dry. Come back with a lighter shade of white, to hit any raised areas that are visible in the casting. Take a wet sponge, to stipple some darker brown shades, along the ground line at the case of the stucco walls. The brickwork on the smaller addition walls is dry brushed in a dark brick red.
Once dry, a second dry brushing of lighter orange is layered over the brick red to highlight the brickwork. Later., go back with a pointed sable brush and paint in a few individual bricks using shades of tan and brown. A capstone on the brick chimney is painted a light grey color, and the chimney flue is done in a light orange tile color.
ROOFS
The wooden shingle roof is dry brushed with a dark reddish brown first coat. When dry, go back and dry brush the shingles with shades of lighter brown and beige to highlight the detail in the shingles.
The thatched roof is one of the hardest roofs to do, and get a decent look. Remember that with weathering and age, the average thatch roof tends towards the colors of grey, grey/green, muddy brown, with lighter tan, beige and cream highlights. Too often you see thatch roofs that look like fresh field straw. With the black prime method, 1. start at the bottom of the roof, dry brushing across the grain of the thatch with a grey/green, being sure to paint under the overhangs and both ends of the peak.
The next quarter section is done in a light grey, and a third section, dry brushed in with a muddy tan. The cap section at the peal of the roof is done in a tan or buff color. When these colors are dry come back with shades of lighter beige, bay orange, and small amounts of cream white, as highlights along the upper sections to the peak.
 WINDOWS/DOORS
With window openings already primed in black, detail in the window frames using a fine pointed sable brush, using off white to make the windows stand out. When the white window frames have dried, go back into the window openings with a color that matches the walls, and frame in the edge of the openings up to the window frame. Doors are also primed in black and dry brushed with shades of brown to highlight the planking of the doors. Metal door hinges are painted black, then highlighted using dark metallic paints, such as brass or iron colors.
This is where "Old Scruffy" comes into play. I usually try to show some runoff from the effects of aging. Starting with a flat clack paint, add clear water to make an opaque wash. The chimney receives a wash of the diluted black solution along with the roof where the soot would wash down from the chimney, and down the wall below the roof line. On the wall section use the few scraggly hairs on this brush feathering downward the visible soot stains toward the ground.
When the first coat of washed stain has dried, a second thicker black wash is feathered down the side of the chimney and wall, giving a lined streaked effect. Take some pure black paint, and with your pointed brush, paint in the openings for the chimney in the orange flue tile. You have a good start on painting a house that doesn't look like it just stepped out of a TV paint commercial.
EXTRA DETAIL
Adding personal touches to your buildings can make them the talk of your gaming club. Name that building! That's right! Put your family name on a signboard over a barn door, shop, or inn. To allow for a name, glue a small piece of flat plastic stock over a doorway before priming a building. The Hovels Company turns out a nice 15MM ACW timber mill, which I convert into a family barn by grinding off the words "Timber Mill" from the sign over the door. Later, I paint in the name of the family farm owner, such as, "Wirsing 1745".
A real hit is to name an inn or hotel after someone in the group, such as "Hotel Le Vaclun". Announcement boards on the front of a church building adds a nice touch of realism, and you can even include your own pastor's name as the rector.
FINISHING TOUCHES
Adding textures and finishing touches can enhance the looks of many buildings. Use brush and pen to show the effects of age and daily use. Include green mold in the roof recesses, orangish rust stains from the shutter hinges, dirt smudges around doorways and windows, cracks in the stucco walls, shell holes, and even pigeon droppings in strategic places on roofs, cupolas of barns, and stately houses.
Before painting add some fine granules of sand to a stucco wall with white glue. This gives a look far exceeding the original casting. On many structures I like to add a bright green touch of climbing ivy and vines. Where the vines would wind up a wall, I lay in a wavy bead of white glue. Then I apply green scenic grass or foliage material, which gives the appearance of plant life climbing the walls. In upper windows of barns, I apply white glue, and set in some fine straw material to give the appearance of a full hayloft.
Basing some buildings with extended bases can have a dramatic effect on their appearance. For instance, the ACW church from the Antietam battlefield, produced by Hovels, looks great mounted on an extended base made of thin styrene plastic. Painting the sheet a dark brown, the base is first marked as to the position of the church, and the remaining area is surrounded with some white picket fencing, available from the Atlas model RR people. Scenic dirt is then applied with white glue, showing the path to the front and rear doors of the church.
Headstones are cut from plastic sheet stock and glued in place. To give the appearance of a freshly dug gravesite, a rectangular area is painted black and surrounded with the same scenic soil. Scenic grass is then applied with white glue to the remaining areas, and the church is set in place afterwards. Using the base as the anchor for wall sections, with separate farms buildings filling in the openings between wall sections, this same technique has worked well in putting together walled farm yards.
Using this same principle, headquarters scenes for horses and musket armies can easily be done. Stone Mountain Miniatures turns out some nice 15MM ACW campsite figures with tents, campfires, hitched horses, stacked rifles, and troops sitting around doing chores and passing time. I start be painting the plastic sheet base green, gluing the firepits, tents, stoves, figures, and hitched horses in place.
For foot trails and worn areas, I lay in white glue and put down some scenic soil. Finally, scenic grass is sprinkled over the remaining area, which has been painted with white glue. To give the look of the encampment, the headquarter's scene serves as a base, from which rows of tents can be run off.
Hopefully these tips and hints will encourage you to add to your collection of buildings yourself. There is a feeling of artistic accomplishment in producing top notch scenery. So keep your powder dry, and your brushes clean!
Back to Table of Contents -- Courier #62
To Courier List of Issues
To MagWeb Master Magazine List
© Copyright 1993 by The Courier Publishing Company.
This article appears in MagWeb.com (Magazine Web) on the Internet World Wide Web.
Other articles from military history and related magazines are available at http://www.magweb.com