 BLANKET ROLLS AND VEHICLE COVERS
This article describes how to add blanket rolls and rolled up tent covers to your miniatures for added realism. These additions can customize your figures and add the lived in TI'to 1/285 vehicles.
A while back I purchased a mixed bag of old Napoleonic cavafry figures. These figures were not of the highest quality but the price was right. The horses were somewhat flat and there was no horse furniture included. I decided to add some horse furniture using some wire, white glue, water and tissue paper.
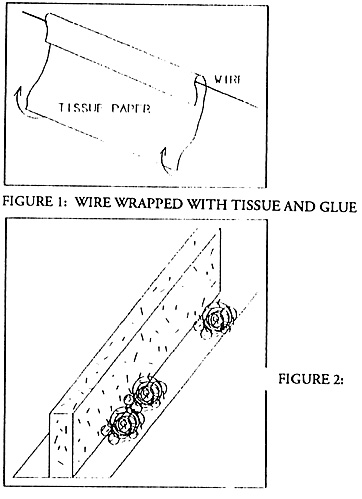
I first cut or rip the tissue paper into a 4 inch wide by 1 to 1 1/2 long strips. The length of the tissue paper determines the blanket rolls final diameter. Cut a piece of wire six inches long. Next, mix a 50/50 solution of water and white glue using an old brush. Paint the wire using the white glue mixture. You may want to put less or no water in the glue that you use to paint the wire with.
Now start by wrapping the 4 inch wide dimension of the tissue paper around the wire. The wire is 6 inches long to allow 2 inches of extra length for handling. Add some water/glue mixture to the tissue paper that is no yet wrapped around the wire. Wrap the rest of the tissue paper. When done grab on end of the tissue that is wrapped around the wire and twist the rest of the tissue to tighten the roll up.
After the glue has dried, the tissue can be painted. After paiinting I use wire cutters to cut 1/4 inch long pieces off. Now the reason why the wire is used becomes apparent. The wire can be bent to shape to fit the contour on the horses back, or a man's shoulder for that matter. After bending some cracks may appear in the paint but these can be easily repainted.
The dimensions I have given above are what I used to make blanket rolls for 15mm cavalry figures. The wire I use is 0.022 inch in diameter and is available at hobby and craft stores. I am now experimenting with the same method above to make tarpaulins rolled on the sides of 1/285 vehicle miniatures.
HEDGES
Realistic hedges can be made by using 1/4 inch wide by 1/4 to 1/2 inch high cross section wooden strips, some colored saw dust and landscaping foliage. I first glue a 4 to 6 inch long piece of the wood strip to a 1/2 inch wide piece of cardstock for a base. After drying I paint the entire base and wood strip with green flat latex paint. After drying paint watered down white glue on the hedge and add green landscaping sawdust while the glue is still wet. I don't cover the base part evenly to give a more realistic look.
For the final touch, after drying I add some clumps of darker green or brown landscape foliage along both sides of the strip along the base to represent smaller bushes and break up the regular shape of the wood strip. Adding these little pieces of foliage is an important step should not be skipped. The height of the strips you use depends on your scale but I generally use 3/8 to 1/2 inch high strips for 15mm, and 1/4 high for 6mm and 1/285 scales.
EDGE OF TABLE
When placing sections of wargame tables together sometimes gaps occur which can at times take up San Andreas fault proportions. By using thick foam weather stripping to line the edges of joined sections the gap will be filled by the foam even if the gap changes as people lean on or bump the table sections.
Back to Table of Contents -- Courier # 61
To Courier List of Issues
To MagWeb Master Magazine List
© Copyright 1993 by The Courier Publishing Company.
This article appears in MagWeb.com (Magazine Web) on the Internet World Wide Web.
Other articles from military history and related magazines are available at http://www.magweb.com