 Introduction
After many years of making custom wargaming terrain and receiving countless questions from gamers, I have decided to share some simple ideas here. Wargaming terrain can be made out of a variety of items including foam, wood, various types of putties and plastic. Many durable wargaming pieces I have made over the years have included a hard wood base, topped with putty over foam. Other options have included resin base pieces that I have textured and flocked to create various finished pieces.
Many gamers have used foam to build up hills under their gaming cloth, or to make large terrain tiles or board sections. Foam can also be used to make larger wargaming terrain features. Some readers may ask, why foam? Isn't foam too fragile for high quality wargame projects? It can be, but foam can also be treated or sealed, allowing it to be highly durable and to withstand the abuse of travel and wargamers.
Chronicling A Terrain Project - Culp's Hill
 For the sake of this article, I will chronicle the recent production of a large Culp's Hill terrain project for a customer. My customer was interested in a large Culp's Hill piece designed from the maps in Enduring Valor. I decided that in order to capture the terrain features, this 15mm piece would have to be almost 3'x3', making many conventional methods of building terrain unacceptable. Generally, this piece would be difficult to create using a method that would allow me to both ship it (low weight) and make it durable for many years of gaming pleasure.
After thinking about this project, I decided foam would be the material of choice. Now to decide which kind of foam to use - white bead foam or blue board? I decided to use white bead foam which I obtained in sheets that measured 48" x 13" x 3/4", because these would allow the piece to be built in three sections, with minimal cutting and matching of the adjoining edges. Blue board is generally stronger and more durable, but for this project, matching 3 cuts perfectly to line up the three tiered sections required to do a 3level hill would prove challenging. White foam would need more sealing, but it is easier to cut and align the precut edges.
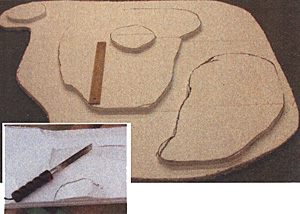
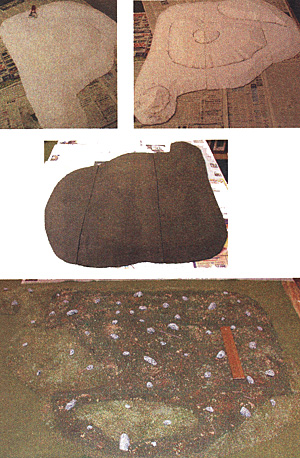
My next step was to lay out three large pieces of foam and draw the lower level of the piece onto the foam with a Sharpie. I then cut out these pieces using a sharp X-actoTM knife. I repeated these steps for the upper levels until all pieces had been cut out. Next, I glued the pieces together (I used a product I call Foam ShieldTM; explained more later).
You can also use construction adhesive, Mod PodgeTM or even white glue (I do not use white glue for this due to its tendency to shrink during drying).
After drying, I applied 3 coats of Foam Shield to the bottom of the pieces, allowing drying time in between. Only coat the bottom at this time, because the top areas still need to be contoured. Foam Shield is an elastomeric Coating and adhesive that I apply to the foam by a brush. It seals and locks the foam beads together and provides a flexible, protective shell that extends the life of foam and reduces damage from handling. Foam Shield is available from Battlefield Terrain Concepts.
The next step was to slope the contours by cutting away the excess foam. I moved my foam sections outside, and went to work with my Crafters Hot KnifeTM. This handy tool is excellent for sloping terrain. It gets very hot and slices through all kinds of foam like a hot knife through butter. I work outside to avoid having all of the nasty fumes in my home. The Crafters Hot Knife is such a terrific tool and it made quick work of this project. The 6" blade really allows for cutting slopes and contours that your troops can stand on.
 Some tips of using this tool include:
- Work outside or with good ventilation and avoid directly breathing the fumes.
- Press the heating button until you are slicing through the foam easily, and then release it. You know when it is too hot because it will smoke more and is melting the foam too quickly.
- Work away from yourself in case you slip, so you do not cut yourself.
- Do not overheat the blade (if you push the heating button too long, it will overheat and shut off for 5 minutes). It takes practice to learn when to press the heating button.
- Keep a rag and small piece of scrap cardboard from a box near you. Wipe the blade onto the cardboard to get rid of excess foam "goo." Then wipe the blade with the rag.
- Caution, the blade gets very hot and can burn you. Lay it in a safe place to cool, away from all combustibles.
- Use the tool to smooth edges by melting, not cutting.
This is such a wonderful tool. It is also available from Battlefield Terrain Concepts. Another good foam tool is the Tippi tool, which is an excellent complimentary tool which can help gouge out stream beds, sunken roads and other features.
Once I had cut all of the edges, I finished smoothing out any contours by using the side of the hot knife blade to melt and smooth any abrupt slope changes.
After cooling, I then applied a thin layer of lightweight spackling compound where needed to finish the slopes and hill as I desired (white foam can have rougher edges due to the foam's texture). I also used this to provide some rolling effects to the terrain (I hate flat terrain). The spackling was applied with a large putty knife, and sanded when dry.
After sanding, I coated all three pieces with 2-3 coats of Foam Shield (remember the backs are done). I applied three coats to all slopes and top areas, and 3 coats to the vertical sides, corners and edges (where wear and damage is most likely to occur). I used a large 1" or 2" brush to speed up the process of applying the Foam Shield. Dry times will vary, but I was able to apply the next coating within 5 hours.
Now the pieces are ready for painting followed by flocking. Since the pieces have been coated with Foam Shield, they can be spray-painted (if they were not coated, care would have to be used to select a paint that will not dissolve the foam). I used KrylonTM Green Camo Paint, which is nice and flat.
I then spread Elmer's glue on the surface in the areas to be wooded and sprinkled my own custom mixes of woods flocking onto the wet glue. After drying and knocking off the excess, I repeated this process with the open areas.
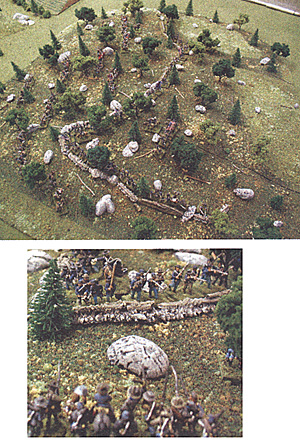
After flocking, I then glued pre-painted resin boulders and rocks onto the hillside in a random arrangement, to signify the rough rocky nature of Culp's Hill (I was careful not to place too many to allow enough space for miniature formations during gaming). Following this step, I randomly drilled holes into the foam for trees. I glued plastic tubing into about 1/2 of the holes to accept my deciduous trees (Woodland Scenics), and left the others open for the pines (Heki). I placed over 60 trees on these three sections.
The last items needed for any Culp's Hill terrain are the hastyworks/lightworks built by the 12th Corps. For these, I used some pre-painted resin products that I manufacture and laid them on the hill. I was careful not to glue these on (at the request of my customer) to also allow the terrain to be used for other scenarios. Additional items such as walls and fences could have been installed to the exact requirements of the scenario map, but this would have limited the use of the pieces and created shipping and handling challenges.
The options for wargaming terrain made with foam are endless. From finely sculpted terrain boards to special terrain features, it is fairly easy to make these in a couple of weekends. With the right tools and materials, making foam terrain can be simple and fun.
EDITOR'S NOTE: Two scenarios for Culp's Hill may be found in Enduring Valor: Gettysburg in Miniature by Scott Mingus. An on-line scenario for Pardee Field may be viewed at www.geocities.com/scottmingus/Gettysburg
Back to Table of Contents -- Charge! # 6
Back to Charge! List of Issues
Back to MagWeb Master Magazine List
© Copyright 2005 by Scott Mingus.
This article appears in MagWeb.com (Magazine Web) on the Internet World Wide Web.
Other articles from military history and related magazines are available at http://www.magweb.com