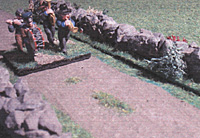
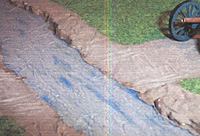
 All throughout history, troops had to march to reach their objective. Since often both sides wanted to travel fast, or one force wanted to ambush its opponent, pre-existing roads made military movement faster and easier. So, battlefield terrain maps almost always include roads of some kind. This was no different during the American Civil War, and is the reason why I want to give a guideline on how to model them.
At conventions, you often see people with the most beautiful hills, trees, fences, and houses, but too often their roads look horrible. The main reason is that most people simply pick the wrong base materials. Picking the right one is the biggest problem, and the decision should be made according to how you want to use your roads.
Normal Dirt Roads
If you want to build a board for a given battle only, or a modular board that will be set up from a huge number of small pieces, you are best off to simply apply the road directly to your board, which will prevent it from standing out. You are in for a much harder job if you want roads that you simply lay on the tabletop. In that case, you need to walk a fine line between something that does not bend at the edges (which is the one thing that ruins the look most often), and something that is robust.
The choice is a little easier when you are playing in 25mm scale, as your road can be thicker without standing out. For such large scales, I would advise on using thin MDF boards. They will be robust and not curl when they get wet during painting. If you wargame in a smaller scale, this might be too thick for you. I have heard people using plastic card or thin metal sheets, but the problem with those is that they have a very smooth surface, and because of their low thickness, warp easily. This combination will usually cause whatever you applied to chip off in places.
My advice would be to use cardstock. But since this will curl when you paint it, you need to pick one that will not do so easily. The best should be card that is coated on one side (like the kind used for cereal boxes), as this will prevent the paper to soak up the dampness from the paint. You can buy slightly thicker versions of this at most craft stores, but if it is unavailable, you can use cereal boxes. Always do a test run with one piece to see if it will curl. If it does, you can put packaging tape on the uncoated side, but make sure that it is not applied just flat to the back. It should not bend the card on its own or have wrinkles.
Now that the base material is set, you need to choose how wide your model road should be. It is best to take the wideness of your biggest stand that you will us in your games, as it would really strange if the troops were suspended from the fences by the roadside. If you are applying the roads directly to the board, draw the road onto the board with a marker pen first. Make sure that the road is always the same width at the board edges, and, if the boards are modular, that the sides of the road are always the same distance from the next corner of the board. If you use MDF or cardstock strips, cut them to the desired width, always making sure that the ends are the same width. MDF can be cut to the desired width at the DIY store for free or a small fee.
Always make sure that you have pieces of different length - a few pieces that end in a 45° angle if you want you road to end diagonally at a board edge. You should have at least 3 each that have the 45° angle on the left and as many that have it on the right. Also do a few bends and curves. The best would be a couple that turn the road by 45° and 30° and just a few at 90°. If you want you can also do a few X-pieces for intersections, but this can also be done by simply putting normal pieces together.
 When you are finished with this, you need to apply texture to your boards or card. This is best done with structured paint. You simply go and mix sand into normal latex (indoor) paint. The grains of sand should be about the size of grains of salt to get the desired effect. It does not matter which scale you use, as this will give you a convincing texture when you dry brush. Mix enough of the sand into the paint to give it the look of soft ice-cream. Paint this onto your boards / card. Always paint it onto the coated side of both MDF and card. If your MDF has no coated side, go for the one that has a flatter surface.
Always apply the paint by brushing it along the long direction of the road. Always apply 2 or 3 thin coats rather than one heavy coat (especially when you use cardstock). After this has dried, simply paint it in the desired earth colour and dry brush with a lighter version. Add some static grass that fits the rest of your table in the middle of the road and along the edges to recreate those places that wagon wheels will not touch, and you are finished. If you are playing more modem eras as well, this can also be used for asphalt or concrete roads by painting it in appropriate colours.
Sunken Roads
Sunken roads are created primarily by erosion. When wagon wheels and feet move over ground frequently, nothing really can grow there. In the event of heavy downpours, the water will flow down the sides of hills, taking along soil when there are no plants to secure the soil with their roots. These usually are roads and paths, and this is how sunken roads are created. But this also means that they can only be found on the sides of hills.
As you will need to create those hills anyway, you can now easily use the first version form above. But of course, if you want your road to really appear sunken, cut your hill out of a foam board of the desired strength with the historic topography.
Now draw the desired width and direction of your sunken road onto a piece of paper or card. Place it on top of your hill at the desired spot, mark the edges on the board and remove the paper. Cut your sunken road out from the foam. Do not try to get the desired shape (or depth) at this time. As you are doing a negative shape, this will only come out as a mess.
Cut it out a little wider than what you drew, and a little deeper then you will need. The desired end depth should be about as deep as the knees of your based minis, so you should cut about 3 to 6mm deeper.
Now, apply plaster to your cut. The bottom of your cut should be at the desired depth. Build the edges of your road up to the top of the foam, keeping it as wide as your road at the bottom (you can use your cut out paper road as a guideline for this). You should then create a little "ridge" running along the middle of the road. As explained before, the water will wash out your road where there are no plants. As there usually is some grass in the middle of the road, the effect will not be as severe there. When you look at your road from the side, you should see a vague "W" shape now.
After this, you just go and paint it with structured paint and go on as described above.
Muddy Roads
This should be rather rare, but you might need it when you do fords. This can actually be done quite easily by just applying a thin layer of plaster to your board, MDF, or card (although it might be impossible to prevent warping here). Mix it a little wetter than you usually would. Now simply take one of your cannons, caissons, wagon, etc. Wet the wheels and pull the miniature through the plaster a few times. You should use an unpainted model for this as you might ruin the pain otherwise!. Once this is done, let it dry and go on like mentioned in the basic method, but leave the structured paint off. Mud hardly looks this textured!
Back to Table of Contents -- Charge! # 4
Back to Charge! List of Issues
Back to MagWeb Master Magazine List
© Copyright 2004 by Scott Mingus.
This article appears in MagWeb.com (Magazine Web) on the Internet World Wide Web.
Other articles from military history and related magazines are available at http://www.magweb.com