Introduction
The basic rules for BattleTech specifically prohibit "stacking" BattleMech units in one hex. This allows play to proceed quickly and simply but sacrifices an element of realism. One BattleTech hex, after all, is three times wider than the typical BattleMech is tall, which suggests that more than one 'Mech could occupy the same hex at the same time without crowding.
Optional Rules Variant 0204-B addresses this situation and provides a means for players to resolve close-quarters combat between opposing 'Mechs.
Standards:
Rules Variant 0204-B is designed to mesh with 0204A, above. The standard scale is set at 1 cm = 2.5 meters, which fits well with the Ral Partha line of miniatures. One 30-meter hex measures 12 centimeters across.
Variant 0204-B is also designed to mesh with the basic BattIeTech game. Each small hex on the Close Assault Hex measures 10 meters across. One turn equals five seconds of time.
Close Assault Hex
This variant makes use of a Close Assault Hex. A copy is printed on page 44. Permission is explicitly granted to photocopy page 44 so that multiple copies can be made, and so that players do not need to mar this issue of BattleTechnology. Paste the photocopy onto a sheet of cardboard or other stiff backing and cut it out as shown.
The Close Assault Hex represents one standard, 30-meter BattleTech game hex, expanded until it is in scale with BattleTech miniatures. It is divided into seven smaller hexes, called Tactical Hexes, each representing an area 10 meters across.
Stacking limitations for Tactical Hexes are the same as for regular BattleTech rules. No more than one BattleMech may occupy any one Tactical Hex at the same time. Up to two small vehicular units (less than 60 tons) may occupy the same Tactical Hex. Large vehicular units, however (Demolishertanks, and other vehicles; of 60 tons or more) are restricted to no more than one per Tactical Hex.
Outside the Close Assault Hex are six additional small hexes, one on each side of the Close Assault Hex, called Approach Hexes. Entry to the Close Assault Hex can only be made through one of these Approach Hexes. They are treated as Tactical Hexes for stacking purposes.
Order of Play
Use of Rules Variant 0204-B is strictly Optional. In many cases, players may wish to resolve combat in the usual manner, without using 0204-B to resolve close combat. If all players agree, however, it may be used instead of the normal Physical Attack Phase in BattleTech play. Thus, Close Assault combat is resolved after the Weapons Attack Phase and before the Heat Phase.
Close Assault
A Close Assault occurs whenever two opposing 'Mechs (or other vehicles or units) engage in combat at ranges of 30 meters or less. In the Basic BattleTech rules, this type of combat encompasses all Physical Attacks: Punching, Kicking, Shoving, Charging, and Death From Above.
In the Basic BattleTech rules, Punching, Kicking, and Shoving may be initiated whenever one 'Mech ends its movement phase adjacent to an enemy 'Mech. Charging and Death From Above attacks may be declared by the Attacker during his movement phase, if he has enough MPs (for a Charge) or jumping MPs (for Death From Above) to enter the Defender's hex.
In addition to the usual Physical Attacks, this rules variant allows certain other close-range activities, including Blocking (by the Defender) and Close Range Fire Attacks (by either side).
When using the Close Assault Rules Variant, all combat takes place within a single 30-meter hex. Rather than ending their movement phases in adjacent hexes, an attacking 'Mech actually enters the Defender's hex. Combat is then transferred to the Close Assault Hex and played out there during the Close Assault Phase of the turn.
Set-Up
The Close Assault Hex represents one hex on a normal BattleTech game map. The Defender's'Mech starts out in the center Tactical Hex of the Close Assault Hex.
The Defender's orientation must be the same as for that BattleMech on the game map. In other words, if a'Mech starts out facing south in a given hex, that'Mech must begin the Close Assault segment of the game phase facing south as well.
The Attacker places his 'Mech on the proper Approach Hex. For example, if an Attacker is approaching a Defender from the south, the Attacker's 'Mech is placed on the Approach Hex on the south side of the Close Assault Hex, facing north. Attacking 'Mechs entering the hex by jumping are not placed on an Approach Hex.
Note that, with this variant, more than one attacking BattleMech may attempt to enter the same hex at the same time. Theoretically, six Attackers could enter the Defender's hex from six different directions, all at the same time.
Maneuvering
BattleMechs may expend MPs to maneuver within the Close Assault Hex. Turns are performed in the same way as in basic BattleMech, by expending one MP for each 600 (one hex side) change of direction.
BattleMechs may also move within the Close Assault Hex. Movement is conducted in the same way as in normal BattleTech combat. However, only 1 MP is expended for each Tactical Hex move, regardless of the type of terrain the larger, Close Assault hex may represent.
Close Assault Procedure
The attacking player moves first. If the Attacker has more than one 'Mech attempting to enter the Defender's hex, he chooses which of his 'Mechs moves first.
The Close Assault Phase is considered to be the resolution of movements initiated earlier in the turn. For example, 'Mechs which executed a Charge during the Attacker's movement phase resolve the results of that charge through a Close Assault.
Attacker's Movement
To make his move (or moves) the Attacker must have enough MPs remaining to enter the hex during his movement phase. If the hex represents rough terrain, for example, each 'Mech which wishes to enter the hex must have at least 2 MPs remaining to enter it. 'Mechs attempting to jump into the hex must have sufficient jumping MPs to do so.
 Defender's Movement
After the Attacker has moved his first unit onto the Close Assault Hex, the Defender may, if he wishes, move to any of the three Tactical Hexes in towards his front, or step back into the hex immediately to his rear. He may not leave the Close Assault Hex, and he may not enter a Tactical Hex already occupied by another 'Mech.
This movement is free. It represents a last-minute shift in the Defender's position and does not require remaining MPs to execute it.
The Defender may also change his facing either before or after he makes his free shift within the Close Assault Hex. This movement is not free, however. The defending 'Mech must have enough MPs left over from his movement phase to execute the maneuver.
Tactical Decision
Both the Attacker and the Defender now secretly record the tactics they plan to have their 'Mechs execute during the Close Assault combat.
The Defender may choose one of the following:
- a. Stand in place-fire weapons
b. Stand in place-punch
c. Stand in place-kick
d. Stand in place-block attack
e. Maneuver-avoid attack
f. Maneuver-flee
g. Eject
The Attacker may choose one of the following:
- A. Advance-fire weapons
B. Advance-punch
C. Advance-kick
D. Advance-push
E. Advance-collision
F. Maneuver-avoid or break off attack
G. Eject
Attacking units executing Charge or Death From Above maneuvers may only choose Advance-collision. Attacking units executing Pushing maneuvers may only execute Advance-push. Attacking or defending units may only choose Maneuver commands if they have at least 1 MP remaining after all last-minute shifts and maneuvers have been completed, and after all MP costs for entering the hex have been expended.
 Combat Resolution
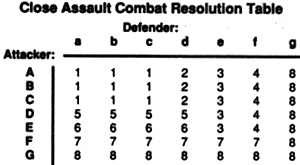
The attacking and defending players reveal their chosen tactics to one another. The lower-case letters of the defending strategies and the upper-case letters of the attacking strategies are compared with one another on the chart. By cross-indexing the two, a numbered result may be obtained from the Close Assault Combat Resolution table.
Close Assault Combat Results
1: Both sides exchange attacks according to the basic rules for physical combat.
Damage is considered to be simultaneous, and both'Mechs are able to complete their chosen tactics before damage is applied.
Fire combat is carried out in the usual way. LRM fire is not permitted. All other fire is resolved as for a range of 1. Fire may be directed at other 'Mechs within the Close Assault Hex at a range of either 1 or 2 Tactical Hexes. No 'Mech may fire any weapon which was fired during that turn's Weapon Attack Phase. For this reason, players should keep track of weapons which were not fired during each Weapon Attack Phase.
Punch, Kick, and Shove attacks are possible only if the two 'Mechs are in adjacent Tactical Hexes. Should the attacking 'Mechs not be adjacent to the Defender, all such physical attacks miss automatically. Any MechWarrior who misses with a kick must make a Piloting Skill Roll to avoid falling.
2: The Defender attempts to block the Attacker's kick or punch.
The attempt requires a successful Piloting Skill Roll by the Defender. If the attempt fails, damage from the Attacker's kick or punch is delivered as usual. If the blocking attempt succeeds, the damage from the attack is halved (fractions rounded up) and applied against the arm of the Defender for a punch, and against the leg for a kick. The Defender chooses which arm or leg suffers damage, unless the attack comes from the side, in which case damage is applied against the arm or leg on that side.
Sometimes, the Defender may expect a physical attack and try to block it, only to discover the Attacker has elected to fire his weapons instead. When this happens, the Defender receives damage from the Attacker's fire as usual. The Attacker suffers no damage.
To block a punch, a defending 'Mech must have all of its arm actuators intact and may not fire any weapons from that arm during that turn.
If the block attempt fails, the Attacker suffers no damage. If the blocking attempt succeeds, the Attacker suffers one quarter of the total amount of damage to that arm or leg, with fractions rounded up.
Example: A Warhammer (70 tons) throws a punch at a Crusader (65 tons). Normally, if the punch was successful, the Crusader would suffer 1 damage point for every 10 tons of the attacking 'Mech--7 points, in this case. ff the Crusader was able to successfully block the attack, however, the Crusader would suffer only 4 points of damage, all of it applied against the arm with which it blocked the punch. At the same time, the Warhammer would suffer 2 points of damage to the arm with which it threw the punch.
3. The Defender attempts to avoid his opponent's attack by executing a last-second maneuver such as stepping out of the way.
Note that the Defender does this instead of trying to damage or block his opponent. The maneuver does not require additional MPs and may be attempted even if all available MPs have been used in earlier maneuvers during the turn or phase.
For every Piloting Skill Level below 4, the Defender may add one to the Attacker's To Hit Number. This modifier is in addition to any modifiers added reflecting differences in the pilots' Piloting Skill Levels.
The Attacker must also add 1 to his To-Hit Number if the target 'Mech weighs 50 tons or less, and 2 if the target 'Mech weighs 20 tons or less (reflecting the generally greater agility of lighter 'Mechs).
If the Defender avoids a punch or a kick, he suffers no damage. The Attacker must roll against his Piloting Skill to avoid falling after missing a kick.
If the Defender avoids a charge, he may move to any adjacent unoccupied Tactical Hex (his choice), with any facing (again, his choice). The Attacker continues moving in a straight line through the Close Assault Hex, exiting through the opposite side from which he entered. If the Attacker has insufficient MPs to continue movement, he remains in the Close Assault Hex, in the Tactical Hex opposite from his Entry Hex. If he has sufficient MPs to continue into the next hex, he does so and is removed from the Close Assault Hex. In both cases, the Attacker must roll against his Piloting Skill to avoid falling after missing his target.
If the Defender avoids a Death From Above attack, he may move to any adjacent unoccupied Tactical hex, with any facing (his choice). The Attacker lands in the Tactical Hex vacated by the Defender and must make a Piloting Skill Roll to keep from falling.
If the Defender fails to avoid the attack, damage is suffered by both 'Mechs as always.
Example: A Crusader executes a Charge against a Phoenix Hawk (45 tons). The Crusader pilot has a Piloting Skill Level of 4, while the Phoenix Hawk pilot has a Skill Level of 2. The Phoenix Hawk pilot elects to attempt to evade the charging Crusader at close quarters, a maneuver not unlike that executed by a matador in the arena.
Normally, the Attacker would have to roll 5 or higher to hit the Defender with his charge. However, a very good pilot in a fast medium 'Mech is attempting to avoid the charge at the last moment. The Defender's Piloting Skill Level is 2 less than 4, so 2 is added to the To Hit Number. In addition, 1 is added because the Phoenix Hawk weighs less than 50 tons. The Attacker must roll 5 + 3= 8 or better to successfully charge the Defender.
4. The Defender attempts to flee before the Attacker can close with him.
He does so by rolling against his Piloting Skill Level. If the Defender has a 'Mech heavier than 50 tons, he adds 1 to the To-Hit Number. If his 'Mech weighs 80 tons or more, he adds 2 to the ToHit Number. Thus, it is more difficult for large, heavy 'Mechs to avoid attacks and flee than it is for light, fast 'Mechs.
If the Defender's roll fails, his 'Mech must remain in place for whatever type of attack his opponent delivers. If his roll succeeds, he can leave the Close Assault Hex. However, it is possible he will suffer some damage as he withdraws.
The Defender decides which way his 'Mech is withdrawing. He may change his facing, and he may enter any Tactical Hex adjacent to his own which is not occupied by the enemy. These maneuvers do not require the expenditure of any MPs. At the end of the maneuver, however, the Defender's 'Mech must be in one of the Tactical Hexes along the sides of the Close Assault Hex. He may be facing away from the Close Assault Hex's center (exposing his back to the enemy) or he may be facing towards it (intending to back out of the hex). His facing will determine where he will take damage, if any, from his opponent.
If the Attacker elects to fire weapons, the Defender takes damage from the attack in the usual fashion. The Defender may not return fire, since the Pilot's attention during that turn was focused on escape.
If the Attacker has elected to deliver a kick or a punch, he enters the central Tactical Hex and does so. However, he may not change facing and can kick only if the target is in the Tactical Hex directly in front of him. If the target is to the left front or right front Tactical Hex, the Attacker may deliver a punch only with his left or right arm, respectively.
If the Attacker has elected to deliver a push, he does so from the central Tactical Hex. The Defender will exit the Close Assault Hex through the nearest hexside.
5. The Attacker attempts to push the Defender out of the Close Assault Hex with Its arms.
The Defender may damage the Attacker by punching, kicking, or firing its weapons. The Attacker must make the usual roll against a base To-Hit number of 4+ for the push to be successful.
A successful push does no damage to the target but does move the target into the adjacent hex, while the Attacker remains in the Defender's original hex. If the push is unsuccessful, both 'Mechs remain in the same Close Assault Hex, and combat will continue at close quarters.
If the Defender successfully avoids a push, the Attacker remains in the center Tactical Hex of the Close Assault Hex.
6. The Attacker attempts to collide with the Defender, causing damage to both 'Mechs.
This is the end result of either a successful Charge or a successful Death From Above attack.
Charge: The Attacker first takes damage from the Defender's attempt to kick, punch, or use his weapons. The Defender may also attempt to maneuver clear of the attack instead of fighting back. If the Attacker is not crippled by the Defender's actions, and if the Defender is unable to avoid the attack, the results of the collision are resolved normally, by comparing the Piloting Skill Levels of the two pilots and using the difference as a modifier.
Death From Above: If the Attacker executes a Death From Above attack, the Defender will not have the opportunity to attempt a Punch or Kick against the Attacker before he is hit. He may, however, have the opportunity to fire his weapons before the Death From Above attack is resolved.
The Defender may only use weapons which can bear on the Attacker as he approaches. That is, attacks from the rear can only be met by a Defender's rear-facing weapons, while an attack from the forward left side could only be met by the Defender's left arm weapons. The Defender may not move, turn, or twist to meet a Death From Above attack.
The Defender may only use weapons which he did not fire during that turn's Weapon Attack Phase (immediately preceding the Physical Attack Phase). Long Range Missiles may not be used in the attack. All other weapons may be fired, using the appropriate modifiers for a moving target at a range of one 30-meter hex.
The Defender makes all fire attack rolls before the Attacker hits. Weapons fire will not divert a 'Mech executing a Death From Above attack from its course. Even if the Attacking 'Mech is destroyed in mid- air, the wreckage will still strike the target, according to the usual rules governing Death From Above combat.
7: Attacker breaks off attack.
The attacking player may, at the last moment, attempt either to avoid the Defender's fire or other hostile action, or to flee. To do so he advances his 'Mech from the Approach Hex onto a Tactical Hex within the Close Assault Hex, then rolls against his Piloting Skill. If the roll fails, he remains in place and is subject to any fire attacks or maneuvers the Defender may have planned for that turn. If the roll succeeds, the Attacker may withdraw his 'Mech from the Close Assault Hex, and place it in any Approach Hex within two Tactical Hexes of the Tactical Hex he entered on. He maintains the original facing he had when he entered the Close Assault Hex.
This maneuver is primarily used to give the Attacker a last chance to change his mind-if, for example, he suspects a trap after he has already committed himself to a punch or other Physical Attack. It may also be used to draw the Defender out of a strong defensive posture, to trick him into launching a Close Assault of his own, orto reveal infantry or other units hidden in the Defender's hex.
Breaking off the attack may not be used in Charge or Death From Above attacks. The 'Mech pilot must commit himself to those maneuvers during the movement phase of the turn, and the inertia of his 'Mech is too great to permit a last-second change of plan.
8: Eject
Either the Attacker or the Defender (or both!) elects to "punch out," using their cockpit ejection systems to abandon their 'Mechs. This is always a last resort option, used when a player knows the 'Mech is lost but wants to save the MechWarrior pilot for future campaigns.
The rules for ejection are given on page 46 of The Rules of Warfare, from FASA. A roll is made against the MechWarrior's Piloting Skill, with modifiers for such factors as damage to the 'Mech's head and the presence of light or heavy woods. The ejected MechWarrior will land in the 30-meter hex directly behind his 'Mech.
If the roll fails, the pilot takes 1 point of damage and must make a consciousness roll.
Ejection occurs before damage from the opponent's fire or other attacks is applied. However, these attacks must be resolved as planned by the opponent, since the actions are considered to be simultaneous. The target 'Mech is considered to be stationary as these attacks are resolved.
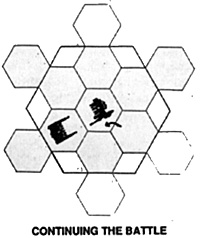
Continuing the Battle
 Once the first exchange of combat has taken place, both
Attacker and Defender reassess their situations. If either'Mech has left
the Close Assault Hex, both 'Mechs are returned to the basic game map,
and play continues with the Heat Phase of that turn.
Once the first exchange of combat has taken place, both
Attacker and Defender reassess their situations. If either'Mech has left
the Close Assault Hex, both 'Mechs are returned to the basic game map,
and play continues with the Heat Phase of that turn.
If both 'Mechs remain in the same Close Assault Hex, Close Assault Combat may continue. Each player secretly records his movements for the next round of Close Assault Combat. This time, there is no preliminary maneuvering. The players compare their respective tactical decisions, and the steps outlined above are repeated.
In normal BattleMech combat, one game turn represents ten seconds. Combat within the Close Assault Hex represents 5 seconds for each exchange. Thus, after two exchanges in the Close Assault Hex, the players should return to the regular game map to resolve the maneuvers and combats of the next turn. BattleMechs engaged in Close Assault Combat are left where they are until the next Close Assault Phase, when combat continues.
As soon as one BattleMech or the other leaves the Close Assault Hex, either voluntarily or as a result of enemy action, both 'Mechs are returned to the regular game map and placed in the appropriate hexes. Both are given the same facings they had when they were removed from the Close Assault Hex. It does not matter which of the Tactical Hexes within the Close Assault Hex a 'Mech occupied when it was returned to the main map.
Multiple BattleMech Combat
As many as seven BattleMechs can occupy one Close Assault Hex at one time, with one 'Mech in each of the seven Tactical Hexes. The Close Assault Rules Variant allows several smaller BattleMechs to gang up on one large one in direct hand-to-hand combat.
The order of play proceeds as for two 'Mechs. If the Defender has more than one 'Mech in the Close Assault Hex, he places them within the hex, as desired. The Attacker then places his 'Mech or 'Mechs on the Approach Hex or Hexes of his choosing.
The Attacker moves first by moving one of his 'Mechs (his choice) from its Approach Hex to a Tactical Hex. If that Tactical Hex is blocked by an enemy unit, he announces that his 'Mech is attempting the move, and that combat is occurring.
Next, the Defender moves a 'Mech of his choice as desired. He may not attempt to enter a hex occupied by an Attacker. Play continues back and forth, then, until all Attacking and Defending 'Mechs have been moved or have had a chance to move. No 'Mech must move, and the Attacker may elect at any time to leave one or more of his attacking 'Mechs in their Approach Hexes.
Both players now make their Tactical Decisions, writing down their choices for each of their 'Mechs. If more than one target is available, each 'Mech must state which enemy 'Mech it is acting against.
The Tactical Decisions are compared, and combat is executed. All combat is considered to be simultaneous, and the order of combat can be carried out in any manner agreed upon by the players. Note that BattleMechs technically in adjacent hexes (those forced to remain on Approach Hexes by the presence of defending units) may take part in combat in the Close Assault Hex. Those choosing to fire their weapons may target any enemy unit in the Close Assault Hex, and are not limited to the 'Mech blocking their way into the Close Assault Hex. Attacking 'Mechs which have not gained entry to a Close Assault Hex are free to move on without making extra Piloting Skill Rolls or Tactical Decisions during the next Movement Phase, if desired.
All normal Tactical Decisions are allowed. Note, however, that maneuvering inside a crowded hex may prove quite difficult. A BattleMech is permitted to shove or collide with a friendly 'Mech in the same Assault Hex in order to carry out a maneuver. However, damage is still applied to both 'Mechs in the usual fashion.
Fire From Outside the Hex
If BattleMechs remain locked in Close Assault Combat from one turn to the next, other 'Mechs outside the Close Assault Hex may fire at targets inside that hex. Targeting and line of sight determinations are made normally. If a friendly 'Mech is positioned between the target 'Mech and the firer, the friendly 'Mech must be counted as partial cover.
Fire which is recorded as hitting the target causes damage during the Weapons Attack Phase, as usual. A separate roll is made for each shot which misses, however. On a roll of 7+, fire which missed the target will hit the friendly 'Mech instead. If more than one friendly unit is in the hex, the friendly 'Mech to be hit is chosen randomly each time a roll for a missed shot must be made.
Fire From Inside the Hex
 BattleMechs engaged in Close Assault Combat during a
Weapons Attack Phase may elect to fire at targets outside the Close
Assault Hex. However, they are considered to have already acted for
that turn and may take no action, offensive or defensive, during the
Close Assault Phase of that turn.
BattleMechs engaged in Close Assault Combat during a
Weapons Attack Phase may elect to fire at targets outside the Close
Assault Hex. However, they are considered to have already acted for
that turn and may take no action, offensive or defensive, during the
Close Assault Phase of that turn.
Vehicles and Infantry
Vehicles (tanks, hovercraft, weapon-carrying jeeps) may participate in Close Assault tactics. Indeed, this is often the best hope such light and relatively unprotected units have against BattleMech targets.
Vehicles engage against BattleMechs or other vehicles in exactly the same manner as BattleMechs. Up to two vehicles each weighing less than 60 tons may occupy the same Tactical Hex. Larger vehicles (60 tons or more) are limited, like BattleMechs, to one per Tactical hex. Only one infantry platoon (21 men for jump infantry, 28 men for others) may occupy one Tactical Hex at a time.
Vehicles are limited somewhat in what they can do in Close Assault Combat. The only Tactical Decision options open to the Defender are:
- a. Stand in place-fire weapons
e. Maneuver-avoid attack
f. Maneuver-flee
g. Eject.
The only Tactical Decision options open to the Attacker are:
- A. Advance-fire weapons
E. Advance-Collision
F. Maneuver-avoid or break off attack
G. Eject
All other rules for Close Assault combat are the same for vehicles as for 'Mechs.
Special Applications
Normally, more than one 'Mech will enter the same hex only when engaged in Close Assault Combat. 'Mechs which are maneuvering do not generally approach one another closely (i.e., within 30 meters) because of the danger of collision.
A Defender may, however, elect to place several of his 'Mechs close together in a so-called "steel wall," generally to prepare for an expected Close Assault by the enemy, or to discourage vehicles or infantry units from entering a tactical bottleneck such as a narrow valley or bridge. Defending units so placed may not move en masse from one 30-meter hex to another. Movement must be made one 'Mech at a time, as usual. If enemy fire is directed at that hex, rolls must be made for each shot which misses against the other 'Mechs in the Close Assault Hex.
Note that this type of formation is particularly vulnerable to strafing or dive bombing attacks by aerospace fighters!
Infantry
Players may also deploy infantry using the variant rules for close assault. All rules for using infantry are the same in this variant. They are described on page 36 of FASA's The Rules of Warfare. The use of the Close Assault Hex allows the application of some additional tactics in the use of infantry in BattleMech warfare.
Ral Partha makes infantrymen to the same scale as their other BattleTech products. Players may also use cardboard counters or tokens from old wargames or other products to represent infantry platoons in BattleMech scenarios.
In the basic rules for BattleMech, up to two infantry platoons can deploy in one 30-meter hex at a time. Using the Optional Variants described here, infantry can occupy a hex in one of two modes, deployed and in formation.
Infantry units which are deployed are considered to be spread out and making the most of all available cover. Up to two deployed infantry units (or one infantry unit and one vehicle) may occupy a Close Assault Hex at one time. Two infantry units may be deployed in a Close Assault Hex which is then entered by one or more 'Mechs or other vehicles and remain hidden, but only until the combat portion of the Close Assault Phase. Once combat begins, all infantry units hidden in the Close Assault Hex are revealed.
Infantry units in formation may not attack and they may not be hidden. They are considered to be in parade-ground formation (marching, boarding vehicles, or awaiting orders). Up to seven units in formation may occupy one Close Assault Hex, one in each Tactical Hex. Units in formation receive no benefit for cover from the terrain they are in, and hits against them are tripled. Deployed and formation infantry units may not share a single Close Assault Hex.
Players may agree that infantry units in formation are occupying tents, barracks, or other shelters in an encampment.
Hidden Infantry
Players may deploy hidden infantry in ambush sites in hopes of launching a close assault against passing enemy 'Mechs or other units. The position of these hidden units is secretly recorded by the player deploying them before play begins. The record should note both which 30-meter game hex and which Tactical Hex within the Close Assault Hex the infantry is deployed in. These infantry units are considered to be dug in or well hidden behind or under available cover, sufficiently hidden or screened to keep them from being noticed by heat sensors or other normal battlefield detection gear.
Whenever an enemy 'Mech enters a hex within which infantry is hidden, the player with the hidden infantry may declare a Close Assault. Combat is then resolved using the rules for infantry combat given on page 36 of FASA's The Rules of Warfare.
Secret Movement
Infantry may take advantage of rough terrain or woods to remain hidden while moving. Such infantry units must begin a turn hidden in one 30-meter hex, then move into an adjacent hex with rough or wooded terrain at the rate of 1 hex per turn without revealing the unit's existence. The owning player must keep track of the hexes the unit moves through. The unit must be revealed when it engages in combat or leaves rough or wooded terrain.
Infantry units which are moving while hidden may not engage in Close Assaults or the Special Infantry Ambush Option described below.
Special Infantry Ambush Option
If both players agree, those BattleMechs which enter a hex containing hidden infantry during their movement phase may be attacked while they are moving. If, during movement, a BattleMech enters a hex containing hidden enemy infantry, the infantry may declare a close attack as the 'Mech passes. The 'Mech stops its movement and the combat results of the infantry attack are resolved.
After damage is applied against the 'Mech, it may then either remain in that hex or continue its movement, at the pilot's choice. If it remains in that hex, it may attack the infantry either during the Combat phase of the turn, or during the Physical Attack phase. If the damage suffered by the 'Mech is severe enough to hinder or stop movement, that damage is applied for the remainder of the 'Mech's movement. For example, a critical hit to the 'Mech's hip will halve its available MPs (with fractions rounded up). If a Wasp (6 walking MPs) has already expended 4 MPs when it receives a critical hit to its hip due to an ambush by hidden infantry, its remaining 2 MPs for that movement phase are halved to 1. The Wasp will be able to expend only 1 more MP before ending its movement.
Infantry which attacks a passing 'Mech during the Movement Phase may not attack again during that turn, either during the Weapons Attack Phase or during the Close Assault Phase. If attacked by the same or another 'Mech in either the Weapons Phase or the Close Assault Phase, they may receive fire or physical attacks but may not fire again.
The Special Ambush Option may not be exercised against airborne (jumping) 'Mechs passing over a unit's position. It may only be used against 'Mechs walking or running through the hex.
Infantry which moves or fires on other units from ambush is considered to have revealed its position; it is then revealed to the opposing player by being placed on the map.
Anti-Mech Infantry
The rules for Close Assault tactics by infantry against 'Mechs are presented under the title Anti-'Mech Infantry, on page 47 of The Rules of Warfare, from FASA. Note that any type of infantry may attack 'Mechs (or try to), but specially-trained and equipped anti-'Mech infantry receives an added advantage in being able to execute close assaults without modifications for movement or terrain.
This type of attack represents an assault made with satchel charges and other special weapons by elite troops.
Tactics
Infantry units do not survive long against BattleMechs at short range. However, the judicious use of infantry, especially in prepared, hidden positions, can be an important tactic in 'Mech combat, especially for the Defender.
In particular, if the Special Infantry Ambush Option is used, hidden troops can serve as a kind of tripwire in advance of a Defender's main positions. They can slow advancing BattleMechs and armored vehicles and inflict enough damage to make a critical difference at a later stage of the battle.
Another use of infantry is to deploy them in ambush in the same hex as friendly 'Mechs or vehicles in the hope of luring an Attacker in for a Close Assault. When the Attacker enters the hex and combat is transferred to the Close Assault Hex, the appearance of infantry (especially anti-'Mech infantry) hidden in the same hex can come as a nasty surprise to an Attacker who was counting on an easy kill.
Players should not become too attached to their infantry units, however. Against BattleMechs, they rarely last very long.
Back to BattleTechnology 6 Table of Contents
Back to BattleTechnology List of Issues
Back to MagWeb Magazine List
© Copyright 1988 by Pacific Rim Publishing.
This article appears in MagWeb (Magazine Web) on the Internet World Wide Web.
Other military history articles and gaming articles are available at http://www.magweb.com