Background:
On July 13,3042, Enif, a world on the Kurita Periphery which is technically an independent, was raided by two enemies at the same time. Once was a a Kuritan Academy Training Force, culled from all parts of the Draconis Combine. It included all the different types of units found in a the presentday combined arms regiments. The other was a combined arms battalion from the Outworlds Alliance. On hearing that Enif had hired on a group of mercenaries known as the Guards of Uruk, the Alliance decided to stage a raid, both to test the Guards' strength and to warn them against raiding the OWA for water.
The scene of this particular battle is the area known as the Valley of the Winds. It is an area on one of the main continents which is roughly circular, surrounded by a high mountain range. It has a diameter of approximately 1,000 kilometers. The only ways to get in here with Mechs are to land them by DropShip or to come thorough the single mountain pass that lies on the southern mountain range.
The place receives its name because of the completely unpredictable winds which crisscross the valley. These winds can be anything from a light breeze to gale forces capable of knocking down a 60- ton BattleMech. Within this valley, the Guards of Uruk have placed their main base, farfrom any inhabitants.
The actual battle site is one of the smaller bases set up by the mercenaries as a resupply dump for their flight elements. It is protected by a heavy Mech Lance, a Lance of Medium Armor, a platoon of air-mobile jump Infantry, and two Striga fighters.
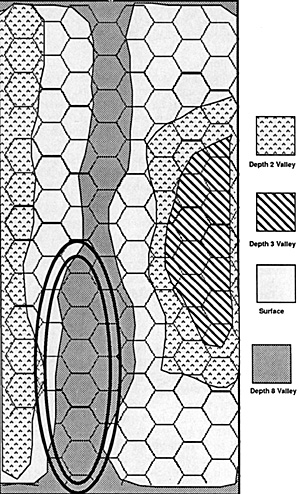 AeroTech Map
On the map, one hex = 1 standard BattleTech Map. This represents the narrowest and deepest portion of the Valley of the Winds. which opens out to either end of it.
Standard BattleTech maps which are to be placed and used for this scenario will fit within the six Aerotech hexes shown in the deep valley on the map below. As you can see, the valley walls are too steep to climb without lobster claws and if your Mechs use lobster claws, they won't get there till the scenario is over!
Game Setup
This setup is a bit different from the normal. There are three sides played. The rules required are BattleTech, CityTech, and AeroTech. Two sets of boards will be required, the low altitude AeroTech board, and the standard BattleTech maps. Only one AeroTech board is necessary.
For the BattleTech portion of this scenario, place six boards so that they form a rectangle running from north to south. After all setup is done, roll for wind and direction as in the special rules section before you begin. Once the specified number of turns is finished, another wind level roll must be made. The wind level roll is made before any forces are moved or fired.
Defender Setup
Place the defenders anywhere within 3 hexes of the center hex, designating one side as north and the other as south. Place the base ammo dump somewhere in hex #1210 of the middle board. In hex # 1510 of the middle western board, place the fuel tank. Eight hard cover hexes may be placed randomly throughout the board. Thedefenderscan be dug in anywhere around the base, including behind the hard cover areas.
Defending Forces: Guards of Uruk
Heavy Lance
Captain Cyd Anderson, Victor Piloting: 2, Gunnery: 3
Ed Dixon, Archer Piloting: 3, Gunnery: 2
Ashley Holland, Catapult Piloting: 3, Gunnery: 3
Gabriel Finnegan, Crusader Piloting: 3, Gunnery: 4
Laser Jump Infantry Platoon
Medium Armor Lance:
Van LucknerDriver:3, Gunner: 2
Van LucknerDriver:3, Gunner: 2
Goblin Driver: 4, Gunner: 2
Goblin Driver:3, Gunner: 4
Air Lance
Lt Shawn Gobers, Striga Pilot: 4, Gunnery: 4
Lt Michelle Miller, Striga Pilot: 4, Gunnery: 4
for the Striga conventional fighter, see the Striga
Technical Readout, this issue
Other Units
3 Ferret VTOLsPilot: 4, Gunnery: 4
Fuel Bunker Stats:
Construction Factor: 25
Levels: 2 (1 above ground, one
under)
Area Covered: 3 hexes
Internal Structure Tonnage: 15
Armor Tonnage: 8 tons (128 armor
points) each wall has 16 points of armor
Outpost Bunker Stats:
Construction Factor: 50
Levels: 2
Area Covered: 3 hexes
Internal Structure Tonnage:
30
Armor: 8 tons (128 armor points)
each wall has 16 points of armor
Weapons and
Ammo:
Weapon location tons
SRM 4-pack North 2
SRM 4-pack South 2
SRM 4-pack East 2
SRM 4-pack West 2
Ammo SRM Center 4
Draconis Combine Attacker
The Kuritan forces enter on the north edge of the board.
Mech Force
Chu-i Alphonse Mikhail, Dragon Piloting: 2, Gunnery: 2
Albert Basti,Shadow Hawk Piloting: 4, Gunnery: 5
Kimi Ohara,Phoenix Hawk Piloting: 4, Gunnery: 5
Fuhito McTeague, Panther Piloting: 5, Gunnery: 5
Nick van Rohrs, Valkyrie Piloting: 6, Gunnery: 6
Nelson Makharov, Stinger Piloting: 6, Gunnery: 5
Armor Lance
Pegasus Driver: 4, Gunner: 5
Pegasus Driver: 5, Gunner: 4
Hunter Driver: 3, Gunner: 4
Hunter Driver: 4, Gunner: 3
Laser Jump Infantry Platoon
Air Lance
MechbusterPilot: 4, Gunnery: 4
Mechbuster Pilot: 3, Gunnery: 4
Outworlds Alliance Attacker
The OWA forces enter anywhere on the southern edge of the board.
Mech Force - Outworlds Alliance
Alberto Boscali, Phoenix Hawk Piloting: 3, Gunnery: 4
Nilos Boblett, Vulcan Piloting: 4, Gunnery: 4
Lajos Nichols, Panther Piloting: 5, Gunnery: 4
Joel Connors, Spider Piloting: 4, Gunnery: 5
Siriwan Carlyle, Jenner Piloting: 5, Gunnery: 5
Mack Drummond, Locust Piloting: 5, Gunnery: 6
Armor Lance
Scorpion Driver: 4, Gunner: 5
Scorpion Driver: 5, Gunner: 4
Scimitar Driver: 5, Gunner: 3
Scimitar Driver: 3, Gunner: 5
Rifle Jump Infantry Platoon
Air Lance
Guardian fighter Pilot: 5, Gunner: 5
Guardian fighter Pilot: 4, Gunner: 5
Victory Conditions:
For the Kuritan or the Outworlds Alliance, the goal is the same. Capture this outpost without destroying the site. Each force wants to be able to resupply from the site, and to use it as a point to fall back on if the rest of the raid goes badly.
The defender's goal is to repulse and destroy both of the attacking forces.
If both buildings are blown up, the battle is considered a draw. If one side is in possession of one of the buildings, and it is intact at the end of the scenario, that side has a marginal victory. Any other result is a victory.
Special Rules:
Building Explosions:
If any weapon fire penetrates either of the building, it is considered to trigger an explosion. Depending upon which building is hit, either the fuel or the ammo will explode. If the fuel dump explodes, everything within 15 hexes will take 85 points of damage, and all within that range will be on fire (see spreading fire rules). If the ammunition bunker is exploded, anything within 10 hexes will take 70 points of damage.
Charging:
Any of the pilots of the various vehicles may decide to charge a BattleMech or a building. First, the pilot must make a piloting roll to see if he hits the Mech. If he is successful, he does damage according to the following formula: One point for every 10 tons the fighter weighs, multiplied by one times the number of hexes crossed. The fighter is destroyed when hitting the Mech or building
Wind Chart:
The Valley of Winds can be devastating to the forces who fight in it. This chart shows at what point the players must roll to avoid falling or crashing because of the winds. Roll 2D6 for the wind level, then roll 1 D6 for direction. Lastly, roll 1 D6 for the length in BattleTech terms which the wind will last.
Table # 1 Wind
Level (roll 2 D6)
2-4 = Dead Calm
5-7 = Light Breeze
8-9 = Heavy Breeze
10 = Heavy Winds (Jump Packs won't function)
11 = Near-Gale Winds (Vehicles under 15 tons must
make piloting roll or lose control)
12 = Gale-Force Winds (see table 2)
Table # 2 Gale Force Winds (roll 1D6)
1 vehicles or Mechs 20 tons or less must make piloting roll or lose control
2 vehicles or Mechs 30 tons or less must make piloting roll or lose control
3 vehicles or Mechs 40 tons or less must make piloting roll or lose control
4 vehicles or Mechs 50 tons or less must make piloting roll or lose control
5 vehicles or Mechs 60 tons or less must make piloting roll or lose control
6 vehicles or Mechs 70 tons or less must make piloting roll or lose control
and on a roll of 6, anything at 20 tons or less loses control and takes damage
as it crashes into the nearest vertical surface (calculate damage as if the attacker
had charged the surface, but roll a random damage location. Roll 1 D6. On a roll
of 1-2, the left side takes damage; on a roll of 3-4, the damage is rolled on front/
back, on a roll or 5-6, the damage is done to the right side. )
Back to BattleTechnology 12 Table of Contents
Back to BattleTechnology List of Issues
Back to MagWeb Magazine List
© Copyright 1990 by Pacific Rim Publishing.
This article appears in MagWeb.com (Magazine Web) on the Internet World Wide Web.
Other military history articles and gaming articles are available at http://www.magweb.com