 This information on the organization and disposition of the Allied
army at Hastenbeck was compiled primarily from the map in the Grosser
Generalstab history of the Seven Years War, which shows the positions of
each unit on a highly detailed terrain map. In terms of organization, this has
mostly been gleaned from various accounts of the battle. Finally, Savory's
original notes can be inspected in the library of the National Army Museum
in London, and these contain a rough diagram of the main battle line and its
organization. Thus, the units shown in this article should be highly
accurate, and the brigades, divisions and associated generals are fairly reliable.
This information on the organization and disposition of the Allied
army at Hastenbeck was compiled primarily from the map in the Grosser
Generalstab history of the Seven Years War, which shows the positions of
each unit on a highly detailed terrain map. In terms of organization, this has
mostly been gleaned from various accounts of the battle. Finally, Savory's
original notes can be inspected in the library of the National Army Museum
in London, and these contain a rough diagram of the main battle line and its
organization. Thus, the units shown in this article should be highly
accurate, and the brigades, divisions and associated generals are fairly reliable.
The brigading of the cavalry is based on educated guesswork, and I would further speculate that it was classed as two divisions: the Hanoverians comprising the cavalry of the right wing and the Hessians that of the left wing. In terms of identifying units, Hanoverian regiments are shown with the later numerical designations, as employed in the Pengel and Hurt work (although these designations were not used until 1783, when the infantry regiments were all consolidated into two-battalion regiments and the cavalry were combined into four-squadron regiments). Hessian, Brunswick and Buckeburg units are also indicate while a question mark indicates that I could not positively identify the regiment named.
Unit Positions on the Battlefield
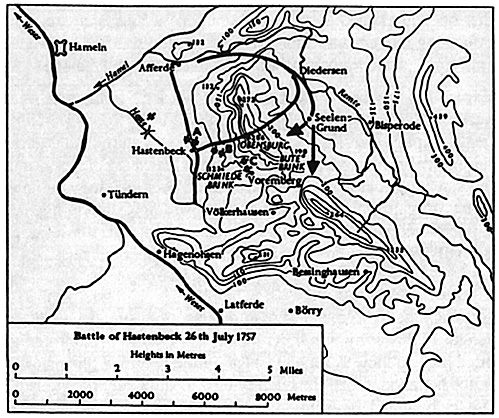
Moving on to the positionsof the Allied troops, you will need a half- decent map to make sense of my semi-diagrammatic lists. The map in Savory will do, as it's a simplified version of that in the Generalstab , but be careful, there are a lot of very "dodgy" maps of this battle floating around.
[Editor. refer to the battlefield maps in Dean West's article while reading this account.]
The main line of battle is the key to the position. The right half of it, as far as the Hanau (Hessian) regiment, was disposed in a long, loosely spaced line snaking from Northwest (near the Hamel stream, half-way between Hameln and Afferde) to Southeast on the road from Hastenbeck to Afferde. From there the line is formed with minimal intervals and it nins due east to hit the road from Hastenbeck to Diedersen, with the left-most brigade behind the cutting of that road, on the wooded slope of the Obensburg. The jagers were on the very peak of that height, a few hundred yards Southeast of the main line. A copy of Savory's map of the battlefield is shown below:
A battery of 9 heavy guns was placed in front of Gilsa's brigade and another brigade, that of Furstenburg, formed a second line to that infantry. Also in the second line was Hodenberg's brigade, some 500 paces behind the regiment of Imhoff. Further behind that unit, facing southwest, stood four battalions of grenadiers, supporting 12 heavy guns. Pushed even further out and facing roughly south, stood Schulenburg's grenadiers, with a six gun battery of 12 pounders. There was more artillery in the center ( 9 guns in front of Gilsa's brigade) and the right (4 guns in front of Block's brigade, covering the bridge over the Haste stream).
The main body of cavalry was deployed behind the right and center of the Allied infantry, forming a second line some 500 paces back, or in a third line where it stretched behind Furstenberg's second-line infantry brigade. There were four detachments on the far right: a modest body of infantry garrisoned Hameln itself, south of that were six squadrons of cavalry; further south was an outpost of mounted jagers; and west of the fortress stood a body of horse and foot.
The Allied deployment was completed by two additional detachments north of the Obensburg ridge; one, just east of Afferde and the other one closer to Diedersen. These troops would later execute an outflanking movement against the French offensive and cause nearpanic amongst the French towards the conclusion of the battle.
Except for one fatal flaw, Cumberland had made the best of the unusual position that he had chosen to defend. His troops were intelligently deployed to take advantage of every feature of the terrain. T'he one error, however, was to treat the Obensburg ridge in much the same way that a wargamer treats the edge of the game table! W'hilst difficult ground, it was not to prove impossible to a general as determined as Chevert, or to troops as spirited as those he led, especially given the flexible columnar tactics about to be used. Troop Quality
Although the light troops were to make a promising debut, the real strength of this army was in its line infantry: solid, well-drilled and with a high firepower, supplemented by the two light guns attached to each battalion. Of all the infantry on the battlefield, the grenadiers were the best, and the Brunswickers were among the worst.
The cavalry was not really tested in the battle, which was fortunate since it was not all that good in 1757. They were superbly mounted, but drilled in the old German style tactics that Frederick the Great had long abandoned (after Mollwitz) : steady, but slow, they would have charged at a trot and quite likely would have received an enemy charge at the halt, trusting instead to their firearms. Ferdinand of Brunswick would soon knock all this out of them, training them in the new Prussian tactics that would make them more than a match for all but the elite of the French horse.
The least effective service arm was undoubtedly the arillery, in 1757. (composed entirely of Hanoverians at this stage in the war). Some 30 heavy guns was inadequate for an army this size, despite adequate caliber. The actual pieces were of very ponderous and oldfashioned contruction, and each battery was a mish-mash of calibers, including howitzers and a few mortors. Most were loaded with loose powder rather than cartidges and many of the gunners were totally untrained. These problems were tellingly displayed when a powder barrel exploded during the artillery duel, causing chaos. Again, this arm was to be greatly improved by Ferdinand.
Many of the cumbersome pieces were replaced by British or captured French guns; gunners became highly trained and experienced; and cartridges provided a better rate of fire as well as avoiding the unfortunate mishaps with barrels of loose gunpowder!
Back to Seven Years War Asso. Journal Vol. VII No. 3 Table of Contents
Back to Seven Years War Asso. Journal List of Issues
Back to Master Magazine List
© Copyright 1994 by James E. Purky
This article appears in MagWeb (Magazine Web) on the Internet World Wide Web.
Other articles from military history and related publications are available at http://www.magweb.com