Austerlitz Using DBN Rules
Tabletop Wargame
Bob Carter and Alex Testo, UK
| |
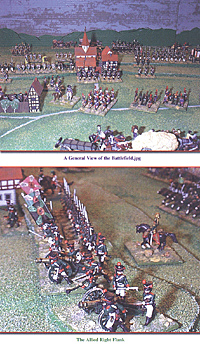
A General View of the Battlefield
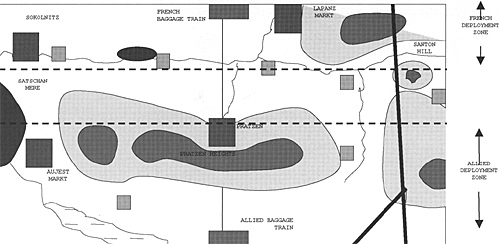
The players were issued with a one page DBN Scenario that included a map, army lists and special rules, all of which are interspersed in the text below. Using this information the two sides evolved their battle plans.
Special Instructions
The game is played on 2 standard tables.
French deploy first, Allies move first.
The musketry of the Allied infantry was poor at this time and they were generally ‘out classed’ by the French Infantry. Therefore all Allied Infantry fire as ‘Militia’ except the Russian Guard, the
Grenadiers and Austrian Jaegers who fire as ‘Regulars’. Russian infantry still get the +1 if the looser in melee.
Up to 50% of French elements may be kept ‘off table’ at noted entry points.
Off table elements can march move on the first 2 turns after entry provide they do not contact the enemy.
`Because of the size of the armies, the Baggage Trains are twice the normal size.
The top of Santon Hill is fortified for one element and can be occupied by the French at the start of the Game.
The streams are frozen and have no combat or movement effect. Bog area and Ponds are Bad Going.
Victory Conditions: The victor is, first to achieve 25 Victory Points (VP):
French loose 3 VP for the loss of the Old Guard, Russians Loose 2 VP for the loss of each Guard Musket.
The French start the game with 6 VP and the Allies with 9 VP.
The Allied Right Flank
The French Army List and Plan
1 x CinC Napoleon (1500paces +1 PIP) The French plan called for a main attack on the Allied Centre, take the town of Pratzen and 'follow through' onto the Pratzen Heights; simultaneously there would be a feint attack on the Allied Left Flank. The Guard, Oudinot's Grenadiers and the cavalry were to be kept in Reserve.
The Allied Army List and Plan
1 x CinC Alexander/Francis/Kutusov (1200paces –2 PIP)
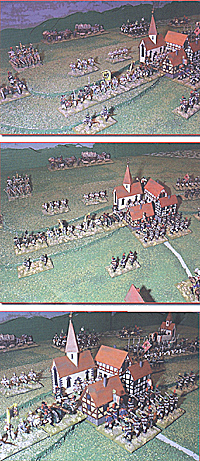
Russians Austrians Despite their optimism, and by now, better PIP dice rolls, the tide started to turn against the Allies, initiated by a French column forcing the Russian Guard out of Pratzen and destroying them in the process. Although the French occupied Pratzen they failed to achieve the necessary 6 on their next PIP dice roll and so were not classed as a 'garrison'. The Austrian infantry, placed in reserve behind the town for just such an eventuality, counter attacked and managed to regain possession.
But they in turn failed to 'garrison' it and were once again forced out by the French who, on their next PIP dice managed to roll a 6, became a 'garrison' and gained 3 VP. Despite several 'heroic' attempts the Allies never regained Pratzen. Meanwhile Oudinot's Grenadiers and the Old Guard arrived in the centre of the French line and started advancing, in column, towards the Pratzen Heights to the West of the town.
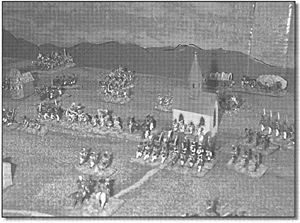
With Pratzen secured the French line columns turn their attention to struggling up the hill to the East of the town. The Austrians responded to this thrust by attacking with their Cuirassiers, who despite having the uphill advantaged promptly lost an element, however in the next turn they managed to destroy a French column. Way over on the French Right their feint attack against the Allied Left Flank progressed in a somewhat sluggish manner, consisting mainly of artillery duels, with the French gradually gaining the upper hand. So much so that the Allies are persuaded of the need to move a substantial part of their cavalry reserve over to bolster the troops on that flank.
By this stage in the battle the French had lost 10 elements to the Allies 13, but as the former had gained Pratzen they had 22 VP to the Allies 16. A French victory was in sight.
Seeing the Allies very clearly on the ‘back foot’ the French then execute the Coup de Grace by launching their Guard Cavalry, supported by the Guard Horse Artillery, up the Eastern slope of the Pratzen Heights. The remnants of the Austrian Cuirassiers never stood a chance and were cut down, allowing the cream of the French cavalry arm to charge on over the Heights and into the Austrian Foot Artillery, which they also destroy. Sensing victory is at hand the French Guard Cavalry then turn on the disorganised (due to poor PIP dice, again!) Russian Guard cavalry who they take in a flank, and a French victory is assured.
In all, including planning and deployment, the game lasted 5 hours and all involved were of the opinion that the rules worked very well. The only adverse comment was that we may have been a bit hard on the PIP dice restriction placed on the Allies, and from a purely gaming point of view we agreed, however from an historical point of view the restriction achieved the desired result. The Allies had difficulty executing their plan because they were unable to move troops as freely as they would have liked. In effect recreating the actual environment in which the two Allied Emperors interfered to such an extent that the Allied command and control was confused and disjointed; indeed they meddled so much that Kutusov, an able enough commander, almost gave up trying to command the battle.
Despite this minor criticism we refought a major Napoleonic engagement to an unequivocal conclusion within a sensible time frame to everyone satisfaction, and there are not many rules set around that can make similar claims. But then we wrote the rules, so we would say that anyway!
As keen and experienced Napoleonic wargamers we became very interested in creating a set of rules using the DBA game system. The simplicity of the DBA rules and the clever command & control system using PIP’s (Players Impulse Points) really impressed us and we quickly saw its potential as the basis for an excellent set of Napoleonic rules. The result of two years of writing and play testing are our recently published ‘De Bellum Napoleonica’ or DBN rules. Using all our wargaming experience and our military backgrounds we have created a set of rules that are simple to learn and fast play but
still give a realistic flavour of the period and most importantly are strategically challenging (we are into strategy). The rules allow for national characteristics and include many national army lists for different periods during the war, The troop scale is one base or element equates to approximately one brigade. Capabilities of commanding generals and their staff are an important part of the rules but are easily covered in these rules. Our primary aim was that the DBA rules would form the basis for setting up procedures and the overall mechanics of the game and to that end DBN cannot be played without a copy of DBA rules. Troop types cover the full spectrum from French Old Guard to Spanish guerrillas and levels of generalship ranging from Napoleon to the Prince of Orange are also covered.
In many Napoleonic battles armies were rarely the same size and a relatively small force of well led, motivated and trained troops often defeated a larger forces of poorer quality. We therefore opted for a points system rather than the standard 12 element DBA order of battle, as we felt that this provide a more flexible and realistic method of creating Napoleonic orbats. To demonstrate the utility of this approach Section Four consists of four example scenarios, each of which has a particular aspect or quirk that makes them different and interesting to play.
Also included are sections on how to fight larger battles and a unique and simple campaign system, using the '100 Days Campaign' of 1815. And to round the whole thing off we have also included a pair of 'Range and Movement' Rulers.
We believe these rules are particularly suitable for fighting the ‘big battles’ and are well suited to competition wargaming. They are not only quick and simple but also tactically challenging, in our opinion they capture the full spirit and flavour of the Napoleonic wars. The rules are currently available from East Riding Miniatures (ERM) or Essex Miniatures.
Back to Table of Contents -- First Empire # 71 Back to First Empire List of Issues Back to MagWeb Master Magazine List © Copyright 2003 by First Empire. This article appears in MagWeb.com (Magazine Web) on the Internet World Wide Web. Other articles from military history and related magazines are available at http://www.magweb.com |
 On Saturday 4 January 2003, a little over 198 years and 1 month after the real battle a group of 6 gamers from York Wargames Club gathered to refight Austerlitz using DBN rules. For those who are not aware of them DBN are a Napoleonic Supplement for DBA that have been published by the authors.
 As the French were able to retain up to 50% of their force ‘off table’ the Allies were unsure as to where they would attack, and so they deployed on a broad front with most of their cavalry in reserve in two separate groups. An element of Russian Guard garrisoned Pratzen (classed as a BUA) with an element of Austrian infantry in reserve immediately behind the town. The remaining two elements of Russian Guard garrisoned and supported the defence of the BUA, Aujest Markt, an element of Grenadiers defended Blasowitz, the village (classed as a fortification) in the centre of the Allied Right Flank, with the remaining two elements of Grenadiers placed in reserve in the centre. Most of the Allied artillery was deployed on the Pratzen Heights with the infantry deployed behind the crest out of sight of the enemy. Although troops from both nations were, as on the day, intermingled the Austrians were mostly on the Right and the Russians on the Left.
 So what do you get for your money? The opening Section defines the troop types, their capabilities, base sizes and figures per base. It also includes either additions to or additional movement and combat modifiers for such things as rockets and ubiquitous guerrilla. Aggressive generals who insist on getting involved in combat are also catered for. The next section is a one page Playsheet that, once you
are familiar with the rules, is all you will need to fight your battles. Section Three describes how to 'recruit' your armies and gives some suggested orbats, based on a Corps sized formation, for most of
the nations involved.
So what do you get for your money? The opening Section defines the troop types, their capabilities, base sizes and figures per base. It also includes either additions to or additional movement and combat modifiers for such things as rockets and ubiquitous guerrilla. Aggressive generals who insist on getting involved in combat are also catered for. The next section is a one page Playsheet that, once you
are familiar with the rules, is all you will need to fight your battles. Section Three describes how to 'recruit' your armies and gives some suggested orbats, based on a Corps sized formation, for most of
the nations involved.