One of the fascinations of our hobby is refighting historical battles. However, because players tend to be familiar with the strategies actually adopted in the battle, they tend to refight them with the benefit of hindsight, and the result is often a battle vastly different to the historical one.
One solution to this problem is to disguise the scenario. A battle I fought recently involved a French army, after its victory at Waterloo, taking on a coalition army outside Louvain in December 1815. A look at the umpire's map suggested that to me that the battlefield was Austerlitz, but the umpire denied this.
We, the French players, fought the battle as if it were Austerlitz, having slightly modified the historical French plan. Unfortunately, our opponents had twigged that they were fighting Austerlitz. They declined to send the bulk of their army on a flank march getting in each other's way. Result? When our attack went in on the Pratzen heights, we got stuffed by the enemy's massed reserves which had been hiding behind their centre.
I recently designed and umpired a battle where I decided that I wanted the players to consider the tactical situation facing them without being influenced by the thought that they were refighting a historical battle with which they were familiar. I therefore concealed successfully the identity of the battle, and, as you will see, the battle proceeded in an historical manner.
Concealed Identity
The way I concealed the identity of the battle was that I analysed the essential ingredients of the battle and altered them so that the players were faced with a similar situation to the historical battle, but in a format which was unrecognisable.
The battle concerned was the second day of Gettysburg in the American Civil War, 2nd July,1863. I have often wondered whether the Confederates could have won a decisive victory on this day if they had got their act together. For those unfamiliar with the battle, I will briefly summarise the events as follows:
The Union army of General Meade was on the defensive, having taken damage the day before. Only part of the army was on the field, and reinforcements were on the way. Once the bulk of the Union army arrived, the Confederates would be too outnumbered to have a realistic chance of winning. 2nd July was the Rebs' last chance to attack. Lee's plan was for Longstreet's I Corps to turn the left of the Union line by seizing the two Round Top Hills on which the Union left was anchored, while Ewell's II Corps assaulted the Union right wing in support.
The Rebels botched the plan. Longstreet's attack did not go in until mid-afternoon. The Union V Corps arrived just in time to hold Little Round Top. On the other flank, Ewell's attack did not start until Longstreet's had been repulsed, and did not make much headway. If the two Rebel assaults had gone in together earlier in the day, which was entirely possible, the Union army could have been defeated, with incalculable results.
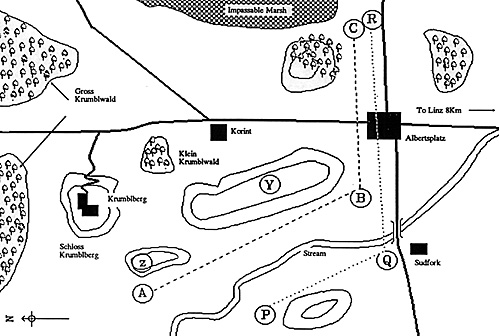
Since my wargaming groups's figures are predominantly Napoleonic 15mm, I designed the scenario to be a Napoleonic one. Appended to this article is the map of the battlefield, and the scenario briefings given to the commanders of the opposing armies. The main challenge lay in selecting opposing armies whose contrasting characters reflected the contrasts between the Union and Rebel armies.
Main Contrasts
Manoeuvrability: The Rebels tended to manoeuvre better than the Union.
Morale: Both sides had a mixture of elite, regular and conscript units.
Fighting efficiency: Not much to choose between them.
Firepower: The Union had an edge in both infantry and artillery fire.
Command and Control: The Rebel division and Corps commanders were generally
better than their Union counterparts.
Command Structure: The Rebels had three infantry Corps, each of 3 or 4 divisions.
The Union had seven Corps, two of which were not on the field at the start of the day. Each corps had 2 or (more usually) 3 divisions. Union divisions and corps were distinctly smaller
than equivalent Rebel units. Neither side had much cavalry available on 2nd July.
Taking all these factors into account, I cast the Union as 1809 Austrians, and the Rebels as French. Rebel divisions and corps translated easily to French units. Several 1809 French Corps had 3 divisions at the start of the Campaign. Elite Rebel units became French veterans of 1805, and Rebel conscripts became Bavarians.
The Union side was a bit more difficult to organise. Union divisions became Austrian brigades, and Union corps became Austrian divisions, by and large. Austrian Corps commanders represented Union "wing" commanders who commanded ad hoc groups of more than one corps. Some Gettysburg units were deleted in order to fit my order of battle. I also had to guess the size of most brigades to reflect casualties from the previous day's fighting. However, the important thing was that the size and composition of the 2 armies was proportionate to the historical situation on 2nd July,1863.
The amount of artillery I gave both armies was much less than the Civil War armies had. I gave both armies cavalry because players would find it odd to find 1809 armies without cavalry.
Attributing commanders to the armies was fun. My choice was subjective, but the Napoleonic commanders were intended to represent Civil War officers of equivalent ability (or lack thereof!).
Gettysburg was a fairly constricted battlefield. The topography did not lend itself to sweeping flanking manoeuvres. I therefore designed my battlefield in the Bohemian mountains for a number of reasons - restricted terrain, authentic setting for an 1809 battle, a setting for an 1809 battle not involving the supreme commanders. The reason for this last consideration was that whilst casting Lee as Napoleon was reasonable, casting Meade as Archduke Charles would over rate him. Also, there were no Rebel troops equivalent to the Imperial Guard.
The battlefield is a mirror image of the Gettysburg area - with a twist. Instead of Little and Big Round Tops being wooded hills, I made them into a wood and a castle respectively. They fulfilled the same function as their historical counterparts, but were unrecognisable as part of the Gettysburg scenery. In retrospect, I should have put trenches or artillery redoubts on Cemetery Ridge.
The scenario briefings were intended to suggest to the Austrian player that his role was defensive, and to encourage the French player to attack. The game was fought using Napoleon's Battles rules and anyone who would like a copy of the ``Napoleonic'' order of battle should write to me at the address given at the end of the article.
Battle
The battle proceeded as follows: Austrian I Corps deployed facing south, and II Corps faced southwest on Cemetery Ridge. The Cavalry reserve was at Korint. The French III Corps attacked the Austrian centre, supported by I Corps' pinning attack to its front. VII Corps stormed up the west end of the ridge. Although the French took some damage, they smashed the Austrian I Corps. French III Corps captured Cemetery Ridge and Austrian II Corps began to take serious losses. The French were well established on the ridge by the time Austrian Reserve Corps arrived and so the game was adjudged a thumping French (Rebel) victory. On to Vienna (Washington!).
ORDERS OF BATTLE
FRENCH
Commander in Chief: Marshal Davout (Lee)
III Corps: Mouton* (I Corps: Longstreet)
-
1st Division: Friant (Hood)
- 3 brigades, (1 veteran) : 9120
2nd Division: Gudin (McLaws)
-
3 brigades (1 veteran): 9120
3rd Division: d'Aultanne* (Pickett)*
-
3 Brigades (1 veteran):7680
Cavalry Division: Jacquinot
-
2240 Light Cavalry
Artillery: 3 batteries (2x12 pdr, 1x6pdr h.a.)
I Corps: Bernadotte (II Corps:Ewell)
-
1st Division: Suchet (Early)
- 3 Brigades : 9120
2nd Division: Reynier (Johnson/Rodes)**
-
3 Brigades of conscripts: 8160
Cavalry Division: Pajol
-
960 Light Cavalry
Artillery: 1x12pdr, 1x6pdr h.a.
VII Corps: Lefevre (III Corps: Hill)
-
1st Division: St. Hilaire (Pender)
-
3 Brigades (1 veteran):8160
2nd Division: Wrede (Heth)
-
3 Bavarian Brigades: 8160
Cavalry Division: Pire
-
960 Bavarian Light Cav, 1280 French Light Cav
Artillery: 1xBav.12pdr, 1xBav.6pdr h.a.
Independent Cavalry Division: Nansouty
-
2 Cuirassier Brigades: 2240
1x6pdr h.a.
AUSTRIAN ARMY
Hohenzollern (Meade)
I Corps: Bellegarde (I and XI Corps: Reynolds/Howard)
-
1st Division: Fresnel (XI Corps)
-
3 Brigades (1 Conscript):9120
2nd Grenadier division: Kienmayer (I corps)
-
2 Grenadier Brigades: 5280
3rd Division: Gyulai (XII Corps: Slocum)
-
1 Jaeger, 1 Grenz, 1 Light Cavalry: 4800 Infantry, 1280 Cavalry
Artillery: 2 x 12 pdr 1 x 6pdr HA
II Corps: Lichtenstein ( II and III Corps :Hancock)
1st Division: Radetsky (Hancock)
-
3 Brigades (1 conscript: 10080)
2nd Division: Ulm (Sickles)
-
4 Brigades (1 Grenz): 10560
Cavalry Division: Elsenitz
-
3 Brigades Light Cavalry:3200 + 1 x 6pdr HA
Artillery: 2 x 12pdr, 1 x 6pdr HA
Reserve Corps: Kollowrat (V and VI Corps: Sykes/Sedgewick)
1st Reserve Division: Kottulinsky (V Corps)
-
3 Conscript Brigades :9600
2nd Division: Klenau (Wright)
-
3 Brigades (1 Freicorps): 8640
3rd Division: Merveldt
-
2 Infantry Brigades, 1 Light Cavalry Brigade: 6240 infantry, 1280
Reserve Heavy Cavalry division: Mescery
- 2 Cuirassier Brigades: 2560 + 1 x 6pdr HA
Artillery: 2 x 12pdr, 1 x 6pdr HA
*Yes, I know that Davout commanded III Corps, with Morand, Gudin and Friant as division commanders, but the Rebel command team of Longstreet's corps was not as good as Davout's III Corps, so I altered Davout's team.
** Some Napoleonic leaders represent more than one Rebel/Union leader, because some Civil War units were merged with others in my O.B. in order to fit the Napoleonic format.
Back to Table of Contents -- First Empire #6
Back to First Empire List of Issues
Back to MagWeb Master Magazine List
© Copyright 1992 by First Empire.
This article appears in MagWeb (Magazine Web) on the Internet World Wide Web. Other military history articles and gaming articles are available at http://www.magweb.com